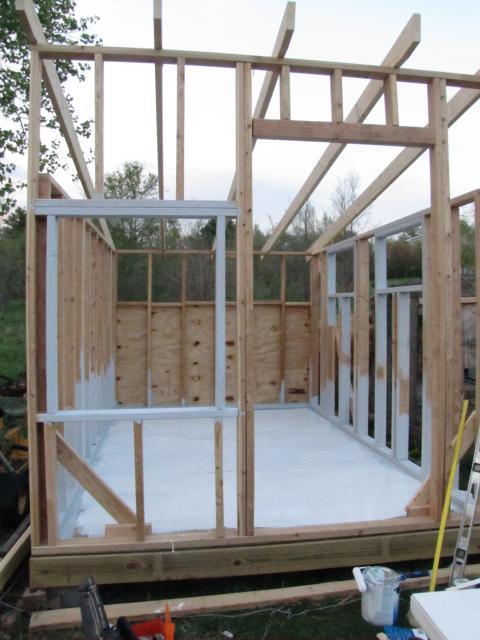
Updated! Pics! Thank you! Someone that has a clue please help

You go girl!! When my BF and I built our coop I was amazed we didn't kill one another. While we are muy sympatico, when we work on projects that require teamwork it's a real effort to stay on polite terms (we're both big control freaks), and I really prefer doing projects like this myself. Sometimes I just need him for the heavy lifting
wink.png
. When we were building there were parts of the construction I tackled myself when he wasn't home, just so I could do them "my" way with no interference. And he'd come home and say "why didn't you wait till I could help you?"
And I would just hide my smile and say "sorry honey - I just couldn't wait!"
Who needs guys anyway?? All girls need is the right tools!
 
It is very nice to see yourself taking on a challenge that is outside of your comfort level. So many times here I see people under estimate their abilities, and you just proved them wrong. Awesome! The worst thing that is gonna happen is that you will fail. Lots of good basic advice here.

Easy way to center studs on the bottom and top sill. (The sill is either the top or bottom horizontal board that connect your vertical studs) If you are using plywood for sheeting, measure from one end and make a mark every 16". Take a scrap piece of stud 2x4 or 2x6, depending on your wall thickness, and center that on the 16"mark, and then mark both sides of the scrap. Do this for all studs, then place and nail or screw. A pneumatic framing nailer comes in real handy here. Once complete, tilt up and start on the next wall.

There is a great deal of satisfaction in taking any raw material, applying a bit of logic and effort, creating something that will last for years and be enjoyed by you and your family.

So, folks. Give it a try.

Looks like a very stable platform for your new coop, and it all starts with your foundation.
 
Last edited:
Another quick tip, If you are using a circular saw to cut your framing, you can position the square on the supported side of the wood (usually the left) and use its edge and butt the edge of your circular saw deck up against it to hold a straight cut. just measure the distance of your circular saw deck to the edge of the blade and adjust your square over. You can also clamp a board, level, or some other straight edge to any larger pieces as well.
 
Here's what you all helped me to do - not done yet - but I am now relatively certain the light at the end of the tunnel is not a train! Thank you for your kind encouragement - guidance and support! My neighbor even came over yesterday to tell me how awesome it looked and he's pretty picky and a carpenter to boot! The other women in the neighbor have been by to express support and awe as well.

Jenny

46136_coop_008.jpg


46136_coop_010.jpg


46136_coop_016.jpg
 
You are doing a fine job! One suggestion: Get all of the vertical sides attached before you head up to the roof. That will make it 10 times more stable when roofing it.

Another suggestion: Although you don't necessarily need it, you might want to run some sisters (trimmers/header support, etc) down both sides of the interior of the door frame. That will add a lot of stability to the header you built. It will also make your door 3" skinnier. You building the door, or are you buying a ready made door? If you ar ebuilding a door, try fix #1) As it is, two of your 5 roof rafters are under supported because of this. There are a number of fixes for this, and your carpenter friend could give you a few pointers to correct it.

Sisters would be quickest, but you would end up with a skinnier door. A more permanent fix would be to tear out the header (but mark the bottom of it first on the door frame) and trim the two inner most sisters (trimmers) that make up the door frame to the height of the header where you marked them (Sawzall). Make a new header board that is 3" longer. Re-install the short studs above the door, and you are done. This way you only have to get new wood for the header and you can re-use everything else.

Final suggestion: I would also take out the sill on the front window and rebuild that properly. An easy fix would be to sawzall out the two bottom horizontal "ears" of the window frame and add trimmers to shore up the window header. Those two issues in front may lead to problems down the road when taken in totality as you have all interior rafters improperly framed. You want a solid stud running down from each side of the header to the bottom sill.

Keep up the good work. The fixes I recommend should not take very long and will add a lot of strength. Just ask your carpenter friend to head over for a consultaion, and ask that he brings his sawzall and a 12" blade.

Take care,

Andy
 
Andy

I think I understood what you told me to do - my door header needs to be 3 inches longer and the studs on either side need to run all the way to the top plate? Is that correct?

Pretty much the same thing on the window -

It sounds like I built them both kind of backwards from the way they ought to be?

Thank you for your help!

Jenny
 
Nevermind Andy - I just looked at the pictures and I see exactly what you are talking about! I have a door - I'm not building one so I just need to fix that door frame out. And after I look at the window - what you are saying makes perfect sense!!

Thank you!
 
46992_basic_wall.jpg


Here is a quick drawing of a wall layout. It shows the basics you'd need for corners, windows and door framing.

I grew up working for my dads construction company. I was a licensed contractor for a long time. There's no reason why a woman cannot do this kind of work. Sometimes we are our own worst enemey, by telling ourselves, we can't do that. I can tell you, YOU CAN DO THAT!!!! And HennyJenney is proving it! Great Job!
 

New posts New threads Active threads

Back
Top Bottom