Welcome to the Duck Disco House

Knighstar679

Crowing
Jun 12, 2018
2,393
6,321
431
Seneca Falls, NY
January marked the death of my duck house being safe for me to be in as the roof started collapsing on me. Then around the same time a fox decided that 4 if my ducks where going to make a great dinner.

My ducks have since then been in a temp house and pen right up against the house since then. It was snowy at the time and one can do much with frozen ground.

First part the plan was to move the pen. One that would deter predators from getting close to the pen and duck house. After lots of thought it was decided to move it to an area in my fenced in backyard that used to house a raised garden beds.

After measuring it out it looked like the area was going to be 17ft by 38 foot. Somewhere in that space was going to be be where the house would be built.

With the Covid stuff going on I had to get creative. That made me go to the idea of doing reclaimed materials. I had pallets here along with some other stuff. Then a friend got me these industrial pallets and plywood.

77255D80-7F72-4505-998E-6A61E41B119F.jpeg 
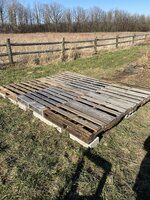
This is the area to build in.


The first steps where to buy some bricks to make sure that the house didn’t sit on the ground that likes to hold water at times. After that I measured and set up pallets in a 2 by 3 pallet fashion.
5BEA0214-8BD8-4AD7-A45C-B5BD7128EEE4.jpeg
After setting it up on the bricks. All the pallets where leveled and then screwed together. These all have an HT on them so they are safe for this use. I know from experience these things can survive in weather for at least two years and be stable for use. So this seemed like a great reuse of the pallets I had used for the fence that I had made for the old pen.

When we did the final measuring of the pallet platform it measured 8 ft by 10ft. This seemed like a great size to work with for my main house.

As I detail more of the things I did I would like people to know I have limited skills in capentry, and few power tools. Plus with how things are there just wasn’t the money or ability to get help from someone else or buy more tools. So I was very stuck in a use what I had situation.

Tools I have
Robi Circliar saw
SawsAll
And drill/ screw gun
I have a level as well as a tape measure.

Feel free to chime in as I build on this post.

the house is currently for these crazy ducks
F8BE7129-28CD-4BDA-941E-43DC72A0FFE7.jpeg A42A29BC-49DC-4681-9029-75C04C617C81.jpeg
 

Attachments

  • EF957014-99E3-41E9-BA31-A55FF2F3AE07.jpeg
    EF957014-99E3-41E9-BA31-A55FF2F3AE07.jpeg
    1.3 MB · Views: 8
After the platform was set we wanted to set up a stable and more solid base than the slats for the pallets. Part of the reclaimed wood was plywood and included in that was several sets of 3 x 8 foot sheets of what we thought would work at the time plywood. Also during this time I was breaking up the industrial pallets for their awesome 2x4 greatness.

IMG_0614.JPG

A little bit of side knowledge this is also around the time that NY state started its lockdown stuff in the world. So as this is being built I am not able to do as much travel to browse stores for things I would like and what not due to this. It has made life just a bit more interesting while getting the things I have needed for this and what not.

So after seeing how the plywood sat on the pallets the final decision was made to make the duck house 8x9 which was what the ply would covered and then cover the left over parts in a way so it made a kinda mini deck outside the door.

Once that was decided we started putting up a base for the walls. We took the industrial 2x4 (they are thicker than a normal stud 2x4 by the way). Measured cut and screwed them into the base.

IMG_0623.JPG

Once that was complete I realized that using these 2x4's for the center part of the project as studs was going to be harder than planned so. I went and got normal wood studs and had them cut to 4 feet because I only have a Jeep Renegade and putting 8ft or 10ft boards was out of the question into my car.

Once I had those and 3 inch screws I started toe tail screwing the studs into place. The 9 foot side I did every 18 inches the back side was every 26. I also used a double 2x4 base for the corners of each wall to try and give it more strength and stability. IMG_0624.JPG IMG_0624.JPG
IMG_0629.JPG Here is the mostly framed sides and back of the house.
I have to say there are many ways to frame a wall. My way worked because of the situation being wet I didn't go with the normal way to frame a wall. If I could do it over again I would do it by building each wall on the ground then raising it up and screwing it in instead. But this way works if you are in wet situations or don't always have a second person to help you.
 

Attachments

  • IMG_0625.JPG
    IMG_0625.JPG
    745.6 KB · Views: 6
Before I saw the last 2 pictures I was going to tell you to make the house so that you can stand up in it for cleaning but I see that you've made it short. It will be a nightmare to clean out and collect the eggs. I've got one pen that is short and I've hit my head on the roof so many times it's a shame. Mostly that I can't seem to remember! Maybe it's not too late though. Make the roof a slant and have the back part what you've got now but make the front tall enough for you to get into.
 
Before I saw the last 2 pictures I was going to tell you to make the house so that you can stand up in it for cleaning but I see that you've made it short. It will be a nightmare to clean out and collect the eggs. I've got one pen that is short and I've hit my head on the roof so many times it's a shame. Mostly that I can't seem to remember! Maybe it's not too late though. Make the roof a slant and have the back part what you've got now but make the front tall enough for you to get into.

It will actually be taller than that. I just don’t have skills to make a roof like a normal person might put on. So it will be a hoop style roof. Details still to come.
 
So last time we had finished the sides and three walls that just left the front. When considering the front of the duck house, I knew I wanted to be able to stand in it. I am not a very tall person at 5'4". So we started with the door. Which was set at 5 1/2 feet tall.

We squared it up and screwed it together and put it up with the toe screw method and plates to make sure that it wasn't going anywhere. After that we put in a few cross bars across the 4 foot mark which was how high the wooden walls where and screwed those into the door frame.

IMG_0648.JPG
After that we added in a few studs in between to give a little extra support for the walls that we would add in later.

Next we needed a roof. The skills i have for roofs are not great so I decided to go with a hoop style roof. It was easy didn't involve finding a ladder that was bigger than six foot and or understanding more than basics. One basic thing to know about hoop roofs is that they really need a spine if your going to be some place that gets snow. The last coop i had was a hoop house but there was no spine support and that was most of the reason why it collapse in the end.

So we made a frame that mimiced the door frame on the other side on the back wall. From there we bracketed in two 2x4's into those two frames to be a double spine to hold up the frame work for the hoop house frame work.

We had all these metal 5'x9' frames that had been used for gardening around the property so we used those for the frame work for the hoop on the roof. They were very similar to cattle panels just a bit shorter and come pre-rusted. You can buy them new at lowes for about $10.

I had a package of zip ties and we zip tied to panels together. The 5' side. We did this to make a long enough panel to go across the house frame. I used fencing staples another left over i had here to hold it into place on the frame of the hoop house. Once I had it in place I zip tied all of the edges of the two panels to a make sure there was enough strength in the hold just in case of wind and for weight. We repeated it for the second panel set and then zip tied it to the spines to add a little more support and hold to the beams just in case of winds.

IMG_0760.JPG IMG_0759.JPG

In the end at the highest point it was just under 6 foot inside. So it worked out well. Even if I asked a friend to take care of my ducks he would be able to be fairly comfortable getting into this house to get eggs if needed.
 
Only thing I would do different, Is use wire instead of zip ties to connect the paneling, changes in temperature throughout the year will make the suckers bust right off. I speak from experience. Besides that it looks good!
 
Only thing I would do different, Is use wire instead of zip ties to connect the paneling, changes in temperature throughout the year will make the suckers bust right off. I speak from experience. Besides that it looks good!

I did think about that but wasn’t sure what type of wire to use/ would be best. I know for sure that the metal in the panels won’t break as we tried once it wouldn’t break or snap with the tools we had.
 
So now we have a roof, and the framing for the walls. It just has to now be Enclosed to keep the weather out, and the ducks in.

So we moved on to the plywood. When we did this we noticed that no one piece was going to cover the 9 foot sides all at once. So we split it up into 2 4.5 pieces. across the bottom. Then we had a bit at the top where the roof wire met the frame that we wanted to cover to try and give it a more finished look and give it less of a chance to catch on anything if the wind caught it.

The first side we did it ended up even with each. Which would have worked great but the wire pushed it out where all for pieces of wood met.

IMG_0764.JPG IMG_0765.JPG
That wasn't an overly great idea and we really wanted a back up plan just in case of water seeping. So we had to come up with another idea for the next side.

On the next side we decided to over lap the top board with the bottom board like one would do with a roof so that any water that would come down onto the boards should there be a leak would hopefully run off and down onto the ground below. This seemed to work really well for an idea for the other side and the back.

IMG_0766.JPG IMG_0767.JPG The side came out pretty good over all.

The back we left open at the top for ventilation. The idea is to cover the opening with hardware cloth before we put on the tarp roofing.

IMG_0768.JPG IMG_0769.JPG

We are also thinking about adding in a top open window in this spot that can be completely sealed up in the winter but opened in the summer to add in the chance of a cross breeze.

Its coming along next will show the front enclosing and the hardware cloth being appiled.
 

New posts New threads Active threads

Back
Top Bottom