One Mans Garbage is another Womans Incubator!
Ok, here is a Mostly recycled goods Incubator, that is a snap to throw together!
I manage a storage facility where we often have things left behind when people move their items out. We take these forgotten items and throw them in 3 of our garage sale units. Well about a month ago, I was rummaging through the units on a boring Snowy day, when It was like the clouds parted, and angels sang as I stare at a glorious old wooden box. It had been stained two tone and had walls about 2 inches thick. Immediately my brain yells, "Wow, that is gorgeous, and the walls are thick enough to really hold in some heat, I should build an incubator!". What more could this unit hold I wondered, what more indeed.... I also found an old Butter turn that I knew would make an awesome egg turner, a wood frame that would be perfect for framing a window and 2 computer fans that I removed from an old IBM computer!WHAM!
Next I ran to the hardware store and picked up:
1 Flat mount light fixture,
1 three foot length of electrical wire,
1 roll duct tape,
1 roll electrical tape,
1 tube of silicone sealant,
1 5/8 wooden dowel,
and one 5/8" drill bit.
.
Then on the way home I stopped at the dollar store and picked up:
1 picture frame with plastic insert instead of glass,
A package of 75W light bulbs,
and a roll of drawer liner.
.
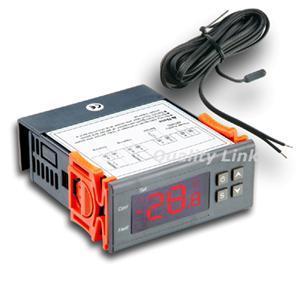
At home I ordered a Mini Digital aquarium thermostat, on Ebay.
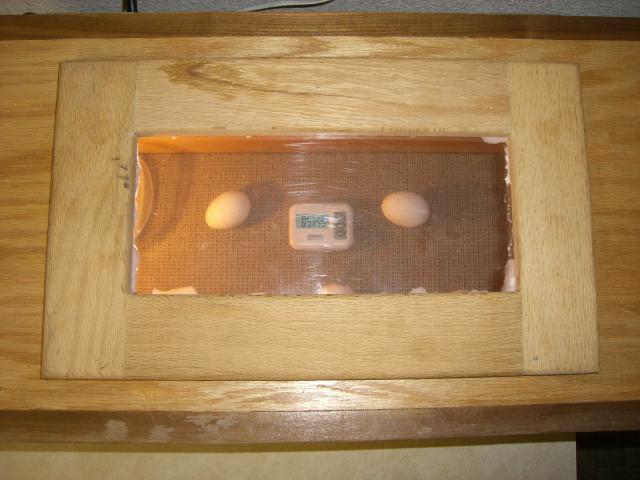
I first used a saw to cut a rectangle hole in the lid the size of the wooden frame I had found, I then glued the insert from the dollar store frame to the wood frame, the mounted it over the hole in the lid, affixing it with wood glue then sealing it with the silicone sealant.
I manage a storage facility where we often have things left behind when people move their items out. We take these forgotten items and throw them in 3 of our garage sale units. Well about a month ago, I was rummaging through the units on a boring Snowy day, when It was like the clouds parted, and angels sang as I stare at a glorious old wooden box. It had been stained two tone and had walls about 2 inches thick. Immediately my brain yells, "Wow, that is gorgeous, and the walls are thick enough to really hold in some heat, I should build an incubator!". What more could this unit hold I wondered, what more indeed.... I also found an old Butter turn that I knew would make an awesome egg turner, a wood frame that would be perfect for framing a window and 2 computer fans that I removed from an old IBM computer!WHAM!
Next I ran to the hardware store and picked up:
1 Flat mount light fixture,
1 three foot length of electrical wire,
1 roll duct tape,
1 roll electrical tape,
1 tube of silicone sealant,
1 5/8 wooden dowel,
and one 5/8" drill bit.
.
Then on the way home I stopped at the dollar store and picked up:
1 picture frame with plastic insert instead of glass,
A package of 75W light bulbs,
and a roll of drawer liner.
.
At home I ordered a Mini Digital aquarium thermostat, on Ebay.
I first used a saw to cut a rectangle hole in the lid the size of the wooden frame I had found, I then glued the insert from the dollar store frame to the wood frame, the mounted it over the hole in the lid, affixing it with wood glue then sealing it with the silicone sealant.
Next I drilled the holes for the light bulb wiring
Then I attached the electrical wiring to the flat mount lighting fixture, then screwed the fixture to the left side of the incubator, after passing the wire through the hole I had just cut.
Next I wired together the light fixture wires with the digital thermostat and a computer cord I found with the old IBM computer I got my fans from. After some wiring help from fellow BYCer Deek, I plugged it in and it worked perfectly!
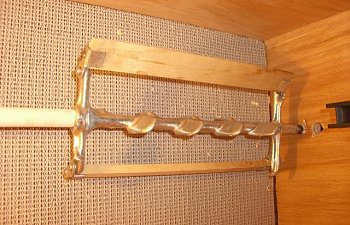
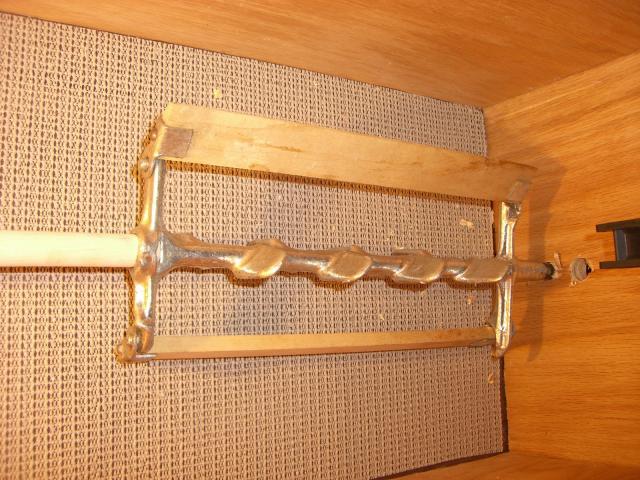
Next I drilled two 5/8" holes on either side of the incubator, on the left end I inserted the crank/turn of the old butter turn, on the right side I inserted the 5/8" wooden dowel I bought, securing it to the butter turn.
Then I attached the electrical wiring to the flat mount lighting fixture, then screwed the fixture to the left side of the incubator, after passing the wire through the hole I had just cut.
Next I wired together the light fixture wires with the digital thermostat and a computer cord I found with the old IBM computer I got my fans from. After some wiring help from fellow BYCer Deek, I plugged it in and it worked perfectly!
Next I drilled two 5/8" holes on either side of the incubator, on the left end I inserted the crank/turn of the old butter turn, on the right side I inserted the 5/8" wooden dowel I bought, securing it to the butter turn.
I then fastened an egg carton to the turn, to hold the eggs in place. Tested the turn with some store bought eggs, and it worked perfectly!
Next came the computer fan. I drilled 4 tiny holes to pass a wire through that would also pass through the screw holes of the fan, and 1 more tiny hole that the fan electrical wires passed through, the wire was then tightened and twisted on the outside of the incubator to fasten it to the side, and the fan electrical wires were joined with an old cell phone charger. Plugged it in, and again PERFECT!

Next I drilled 4 vent holes, and passed the thermostat censor through one.

Last was the finishing touches. Drawer liner on the bottom, Thermometer/Hygrometer, and mesh covered Tupperware for water.
Plugged it all into a surge protector, and let it warm up, did some tuning to the thermostat to get the right temp. I did have to fabricate a 1/2 wall to divide the water/bulb area from the egg area, because I was having direct heat problems, basically the eggs closest to the bulb were too hot, and the ones furthest were too cold, but the divider took care of that, making it so the fan distributed the heat evenly. Also the fan was moved from the left side of the incubator to just above the divider, where it could distribute heat better.
So far the only problem was a blown bulb in the middle of the night that dropped the heat to 80 degrees, but the eggies lived, 3 are in the hatcher now, 10 are developing well, and 7 duck eggs are also developing well.
Here you can see the divider has been added.

Here is the finished Incubator

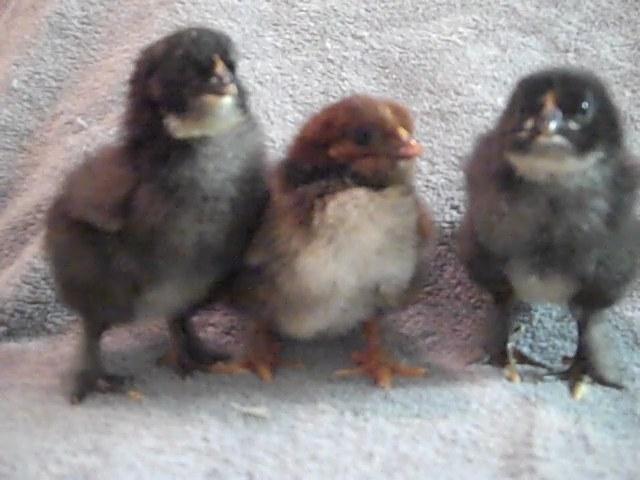
And here are the Newest Babies! More are still hatching but here are the first Fluffy Butts of this hatch from this incubator!
So that's it folks! With some dumpster diving, and some thrift store and garage sale shopping, anybody can throw this baby together! I have never built one thing in my life until this, and I have to say, I'm pretty proud of myself! If I can do it, anybody can!
feel free to PM or email me with any questions, I am more than happy to help if I can.
~Kelsey~
[/LIST]