Once my DH and I decided to build a brooder we did not have an actual drawn plan. What we did have was alot of reclaimed materials, an empty shipping crate (that we got from Craig's List last year) and a pressing need for a brooder, with an order placed with the hatchery for day old chicks.
The foam supports in the crate had to be removed, these were saved to be used as insulation later in another project. Vent holes for fresh air ventilation were drilled near the bottom.

We painted the outside with part of a gallon of "Opps" paint from the Home Depot that we have had left from a previous project, We added 2 recycled door hinges to connect the lid to the crate on one side.
Two holes were cut into the lid so that the brooder lamps could be put into the lid, raising them a bit higher in the brooder than clipping them to the inside edging.
Metal brackets to attach the lamps to the lid were hand cut by our DS from an old metal coffee can and hand shaped so they could hold the lamps securely.
The lamp covers were placed into the lid and attached with screws and sealed with high temperature silicon to seal out moisture at the openings.
For easier cleaning we made 2 forms, covered them with hardware cloth and attached handles so we could remove them to clean the bottom as needed. There is an open space between the 2 forms that is filled and covered with a board so the chicks do not fall into the hole. When the brooder is occupied we can remove the center board and insert a piece of plywood to divide the brooder in half.
While the chicks are very young the hardware cloth will be covered with paper towelling to protect their feet.
Next we decided to make a brace system to hold the lid open while we work inside the brooder. Designed by DS it is made from recycled 2" X 2" lumber pieces attached to the sides of the crate with a recycled cabinet door hinges. Also there is some small size chain attached to help prevent the lid from going all the way over backward while raised.
(In the background you can see some of the other wonderful shipping crates we have used for feed bins and for seed starting cabinets for the gardens and the guinea pen next to one of the gardens.)
Once we are finished and ready to close the lid we simply fold the brasing arms down the opposite direction so that the lid will close completely.
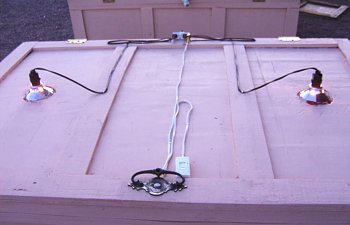
On the outside of the lid we added a handle to make lifting the heavy lid easier and secured the electrical wires of the lamps to the top and added a dimmer switch so we can control the temperature of the 2 heat lamps.
We are using 2-250 watt red heat lamps.
Tools required were :
Hammer
Drill
Screw Driver
Hand Saw
Screws
2 Large hinges
2 Small cabinet door hinges
Scrap 2" X 2" lumber
Paint and brush
One Large Handle
2 Small Handles
1/2" Hardware Cloth
Staple Gun with Staples
Light Duty Chain
2 Brooder Lamp Covers
1 Dimmer Switch
2 Red 250 Watt Heat Lamps
2 thermometers
Feeders and Waterers
Paper Towels
Total Cost:
Hardware Cloth $10.79
($40+ tax for the whole roll and we used a quarter of the roll)
Brooder Lamp Covers $19.34
Dimmer Switch $10.77
Red Heat Lamps $21.58
TOTAL $62.48
We are so pleased with this brooder that we have made a second one just like it and have so far found nothing we would change about it.
Our order of chicks arrived and have been residents in the brooder for 3 days now and all are healthy and very active.
After using the brooders for 8 days now with baby chicks I am so thankful this system is working so well. The temperature is easy to adjust and maintain.
We turn it way down in the day time and then turn the heat back up at night as the brooders are outside on the front porch. I can not imagine having the smell and dust inside the house.
The foam supports in the crate had to be removed, these were saved to be used as insulation later in another project. Vent holes for fresh air ventilation were drilled near the bottom.

We painted the outside with part of a gallon of "Opps" paint from the Home Depot that we have had left from a previous project, We added 2 recycled door hinges to connect the lid to the crate on one side.
Two holes were cut into the lid so that the brooder lamps could be put into the lid, raising them a bit higher in the brooder than clipping them to the inside edging.

Metal brackets to attach the lamps to the lid were hand cut by our DS from an old metal coffee can and hand shaped so they could hold the lamps securely.


The lamp covers were placed into the lid and attached with screws and sealed with high temperature silicon to seal out moisture at the openings.

For easier cleaning we made 2 forms, covered them with hardware cloth and attached handles so we could remove them to clean the bottom as needed. There is an open space between the 2 forms that is filled and covered with a board so the chicks do not fall into the hole. When the brooder is occupied we can remove the center board and insert a piece of plywood to divide the brooder in half.

While the chicks are very young the hardware cloth will be covered with paper towelling to protect their feet.
Next we decided to make a brace system to hold the lid open while we work inside the brooder. Designed by DS it is made from recycled 2" X 2" lumber pieces attached to the sides of the crate with a recycled cabinet door hinges. Also there is some small size chain attached to help prevent the lid from going all the way over backward while raised.

(In the background you can see some of the other wonderful shipping crates we have used for feed bins and for seed starting cabinets for the gardens and the guinea pen next to one of the gardens.)
Once we are finished and ready to close the lid we simply fold the brasing arms down the opposite direction so that the lid will close completely.

On the outside of the lid we added a handle to make lifting the heavy lid easier and secured the electrical wires of the lamps to the top and added a dimmer switch so we can control the temperature of the 2 heat lamps.

We are using 2-250 watt red heat lamps.
Tools required were :
Hammer
Drill
Screw Driver
Hand Saw
Screws
2 Large hinges
2 Small cabinet door hinges
Scrap 2" X 2" lumber
Paint and brush
One Large Handle
2 Small Handles
1/2" Hardware Cloth
Staple Gun with Staples
Light Duty Chain
2 Brooder Lamp Covers
1 Dimmer Switch
2 Red 250 Watt Heat Lamps
2 thermometers
Feeders and Waterers
Paper Towels
Total Cost:
Hardware Cloth $10.79
($40+ tax for the whole roll and we used a quarter of the roll)
Brooder Lamp Covers $19.34
Dimmer Switch $10.77
Red Heat Lamps $21.58
TOTAL $62.48
We are so pleased with this brooder that we have made a second one just like it and have so far found nothing we would change about it.
Our order of chicks arrived and have been residents in the brooder for 3 days now and all are healthy and very active.

After using the brooders for 8 days now with baby chicks I am so thankful this system is working so well. The temperature is easy to adjust and maintain.
We turn it way down in the day time and then turn the heat back up at night as the brooders are outside on the front porch. I can not imagine having the smell and dust inside the house.