My mealworm farm adventure….
(Tenebrio molitor)
(also visit https://www.backyardchickens.com/a/how-to-raise-mealworms to see how Gallo del Cielo raises mealworms and www.westknollfarm.com to read about Amy's mealworm farm.)
In the winter of 2010-2011, I spent $40.00 buying freeze dried mealworms for my girls since there were no insects available that time of year in Pennsylvania. My chickadees absolutely loved them and I was able to train them to come at the slightest call.
I found out that it was possible to raise mealworms without much trouble and went about the task of researching everything I could find regarding the subject. There seemed to be a lot of holes in the information that I found, and to some degree, conflict about it. So I decided to use the 3-drawer setup, which would enable me to ‘study’ the development and habits of the Darkling beetle and its different stages. My ultimate goal, though, was to store up enough larva to take my chickadees through the winter.
To say that I’ve had a blast is putting it mildly. I spent so much time watching and learning that I was even able to take photos of a beetle laying an egg. Really cool (well, it was for me!).
Probably the most important thing I learned was that temperature and lighting have a big influence on the speed of development. BUT, even though ideal temperature is reported to be 80°-100° F, a mealworm farm will develop very nicely at 72° F.
Okay, down to basics.
Life cycle Stages:
Egg
Larva
Pupae
Darkling beetle
This time table is relative to conditions such as temperature, food source, etc:
Egg Incubation: 4-19 days (usually 4-7). Another source says 20-40 days. I had eggs hatch within 14 days of observation.
Larva: 10 weeks. Visible after about a week
Pupa: 6-18 (18-24?) days
Beetle and Egg Laying: 8-12 weeks (followed by death). Egg laying starts 4-19 days (average 12) after emergence. I now have beetles that are going on 5 months old. I am still finding eggs from this group, although not as many.
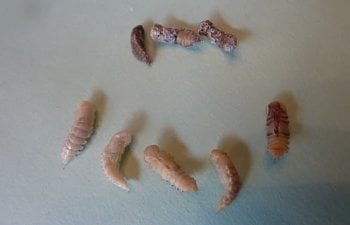
Pupae: Newly pupated to a few days old. The one on the far right is getting ready to morph into a beetle. Also 3 dead pupae at the top of photo.

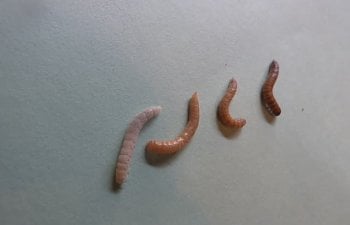
Mealworm: One on the left just shed it's exoskeleton so it is white.

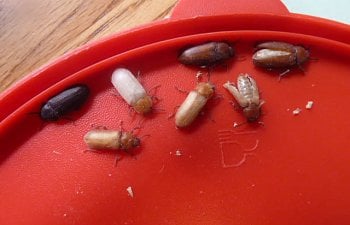
Beetles: Again, the white one is newly morphed from a pupae. As they age they get darker....hense Darkling beetle! There are also a couple malformed beetles for reference.

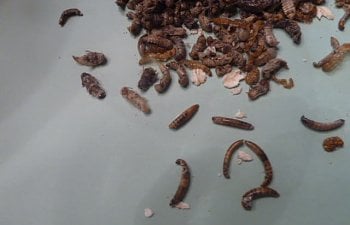
Examples of deal mealworms and pupae. I had just cleaned my bottom drawer picking out the dead.

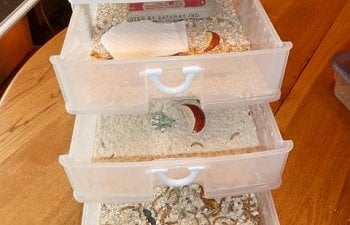
Housing: A simple aquarium or plastic bin will do as both have smooth sides. I have a 3-drawer colony and a bin colony. You will need to provide ventilation. To avoid the chance of other insects invading, I use screening material to cover the large holes we drilled in the lid and on the sides of the bin. Putting a screen over it also keeps curious cat paws out. Do not place in direct sunlight.
I have small holes drilled around the tops of each drawer in the 3-drawer colony for additional ventilation.
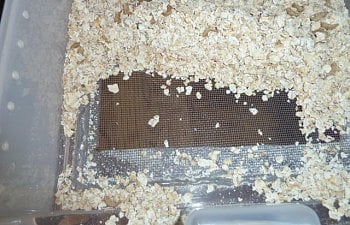
To make the 3-drawer setup, I cut the bottom out of the top drawer and hot glued screening material over the hole. This drawer is for the beetles so that when the eggs hatch, the small worms will fall into the second drawer. I found that a good number of the eggs actually dropped through also. I used the bottom drawer for the mealworms (larva) and moved them to the top drawer when the pupated. There they morphed into beetles and started laying eggs.


Substrate: The best substrate (substance to raise them in) is wheat bran (not the same as wheat germ). Rolled oats work, as does wheat flour and chicken feed. You can even add fish food flakes, dried milk and a wee bit of corn meal. From the research and personal experience, I will not use corn meal or chicken feed any more and I now freeze or microwave all food sources to prevent the possible problem of grain mites. It’s just a precaution but worth doing.
You’ll need at least 1-1/2” of substrate (if using a small set up like my 3-drawer). I’ve found that as the colony grows, it’s necessary to add more. I have about 4” in the single tub now, although I still maintain 1-1/2 in the 3-drawer colony. I have been thinning the numbers out (freezing them) as the worms get big enough.
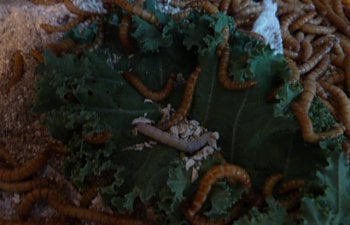
Moisture sources: It is necessary to provide some sort of moisture source such as carrots, potato slice, apple slice, kale, lettuce, beet leaves, celery, dandelion leaves, squash slices, cucumber….you can pretty much try anything (except citrus). Either they will eat it or they won’t. It’s better if you only supply what they can consume in a day or 2 to avoid any chance of mold forming. You do not want mold in your mealworm colony.
It’s advisable to place the veggies/fruit on plastic lids or on bits of newspaper to prevent moisture from entering the substrate. Most of the problems encountered when raising mealworms is caused by too much moisture.
Other:
It’s good to provide cardboard pieces, egg carton pieces, toilet paper tubes, layers of newspaper or paper towel in your colony. The worms and beetles like to hide under and in these items. It also makes collecting them easier. The worms congregate under and in between the newspaper layers allowing you to pickup and shake them into another container or into your hand.
As a mealworm larva grows, it sheds it's outer skin (exoskeleton) many times. After each shedding, the larva appears white. Newly hatched wee wormies are also white, as are the pupae immediately after they pupate and even the beetles appear to have an almost white body immediately after it morphs. As they age, all stages get darker. The beetle will generally darken until it is black.
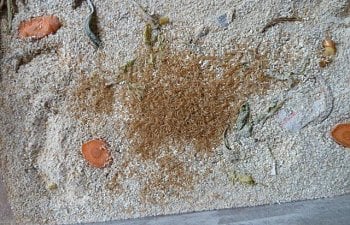
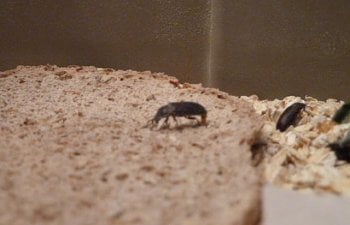
Picture: Pile of shed baby exoskeletons. White larger worm that just shed it's exoskeleton.


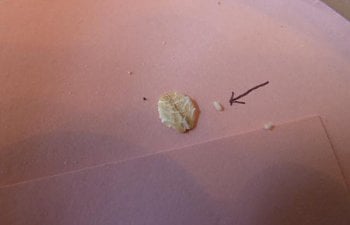
Picture of a beetle laying an egg. Picture of the egg beside a rolled oat.


You can slow down development by placing the larva (mealworm) in the fridge (I used clean cottage cheese containers with some substrate and holes punched in the lid) for quite a while. I did find that there was a higher mortality rate during pupation and higher deformity rate of the beetles from the refrigerated worms. It’s still a useful tool to stager the colony though.
Experiment/observation:
At one point, someone raised the concern that the Darkling beetle is able to fly. Everything I read said otherwise. However, to put minds at ease, I conducted the "Do my beetles fly or not" test.
First test: Let robust beetles fall from height of 5' into bathtub.
Second test: Let different group of robust beetles fall from height of 14' into grass.
Findings: The Tenebrio molitor did NOT fly. Nor did it even bounce upon landing. *thunk* One of the beetles did OPEN it's ineffective little wings but they didn't even change the direction of its descent.
My newest setup:
I've been freezing mealeis from my original group and downsizing their housing as I go. I'm now setting up the single bin to accommodate 2 groups of beetles. I've been putting all beetles into a container for a couple months and plan to start a second container 11/10/11. This way, I can easily get rid of the beetles when they reach 5-6 months old..
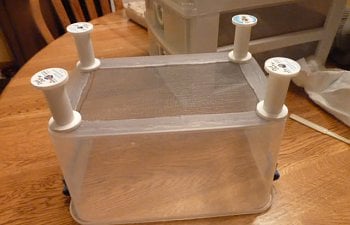
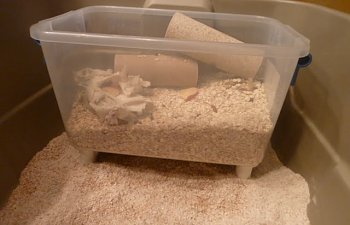
I found 2 smaller containers to fit inside the single bin, cut the bottoms out and hot glued screening in. I then hot glued empty thread spools to elevate it above the substrate for the next batch of wormies!
The 3-drawer colony is still going strong with a new batch of wee wormies under way in the 2nd drawer. I'm still using rolled oats for the beetles and am sticking to a finer substrate for the worms to develop in to make sifting easier.
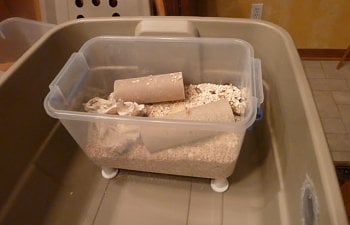
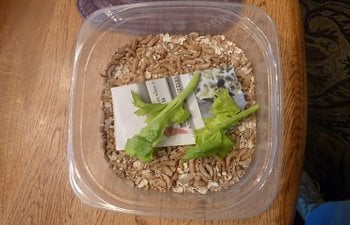
Also pictured is my pupae nursery. I've had more success moving the pupae into a small container with paper and a veggie leaf for a bit of moisture. I check the container often moving any morphed beetle into the beetle container.
I've found that not much space is really needed for a thriving colony so I'm sticking with the 3-drawer unit and my small single bin.


Read more:
- https://www.backyardchickens.com/articles/how-to-raise-mealworms.48416/
- https://www.backyardchickens.com/threads/mealworm-farming.492636/
(Tenebrio molitor)
(also visit https://www.backyardchickens.com/a/how-to-raise-mealworms to see how Gallo del Cielo raises mealworms and www.westknollfarm.com to read about Amy's mealworm farm.)
In the winter of 2010-2011, I spent $40.00 buying freeze dried mealworms for my girls since there were no insects available that time of year in Pennsylvania. My chickadees absolutely loved them and I was able to train them to come at the slightest call.
I found out that it was possible to raise mealworms without much trouble and went about the task of researching everything I could find regarding the subject. There seemed to be a lot of holes in the information that I found, and to some degree, conflict about it. So I decided to use the 3-drawer setup, which would enable me to ‘study’ the development and habits of the Darkling beetle and its different stages. My ultimate goal, though, was to store up enough larva to take my chickadees through the winter.
To say that I’ve had a blast is putting it mildly. I spent so much time watching and learning that I was even able to take photos of a beetle laying an egg. Really cool (well, it was for me!).
Probably the most important thing I learned was that temperature and lighting have a big influence on the speed of development. BUT, even though ideal temperature is reported to be 80°-100° F, a mealworm farm will develop very nicely at 72° F.
Okay, down to basics.
Life cycle Stages:
Egg
Larva
Pupae
Darkling beetle
This time table is relative to conditions such as temperature, food source, etc:
Egg Incubation: 4-19 days (usually 4-7). Another source says 20-40 days. I had eggs hatch within 14 days of observation.
Larva: 10 weeks. Visible after about a week
Pupa: 6-18 (18-24?) days
Beetle and Egg Laying: 8-12 weeks (followed by death). Egg laying starts 4-19 days (average 12) after emergence. I now have beetles that are going on 5 months old. I am still finding eggs from this group, although not as many.
Pupae: Newly pupated to a few days old. The one on the far right is getting ready to morph into a beetle. Also 3 dead pupae at the top of photo.
Mealworm: One on the left just shed it's exoskeleton so it is white.
Beetles: Again, the white one is newly morphed from a pupae. As they age they get darker....hense Darkling beetle! There are also a couple malformed beetles for reference.
Examples of deal mealworms and pupae. I had just cleaned my bottom drawer picking out the dead.
Housing: A simple aquarium or plastic bin will do as both have smooth sides. I have a 3-drawer colony and a bin colony. You will need to provide ventilation. To avoid the chance of other insects invading, I use screening material to cover the large holes we drilled in the lid and on the sides of the bin. Putting a screen over it also keeps curious cat paws out. Do not place in direct sunlight.
I have small holes drilled around the tops of each drawer in the 3-drawer colony for additional ventilation.
To make the 3-drawer setup, I cut the bottom out of the top drawer and hot glued screening material over the hole. This drawer is for the beetles so that when the eggs hatch, the small worms will fall into the second drawer. I found that a good number of the eggs actually dropped through also. I used the bottom drawer for the mealworms (larva) and moved them to the top drawer when the pupated. There they morphed into beetles and started laying eggs.
Substrate: The best substrate (substance to raise them in) is wheat bran (not the same as wheat germ). Rolled oats work, as does wheat flour and chicken feed. You can even add fish food flakes, dried milk and a wee bit of corn meal. From the research and personal experience, I will not use corn meal or chicken feed any more and I now freeze or microwave all food sources to prevent the possible problem of grain mites. It’s just a precaution but worth doing.
You’ll need at least 1-1/2” of substrate (if using a small set up like my 3-drawer). I’ve found that as the colony grows, it’s necessary to add more. I have about 4” in the single tub now, although I still maintain 1-1/2 in the 3-drawer colony. I have been thinning the numbers out (freezing them) as the worms get big enough.
Moisture sources: It is necessary to provide some sort of moisture source such as carrots, potato slice, apple slice, kale, lettuce, beet leaves, celery, dandelion leaves, squash slices, cucumber….you can pretty much try anything (except citrus). Either they will eat it or they won’t. It’s better if you only supply what they can consume in a day or 2 to avoid any chance of mold forming. You do not want mold in your mealworm colony.
It’s advisable to place the veggies/fruit on plastic lids or on bits of newspaper to prevent moisture from entering the substrate. Most of the problems encountered when raising mealworms is caused by too much moisture.
Other:
It’s good to provide cardboard pieces, egg carton pieces, toilet paper tubes, layers of newspaper or paper towel in your colony. The worms and beetles like to hide under and in these items. It also makes collecting them easier. The worms congregate under and in between the newspaper layers allowing you to pickup and shake them into another container or into your hand.
As a mealworm larva grows, it sheds it's outer skin (exoskeleton) many times. After each shedding, the larva appears white. Newly hatched wee wormies are also white, as are the pupae immediately after they pupate and even the beetles appear to have an almost white body immediately after it morphs. As they age, all stages get darker. The beetle will generally darken until it is black.
Picture: Pile of shed baby exoskeletons. White larger worm that just shed it's exoskeleton.
Picture of a beetle laying an egg. Picture of the egg beside a rolled oat.
You can slow down development by placing the larva (mealworm) in the fridge (I used clean cottage cheese containers with some substrate and holes punched in the lid) for quite a while. I did find that there was a higher mortality rate during pupation and higher deformity rate of the beetles from the refrigerated worms. It’s still a useful tool to stager the colony though.
Experiment/observation:
At one point, someone raised the concern that the Darkling beetle is able to fly. Everything I read said otherwise. However, to put minds at ease, I conducted the "Do my beetles fly or not" test.
First test: Let robust beetles fall from height of 5' into bathtub.
Second test: Let different group of robust beetles fall from height of 14' into grass.
Findings: The Tenebrio molitor did NOT fly. Nor did it even bounce upon landing. *thunk* One of the beetles did OPEN it's ineffective little wings but they didn't even change the direction of its descent.
My newest setup:
I've been freezing mealeis from my original group and downsizing their housing as I go. I'm now setting up the single bin to accommodate 2 groups of beetles. I've been putting all beetles into a container for a couple months and plan to start a second container 11/10/11. This way, I can easily get rid of the beetles when they reach 5-6 months old..
I found 2 smaller containers to fit inside the single bin, cut the bottoms out and hot glued screening in. I then hot glued empty thread spools to elevate it above the substrate for the next batch of wormies!
The 3-drawer colony is still going strong with a new batch of wee wormies under way in the 2nd drawer. I'm still using rolled oats for the beetles and am sticking to a finer substrate for the worms to develop in to make sifting easier.
Also pictured is my pupae nursery. I've had more success moving the pupae into a small container with paper and a veggie leaf for a bit of moisture. I check the container often moving any morphed beetle into the beetle container.
I've found that not much space is really needed for a thriving colony so I'm sticking with the 3-drawer unit and my small single bin.
Read more:
- https://www.backyardchickens.com/articles/how-to-raise-mealworms.48416/
- https://www.backyardchickens.com/threads/mealworm-farming.492636/

