My husband and I had talked about getting chickens several times but never made the move to do anything about it. We had told my son-in-law about how to make a potato box and the only place that had seed potatoes was the local IFA. Wednesday, May 27 he was there buying seed potatoes with my seven year old granddaughter, they saw the chickens. My granddaughter fell in love and that convinced me that we needed to get chickens. I checked our city codes (there was even a link on the front page of the website saying, "so, you want chickens?" It was pretty funny. I live in a low residential zoning area with half an acre so I can have chickens but we didn't want a LOT of chickens and I wanted a tractor so I wouldn't have to worry about dead spots in the yard. I started thinking about what I had around the house that I could turn into a chicken tractor. Spending a lot of money on coop supplies is NOT an option for me right now.
I remembered that my husband had a cabinet in the shed that he was going to hang "someday" to store gardening stuff in, but it was still just leaning against the wall. I took it into the garage and found a smaller cabinet I thought I might attach for a nesting box. After considering everything I realized that was not going to be big enough for even two chickens really. The cabinet was not tall enough for roosts to be placed in there since the dimensions were 24 x 60 x 14. I didn't give up on my search for more household treasures.
I realized we had been storing our firewood in a large wooden box 31 x 28 x 42 in our garage until it outgrew our needs and I had found a log holder on clearance at my local Home Depot. As the firewood level had dwindled the level of junk in the box had increased proportionally. I realized that it would free up a lot of space in the garage to get it out, make it easier to organize the "stuff" the box had started accumulating and it was otherwise perfect! I finished emptying it and drug it over to where I was starting my accumulations. I got lucky and found some linoleum pieces behind the box.
We had a partial roll of hardware cloth from when we had made our cattery area and that went to the gathering area. I had house rabbits for 12 years and even though they were free range we still had a cage for each of them so they could have their own room and be isolated if they were sick or had stitches. I had already decided those were going to be my run area but I had legs, trays, splash guards, and rails also. They were all considered in the planning. My husband and I had a lawn mower that the engine had seized on and I had been holding onto it until I could find someone that would be able to work with it. I didn't want to send it to the landfill and our local charities won't take things with engines. I am so glad I never listed on Craigslist or Freecycle. It was a self propelled mower and had HUGE back wheels that adjusted. Those were put on the consideration list.
My son-in-law was off work on Friday, May 29, and he came over with his tools and some miscellaneous supplies to help us assemble the chicken coop.
This has been a job where we find a problem and just walk around the house until we find a solution. When I wanted to attach the ramp to the coop I knew it would need to be able to be lifted a couple of inches if we needed to move the tractor forward, so I used a luggage strap that I cut into pieces and burned the edges with a lighter. I used an old piece of swing chain for the other end of the ramp to allow me to lift it from the outside but also let the girls go down the ramp without any problems. The luggage strap worked so well that we used the rest of it in several places on the coop. My DH made some vents with the deadbolt cutter and I lined them with hardware cloth but I was still concerned about rain and snow blowing into the vents. I decided to use the old splash guards that I cut into "dryer vent" like covers. I thought about painting them but I like the rustic look of the galvanized steel. There is plenty of room for air to circulate but this should keep the girls drier since the coop is so small.
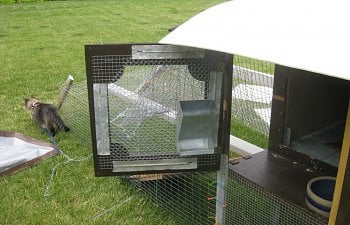
I got a little concerned about the door with the hardware cloth being a security concern, especially since I decided to keep their water and food in there to keep it out of the litter so I reinforced with a diagonal sheet of hardware cloth. I pounded the tray guides from the rabbit cages flat and used those to screw the two layers of hardware cloth on there so it should be secure now.
Here are the original parts of the coop:

The back of the nesting box/entrance:

The main part of the coop:

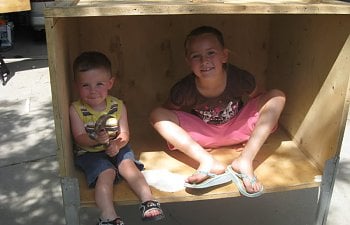
The cutest chickies, for a size comparison:

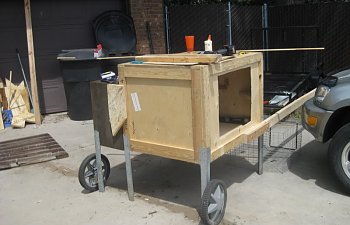
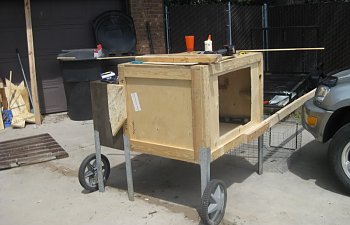
After the two parts have been combined, the door cut and the legs put on:

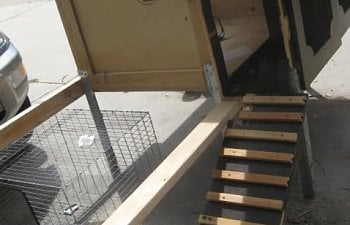
I took the shelf that we cut out of the cabinet (leaving one part for the nesting boxes) and put on slats for the ramp:

We found out that the wheels twisted the metal legs too much so we had to reinforce the bottom with 2 x 4 and 2 x 2. I didn't get a good picture of that but you can see it in subsequent pictures.
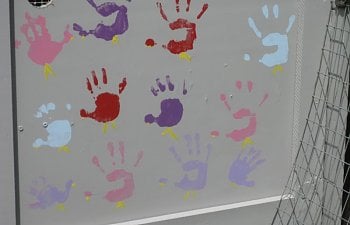
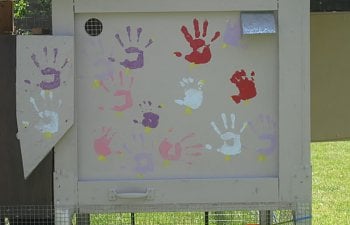
We moved the coop into the backyard. I knew I wanted a cute paint job but I am not talented or crafty so I enlisted the help of my grandkids. The chickens are for them as much as they are for me (or even more!) and I wanted them to have some ownership. I got a lot of different colors of paint from my son-in-law and decided to have my gkids make chickens out of hand prints:
Here are the "chickens" made from hand prints by my seven year old granddaughter with a paint brush and a little yellow paint:

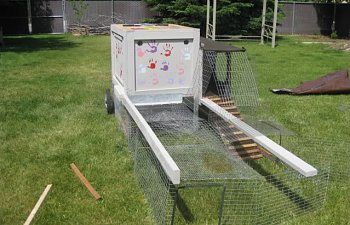
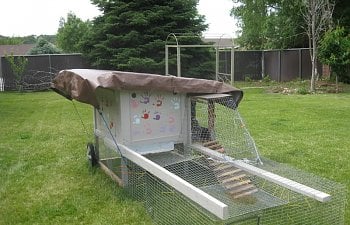
After the paint job I was ready to start attaching the run. We are using colorful zip ties to fit in with the ease and "down home" flavor of the whole thing:

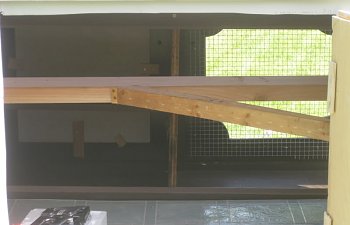
My husband figured out a way to put both roosts in with the ability to remove them for cleaning, even the diagonal. They are both separate so they can be removed, replaced and cleaned if needed. You will also see the nesting boxes on the left and the entrance/exit to the run on the right. I am going to leave that open during the warm months and I have a cover for it during the winter. The board I am closing the door for the nesting box with is a piece of shower backer board so it should hold up to cleaning and chicken stuff:


31x28
42 60
I remembered that my husband had a cabinet in the shed that he was going to hang "someday" to store gardening stuff in, but it was still just leaning against the wall. I took it into the garage and found a smaller cabinet I thought I might attach for a nesting box. After considering everything I realized that was not going to be big enough for even two chickens really. The cabinet was not tall enough for roosts to be placed in there since the dimensions were 24 x 60 x 14. I didn't give up on my search for more household treasures.
I realized we had been storing our firewood in a large wooden box 31 x 28 x 42 in our garage until it outgrew our needs and I had found a log holder on clearance at my local Home Depot. As the firewood level had dwindled the level of junk in the box had increased proportionally. I realized that it would free up a lot of space in the garage to get it out, make it easier to organize the "stuff" the box had started accumulating and it was otherwise perfect! I finished emptying it and drug it over to where I was starting my accumulations. I got lucky and found some linoleum pieces behind the box.
We had a partial roll of hardware cloth from when we had made our cattery area and that went to the gathering area. I had house rabbits for 12 years and even though they were free range we still had a cage for each of them so they could have their own room and be isolated if they were sick or had stitches. I had already decided those were going to be my run area but I had legs, trays, splash guards, and rails also. They were all considered in the planning. My husband and I had a lawn mower that the engine had seized on and I had been holding onto it until I could find someone that would be able to work with it. I didn't want to send it to the landfill and our local charities won't take things with engines. I am so glad I never listed on Craigslist or Freecycle. It was a self propelled mower and had HUGE back wheels that adjusted. Those were put on the consideration list.
My son-in-law was off work on Friday, May 29, and he came over with his tools and some miscellaneous supplies to help us assemble the chicken coop.
This has been a job where we find a problem and just walk around the house until we find a solution. When I wanted to attach the ramp to the coop I knew it would need to be able to be lifted a couple of inches if we needed to move the tractor forward, so I used a luggage strap that I cut into pieces and burned the edges with a lighter. I used an old piece of swing chain for the other end of the ramp to allow me to lift it from the outside but also let the girls go down the ramp without any problems. The luggage strap worked so well that we used the rest of it in several places on the coop. My DH made some vents with the deadbolt cutter and I lined them with hardware cloth but I was still concerned about rain and snow blowing into the vents. I decided to use the old splash guards that I cut into "dryer vent" like covers. I thought about painting them but I like the rustic look of the galvanized steel. There is plenty of room for air to circulate but this should keep the girls drier since the coop is so small.
I got a little concerned about the door with the hardware cloth being a security concern, especially since I decided to keep their water and food in there to keep it out of the litter so I reinforced with a diagonal sheet of hardware cloth. I pounded the tray guides from the rabbit cages flat and used those to screw the two layers of hardware cloth on there so it should be secure now.
Here are the original parts of the coop:
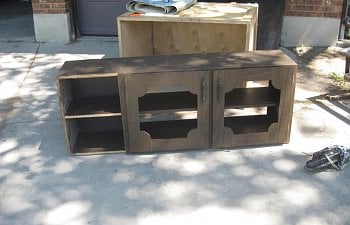
The back of the nesting box/entrance:
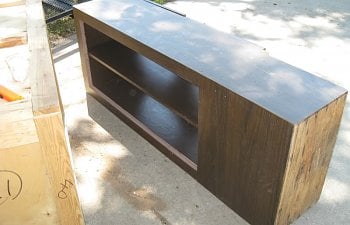
The main part of the coop:
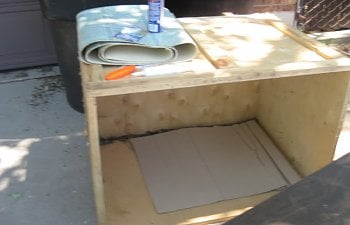
The cutest chickies, for a size comparison:
After the two parts have been combined, the door cut and the legs put on:
I took the shelf that we cut out of the cabinet (leaving one part for the nesting boxes) and put on slats for the ramp:
We found out that the wheels twisted the metal legs too much so we had to reinforce the bottom with 2 x 4 and 2 x 2. I didn't get a good picture of that but you can see it in subsequent pictures.
We moved the coop into the backyard. I knew I wanted a cute paint job but I am not talented or crafty so I enlisted the help of my grandkids. The chickens are for them as much as they are for me (or even more!) and I wanted them to have some ownership. I got a lot of different colors of paint from my son-in-law and decided to have my gkids make chickens out of hand prints:
Here are the "chickens" made from hand prints by my seven year old granddaughter with a paint brush and a little yellow paint:
After the paint job I was ready to start attaching the run. We are using colorful zip ties to fit in with the ease and "down home" flavor of the whole thing:
My husband figured out a way to put both roosts in with the ability to remove them for cleaning, even the diagonal. They are both separate so they can be removed, replaced and cleaned if needed. You will also see the nesting boxes on the left and the entrance/exit to the run on the right. I am going to leave that open during the warm months and I have a cover for it during the winter. The board I am closing the door for the nesting box with is a piece of shower backer board so it should hold up to cleaning and chicken stuff:
31x28
42 60

