

Cooping with a Pandemic.
What do you do when a pandemic puts you in front of a computer screen on Teams Meetings over 95% or more of your time at work and you are normally used to traveling to see customers sometimes over 100 days a year? How do you keep your project management skills honed when you customers are delaying all their projects? Personally, I need a project for the evenings and weekends to keep my sanity.
Since in New Jersey we were in lockdown, homebound and struggling to get groceries for a few months, I decided to take on a project that would also add some food security on to our mini-farm, called the “Studer Ranch.” My wife always wanted to have chickens for the fresh eggs and we had an old pony shed behind our main horse barn that was seriously in need of an overhaul. So, we decided we would be salvaging our run-down shed and repurposing it as a chicken coop.


As often most projects go, the timeline became very short, and it didn't help that my wife decided to order the 13 newborn chicks in the middle of April (adult egg laying chickens were sold out for the foreseeable future at that point) and to raise them in a brooder in our basement....for a while.
And every day the chicks grew, and I felt that all too familiar pressure that drives me to get the job done, which I think really helped me keep my sanity. In many ways this experience was not very different from my project work with Messer: I obtained permits and passed inspections, then hired an electrician and a roofer to keep the project deadline on track, which, after a few change orders, is now October. I did, however, run into some unwanted excitement when I had to evict a raccoon from the attic and when I dropped a couple of feet into a (thankfully) abandoned ground hog den that was under the original dirt floor.
So, here is the status of my project after 5 months I can see the light at the end of the tunnel.
The Before


Assessing the damaged areas


Starting to secure the coop from the ground up
Hardware cloth installed at the base, trusses repaired.


Renovation continues
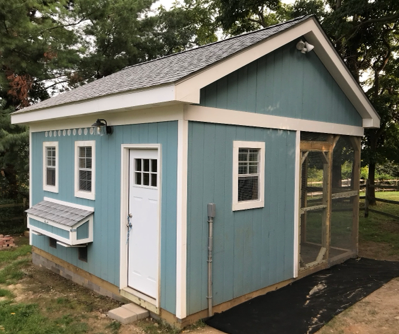
We reduced the enclosed area to allow for a larger covered run that is south facing. We pre-painted the siding before installing.


Nest Box and trenching
We build the nest box based on a design that utilizes paint trays lined with astro turf. We had to dig a trench to bring electricity to the shed. An unbelievable amount of rocks came up.


Windows and door
Coop windows installed, we added extra protection by covering with hardware cloth. We also created some extra openings to create cross ventilation in the warm season. Automatic coop door installed.


Covered run
We used 1/4 inch hardware cloth for the run. We will probably add an electric wire around the base too.


Inside the coop
We installed lynoleum to protect the plywood surfaces. We opted for an elevated roosting area with a dropping board. The nesting boxes are positioned below. The dropping board with the roosting post is movable, can be installed in either side. Since our girls are large we created ramps and a platform so they can walk down instead of jumping down.


Curtains for the nest boxes
We repurposed some old window valances to make these . We started building the ramps too.
cute curtains


 cute curtains
Bedding and dropping boards
For the coop floor we used construction sand. It was a little wet but dried quicly. For the droppings board we used sweet PDZ.


The girls are finally moving in!
Our girls that patiently waited in their makeshift housing (one of our horses’ stalls) are finally moving in!


A good use for all those rocks
We added a no-dig skirt all around the perimeter (1/2 inch hardware cloth). Then used up all the rocks we dug up while trenching to cover it up.


Wifi
The coop has wifi for the automatic coop door and a security camera. Motion activated ligths on the outside hopefully will deter predators.


Winterized
Now getting ready for the long rainy/snowy winter.
Clear vinyl installed on the covered run. Vinyl sheets can be rolled up when weather is warm. We will likely remove them all together in the spring.
With some scrap vinyl we build a little strip door for the chicken door to avoid drafts.
Permanent 4 ft fence installed for some supervised free ranging in the barn-adjacent area.
Started organizing our chicken supplies and feed in the covered coop area.
Clear vinyl installed on the covered run. Vinyl sheets can be rolled up when weather is warm. We will likely remove them all together in the spring.
With some scrap vinyl we build a little strip door for the chicken door to avoid drafts.


Permanent 4 ft fence installed for some supervised free ranging in the barn-adjacent area.


Started organizing our chicken supplies and feed in the covered coop area.
Planning
Our coop was a derelict 16 by 16 horse barn, situated behind our main Horse barn. The whole structure was in very bad shape and had no electricity.
We reduced the size of the enclosed area to allow for a covered run.
We browsed the “Large Coop” articles multiple times and took learned a lot:
We knew we would want a small storage area adjacent to the coop to avoid having to bring the chicken feed from the main barn.
We also decided we would like a lot of good ventilation so we planned for 6 windows, 3 additional openings for Summer. Cross ventilation at the bottom and a series of ventilation openings at the top on the south and north facing side.
We also decided we wanted some flexibility on the positioning of the dropping board, feeders and waterer so we made it removable and predisposed to be installed on either the north or south facing side.
We also decided we wanted a 6 stalls nest box with roll away trays accessible from the outside and below the level of the dropping boards.
We obtained permits to trench and bring electricity to the coop from the main barn.
The most difficult part was to sketch it.


Winter time Update
Just an update.
So far our coop is proving to be very low maintenace and convenient. Here are some images in no specific order.
The marine clear vinyl sheets are keeping the covered run dry and protected from the winds. We purposedly left a gap at the top to allow ventilation.
The droppings board works great, I highly recommend it. Not only it is very easy to clean, but because it is filled with 2-3 inches of Sweet PDZ it practically works as a giant deodorizer and dehumidifier for the coop.
We build a convertible seat/roosting post for the run. The girls love it and it is very covenient when we want to just sit down in the run and pet them.
With leftover vinyl I build a little strip door to stop the draft of colder air from the run. Not sure it is really necessary, but I like it.
We have a wall waterer with heater on the inside. I placed a bowl under it to collect any water drips and we have no problems with excessive moisture inside the coop. Of course the coop is quite large and we have sand on the floor and PDZ in the droppings board.
We installed two heater panels and plugged them through thermo cubes, so they only turn on if the temperature drops below freezing and turn off I believe at 45 degrees. They work well and thanks to the vinyl panels there is not a huge difference in temperature betweem the run and the coop.
The nest boxes (not pictured) are also working very well. To prevent the eggs from freezing we installed a deicer cable under them. So far so good. The paint trays lined with astro turf are working wery well. They are easy to clean and resilient.
Next project: Installing the cedar shutters that we build with the siding salvaged from the shed.


Summer 2021 Update
One year and a half later we still love our Orpington girls and enjoy making their home as fun and comfortable as possible.
We just finished installing cedar shutters that we build repurposing the salvages cedar planks from the original building.
We installed a quiet but powerful fan in the covered run that runs with a thermo cube and similarly two fans inside the coop. So far they do the job, coop is quite cool during the day even if we keep the windows closed.
Landscaping is a work in progress. We spread a horse pasture seed mix since we also have horses that sometimes share that space too and the girls seem to enjoy it, particularly the clover.
3 new girls joined our flock this year. They are one Buff, one Chocolate and one Lavender Orpington. We raised them from one day olds in our basement and they are now gradually being integrated. So far we are offering them a run-to hideaway in the run which is a little cumbersome but gets the job done.
4. Lastly, I couldn’t help myself and forced my husband to install a small AC unit after I spent a couple nights checking in the girls every hour during the heat wave. It works great and we use only when the girls suffer the temperature. But mostly it gives me peace of mind.
2022 Run Expansion
In 2022 we decided to Expand our flock and welcomed some beautiful English Orpingtons, and Bielefelders. They all integrated very well also with our side-by -side run method. We accidentally acquired 2 roosters that so far are well behaved and good flock protectors. We have lots of predators, so our flock is allowed to free range when supervised only. We then decided to give them a bit more predator-proof space. The additional covered run is still under construction and it will have a clear polycarbonate cover to allow sunlight in the winter months.
Updates
Winter 2024-2025 - storm windows added to the run.
Over time the vinyl sheets we use to protect the covered run from wind and snow have been shrinking making it very difficult to install in cold weather and to open and close when ventilation was needed. So we came up with these hinged frames that are working well for us.
Over time the vinyl sheets we use to protect the covered run from wind and snow have been shrinking making it very difficult to install in cold weather and to open and close when ventilation was needed. So we came up with these hinged frames that are working well for us.

")
 loooove the picture overload.
") Love the attention to detail and your ability to be able to repurpose an existing structure. Glad no injuries occurred with evicting the critter and stepping in someone's former underground den.
Love the attention to detail and your ability to be able to repurpose an existing structure. Glad no injuries occurred with evicting the critter and stepping in someone's former underground den. 