.JPG")
New Coop!!!
In the spring of 2011, I got my first batch of chicks, we built them a cute little coop. By 2013 I was ready for a larger coop so I could add to the flock and have a better layout. I began drawing up my dream coop with a standard rectangular building.

1st coop, built in May 2011.
In the summer of 2014, we were getting more serious about the building. We visited a friend’s home to see his coop and other buildings that he had constructed. He had some of the most unique architecture we had even seen. When we got back home my husband looked at me and stated that what we were obviously suffering from was a complete lack of imagination. We then bought a Lloyd Khan book of Pacific Northwest Builders and just got blown away by all the beautiful buildings in the book.
We live in a heavily wooded area in northwest Washington. Our property has majestic Cedars, Doug Fir, Madrones and Hemlock. One of the Cedars in our yard was a serious leaner & had to be removed to make way for our garden and greenhouse. She was such a lovely tree that we kept two sections that we hoped to have milled someday. Unfortunately, they sat there for several years because we could not figure out how to move them to get them to a mill. We had also been working to thin the forest around the property as it was heavily overstocked. After reading the Lloyd Khan book my husband began getting interested in using the wood for the building of the coop.
One day my husband looked at me and said that we should build a round (octagonal) building and use one of the Cedar logs in the yard as a center pole. So, on July 14, 2014 the center pole was planted and thus the project officially began!
A month after the center pole went up my sister’s whole family showed up to help us get the posts and beams in place. My brother in law is a carpenter by trade and notched out each log to fit over the center pole. We quickly realized that we needed more logs to complete the roof framing. So, we tarped the structure for the winter and we went back to the woods to harvest more wood and peel the bark off each log.
[
.JPG")
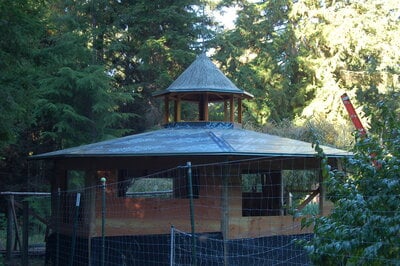
By June of 2015 we were installing the jack rafters that my husband had harvested and prepped the previous winter. Using an extremely dangerous tool (think of a chainsaw on the end of an angle grinder), each jack rafter was shaped to join with the round rafter that connected to the center pole… while standing on a ladder. Ten feet in the air. After they were installed, we counted our fingers and proceeded to use utility grade lumber to sheet the roof. As the roofing got closer to the center pole, we realized that it would be tragic to cover that beautiful wagon wheel. My husband then declared that this building must have a cupola!
Several friends helped in the design and construction of the copula & my husband got a crash course in building windows.
We had been struggling with how to roof the building, the shape did not lend itself well to metal or shingles. I really wanted the building to have an organic feel, so I did not want asphalt roofing. We had read about using a concrete/latex mix over hardware cloth as a roofing material so decided to give that a try on the cupola first. We found that it was difficult to work with but has a great look. The idea of installing it on the entire structure really was not enticing.
At this point we had already covered the roof sheeting in Ice & Water Shield to keep the structure dry. I really wanted a sod roof, but we were concerned with the weight on the building. My sister recommended a moss roof as an alternative. We whole heartily embraced the idea and began doing research. We decided to add a rain diversion path to help direct the water off the roof in certain locations. Our good friend had just returned from Bermuda where he had seen a similar system used for roof rain catchment systems. After this was installed, we laid down landscape fabric to cover the Ice & Water Shield to protect it from UV rays. We then went about harvesting (borrowing sometimes) moss sheets wherever we could find it. It was a fun winter of moss hunting and planting it on the roof.
[
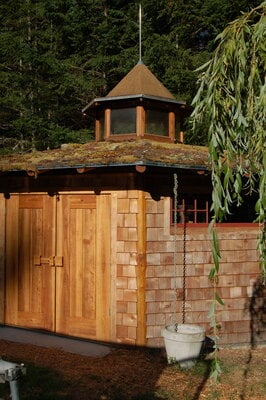
Now the building was more buttoned up than ever, it just needed windows & siding (and one more wall). Another friend had given us several beautiful old windows from farmhouses around here. They just needed a little rehab. My husband painstakingly went over each window, sanding the wood and re-bedding each pane of glass. Once they had a fresh coat of paint they were finally installed. This whole process literally took months. During this same time frame, we started work on adding cedar shingles to each of the exterior walls. Since the site was not level it took lots of plotting and planning to get them to look level from one panel to the next, adding and subtracting rows as we went trying to get the row beneath the window to be level with the window. Maddening! Also, each shingle interacting with a post had to be coped into the post to get the aesthetic we were seeking. Each wall took nearly a week each to complete, working part-time.
We had a lot of rain and snow the winter of 2017 and realized that we really needed a curtain drain to keep the water away from the structure. We have super sandy soil; it is like beach sand once you get through the first foot of rocks. My husband trenched around the entire building down two feet, added a heavy mil pond liner to the side of the trench next to the building and added drain rock, we have not had a problem since.
It is now 2018 and we are getting a little burned out on the project! Fortunately, this same year we bought a tractor. This allowed us to dig a big trench for power & water out to the barn. It also facilitated a wonderful trade with a friend who needed a curtain drain dug and we needed doors for the barn. We had finally milled the other Cedar log from the yard at a friend's home mill and that wood had been drying out for a year. Our friend that needed the curtain drain is an incredible wood worker and him and my husband built us a pair of spectacular doors for the barn. Now the only thing left to do is finish the inside!
.JPG")
It was not until I purchased 6 chicks this last May that the project really got moving in full swing again. Since then we have completed all the interior siding and built the chicken pens. Nothing like growing birds to overcome procrastination!
The small strip of wood to the right of the post is how we would pattern the plywood to fit up tight to the post.
Originally I had wanted a dirt/natural floor. As the building evolved I decided that I REALLY did not want the chickens dusting themselves inside the building. I finally choose to add stall mats to cover the dirt floor.
We added manual locking doors (the draw string to unlock/open the door is missing at this point, it was added later)
The coop was divided into two section, the mini coop & the big coop.
A poop board was added to the big coop filled with PDZ. This has been the most incredible addition to my coop. I was so nervous that my beautiful new building would be a dusty, stinky mess. My girls have now been living in the new coop for over a month and it is still lovely to walk in every morning. My daily maintenance is to scoop the poop on the poop board into a bucket, it takes just a few minutes, I love it!!!
A slider door was added between the two coops to help with integration of two flocks. To the left is the new nests, all are closed off except one for my one old gal that is still laying.
I removed the cardboard in this picture so you could see the nest boxes. The closed off nests have made great storage cubbies! I used Aart's plans for the basic layout & then we modified it to fit our space. There are three single nests & one community nest.
Manual coop door controls added.
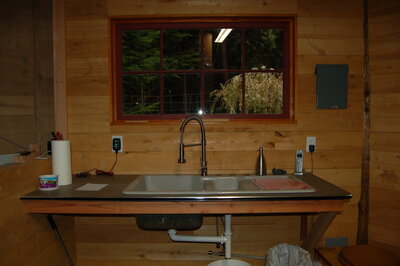
Future home of big farm sink that needs a little rehab. You can also see my new trickle charger setup for my automatic door. It is a Pullet-Shut door that was moved from the old coop to the new coop. It is mounted to the exterior of the building so it does not interfere with my manual door. The manual door will stay in the open position all the time now but it there in case we have a problem with the automatic door.
While writing this page I was overwhelmed by all the help our friends have provided in both their time, ideas, materials & support to get our project to this point. We truly are blessed with wonderful people in our lives!
We still have the people side to complete but now we can do it at our own pace. I hope you enjoy the journey with us!
**UPDATES**
We have continued our work on the "people" side of the coop. Here are some of the updates!
I liked the stall mats so much on the chicken side of the coop that I have added them to my side as well. We also hung the door on the little coop side. We still need to add the backstop & latch but we are closer to being buttoned up.
The sink is in place! I don't have the drain plumbed outside yet but the bucket is working great so far. What a difference it is to have power and water in the coop. I am still trying to decide if I will have an auto waterer in the coop or just outside. At this point I am using my old waterer inside and added a 2 gallon RentACoop waterer outside. It may just be easiest to move the RentACoop waterer inside on a heated base (I have power now!!) underneath it for the colder months.
We are still in progress, I will post more pictures as we go along. Thank you!
***Update, December 2020***
So far during all this rainy weather this fall the coop has been performing very well. Since the humidity in the coop can only be as low as the outdoors I have added a fan to run during the day to keep the air moving.
We completed my workbench, hopefully I can get it varnished this spring when the weather warms up.
I have one bird that does not like to sleep with the other hens. She flys up to a cross support each night to roost. It has now become a ritual for my dog & I to go out each night to lower her down on the end of a broom.
I am planning to add a string of wire a couple of inches above the support to see if that discourages her.
A coop warming gift for the new barn made by a close friend.
Spring 2021
Updated moss & (added) sedum roof picture, Spring 2022

")