Hi Everyone
At the moment many of the questions we answer are usually related to humidity problems. This is our new Guide to Humidity, Weighing and Lockdown. I hope readers will find it useful and that it helps to increase their sucess rates

Links to our other articles and incubation information can be found on our website; http://oakgarthgeese.com
Pete

Guide to Humidity, Weighing and Lockdown
In all the incubation questions we are asked humidity and lockdown appear to be the commonest problematic areas. Frequently we are asked for the correct humidity levels for eggs and when lockdown should commence. However there is NO single prescriptive answer and the owner must accept that they have to flexible in their approach to incubation of their own eggs and consider local environment variations. Hopefully this article will help the operator in deciding what conditions are best for their own incubation practices and make the required adjustments to improve their hatch rates.
In deciding the required humidity level for incubation most owners opt for around 50% relative humidity with an increase to around 70% about 3 days before hatching is due. However although incubation practices at these levels brings success for many, others struggle to obtain a successful hatch. The main cause of failure is that the owner has not considered their eggs as individual or accounted for local humidity levels. An increased success rate is usually obtained when these issues are addressed. It appears that there are 6 key areas for the owner to address before hatch rates improve;
Egg Quality and Viability
Egg Marking, Weighing and Storage
Stable Incubation Conditions
Adequate Turning Programme
Monitoring and Adjustment
Lockdown
Egg Quality and Viability
Improved hatch rates starts with the stock birds and the quality of the eggs. The stock birds should be from healthy and vigorous lines. Using weak or unhealthy stock will result in poor quality eggs and embryos which also lack health and vigour. The parent birds should also be on a good nutritional diet that helps them to produce eggs of high quality. Certainly it has been demonstrated with geese that early season eggs often have thicker shells than eggs produced towards the end of the season. To produce the egg the female draws upon her food reserves and to make the shell utilises calcium that has been stored in the bones prior to the breeding season. Giving the birds access to calcium and grit helps but this should be done year round so the female starts to lay down new reserves once egg laying has finished. The quality of the egg shell will influence the required humidity level as thin shelled or porous eggs will lose moisture at a faster rate and may require an overall higher humidity to compensate for this.
Egg Marking, Weighing and Storage
This is one of the most critical areas that owners should address as success may depend on the work done at this point. Eggs should be collected fresh and checked for damage. If badly soiled then we will usually wash them in tepid running water and dry them with paper kitchen roll. Next the eggs are weighed on a gram scale. We use a cheap kitchen weighing scale which measures up to 500 gram and easily obtainable. Then using a soft pencil, eggs are coded with parents details, date of laying and the weight. A cross is drawn on one side and a circle on the opposite. Eggs are then stored in a cool room (about 50F), laid on their sides and turned once daily. Usually we like to set eggs that are no more than 10 days old for best results.
This simple procedure pays dividends later. By checking and weighing the eggs fresh the owner has a starting point for incubation humidity settings. Once eggs are stored for any length of time then the weight becomes less accurate. For healthy chicks to hatch, eggs must lose approximately 15-16% of their fresh laid weight. Even in storage eggs will start to lose moisture (and therefore weight) which is why a cool room helps to maintain stable conditions. For shipped eggs we would recommend the same procedure as soon as received and then leave the eggs to stand for 24 hours. It is even more helpful if the owner candles the shipped eggs as this may reveal damage to the air cell and even hairline cracks.
Overall we aim for our eggs to lose approx. 15-16% of their fresh laid weight by External Pipping to produce healthy hatchlings. For example, if a fresh laid Goose egg weighs 150 grams then its needs to lose 22.5 grams by approx Day 28 to achieve a 15% weight loss. This would be a weekly weight loss of 5.6 grams. By checking weekly weights the incubator humidity can be adjusted accordingly so the target weight is achieved. After experience is gained then the owner will be able to assess weight loss visually by checking the size of the developing air cells but its not as precise as weighing.
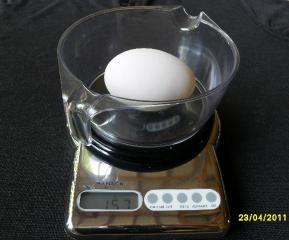
A Goose egg is weighed before marking.
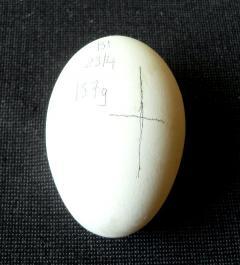
Information about the egg is written onto the shell to avoid later confusion.
Stable Incubation Conditions
Once again preparation before incubation is one of the keys to success at hatching. Try to obtain the best thermometers you can afford and purchase at least two to be certain. Also try to purchase a good quality humidity gauge, the dial type gives a fairly accurate reading but should be replaced annually. Some incubators have automatic temperature and humidity settings but do double check the readings are accurate. Incubators should be run for days to fine tune adjustments before the eggs are incubated. The owner should check the incubation requirement for their breed or species and set the incubator conditions accordingly. It is often useful to experiment with varying amounts of water in the trays and/or vents open/closed to determine what is required to increase or lower humidity. For example, half the trays full of water may give a humidity reading of 50%, no water in the trays may give a reading of 30% etc. Also this gives the owner time to adjust and account for their local weather humidity. Somebody living in a humid area will get a very different humidity reading compared to somebody living in a dry arid area even if they were using identical incubators and settings. Once the eggs are in the incubator this is NOT the time to experiment, give yourself time to become completely familiar with your incubator. One final tip is to perform your test runs with infertile eggs in the incubator. Often people test run their incubators empty only to find the settings are different once eggs are added. However be aware that settings should be left alone over the first 24 hours as the eggs heat up and the incubators thermostat begins to finely regulate the temperature. Once set, eggs require stable incubation conditions and embryos may be weakened by repeated adjustments. One final point is that if you are unsure of the temperature to select then always err on the low side. Most viable chicks will hatch if the eggs have been incubated at a slightly lower temperature whereas higher temperatures will often prove lethal. For example we like to incubate Goose eggs at 37.30C but if our incubators thermostat had a half degree swing between cycles then our range would be 36.8 37.30C.
These are our average settings for a variety of breeds and species;
Geese - 37.3C/99.1F, Humidity 35 - 45%
Ducks - 37.5C/99.5F, Humidity - 55%
Chickens - 37.5C/99.5F, Humidity 45 - 50%
Parrots - 37.3C/99.1F, Humidity - 50%
Rheas - 36.3C/97.3F, Humidity - 50%
Adequate Turning Programme
The importance of adequate turning is often overlooked and yet the embryos health and moisture loss can be linked indirectly to turning. For most eggs we incubate on their sides unless they have damaged air cells in which case we incubate vertically. They are not turned at all for the first 24 hours and then we switch on the auto-turning mechanism of the incubator which turns them hourly. Once a day we also hand turn them and place them on the opposite side which is why theyre marked with a cross and a circle. This ensures complete turning of the egg over a 24 hour period. For hand turning the minimum would be three times but five times daily is better. Always hand turn the eggs an odd number of times daily as this ensures that each night the opposite side of the egg is incubated upwards.
It is widely assumed that turning is to prevent sticking of the membranes and to ensure the growing embryo has access to fresh nutrients and fluid within the whole egg. However from the first week a sac develops from the embryos naval area and rapidly grows as a vascular balloon which encases the embryo, yolk and amniotic sac. This 'balloon' is covered with a generous supply of blood vessels that lead directly back to the embryo. Over the first weeks the Chorio-Allantoic membrane grows to completely line the inner surface of the entire egg-shell. As the membrane and its blood vessels lie adjacent to the shell it places the blood vessels in near contact with the pores of the egg-shell. Therefore gas and moisture exchange can occur easily, ridding the embryo of carbon dioxide and excess water molecules and also absorbing oxygen for the growing chicks needs. This vital membrane meets the growing embryos internal respiration needs until it is mature enough to use its own lungs for pulmonary (lung) respiration. Research has shown that inadequate turning of the egg in the first two thirds of incubation can lead to stunting in the growth of the chorio-allantoic membrane. This would reduce the membrane's ability to provide adequate gas and water molecule exchange to meet the growing chicks needs and lead to a late death.
Monitoring and Adjustment
We monitor the eggs progress throughout incubation without any negative effect on our hatching rate. We have often performed daily candling, photographed the developing embryo and weighed the eggs without any harm coming to the growing chick. It is in fact VITAL to continue to weigh the egg. We start after one weeks incubation and record the new weight. What you are aiming to do is keep a record of the eggs weight as it progresses through incubation. After one third of the incubation period it should have lost 5% of its weight, after two thirds of the incubation period the egg should have lost 10% of the original weight etc. Overall the egg should be on course to lose the required 16% by hatching. If the egg has lost too much then adjust the humidity higher. If insufficient weight has been lost then lower the humidity. After the first week eggs can be weighed every three days if they appear to be off target and require more careful monitoring and incubator adjustments.
The important rule here is that almost all birds eggs need to lose 16% of their weight through moisture loss to produce a healthy hatchling. We have applied this to many species including poultry, waterfowl, parrots, doves, rheas, soft billed birds etc. By weighing the egg the owner can adjust the humidity to reach the target weight loss. That way different sized eggs, thick or thin shelled eggs, different species can all be incubated successfully at optimum conditions which produces the target weight for the individual egg.
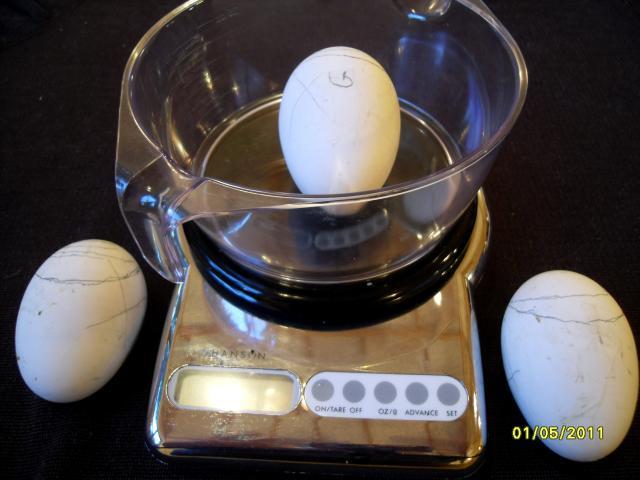
Fertile Goose eggs being weighed and monitored. The outline of the air cell is drawn onto the shell to show its rapid size increase. These eggs are now not turned.
Lockdown
We find this one of the most controversial topics of incubation which appears to be often used as a blanket approach to all eggs without consideration of the individual eggs requirements. The term Lockdown is usually used to describe the conditions required by eggs in the final phase of incubation. Popular opinion appears to suggest that the egg should not be turned and the humidity increased to around 70% from about 3 days before hatching is expected.
We do not use the same method as we believe a more flexible approach is required to account for variations within eggs. If the owner has observed the development of the air cell during incubation then at about 3-4 days before hatching is expected the air cell suddenly enlarges and tends to dip down one side. Within a day shadows can usually be seen entering the air cell as the chick manoeuvres into its final hatching position. At this point the owner should stop turning and place the eggs in a position where the greater amount of air cell is uppermost. All eggs enter this same sequence and the movement of shadows within the air cell is an indicator that the egg should not be turned, however we do not change the temperature or humidity. Even if eggs cannot be candled to see the shadows the change in air cell can be seen through the thickest of egg shells.
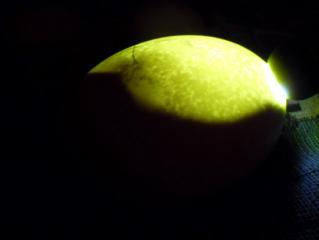
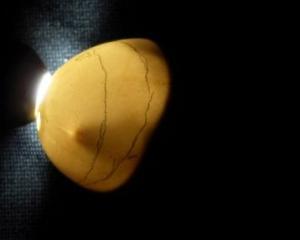
A Rhea egg can be viewed on candling to detect shadows in the air cell and confirm internal pipping.
Within another day the shadows have become even larger and sometimes the outline of the beak can be seen in the air cell itself. By now the chick should have pierced the membrane of the air cell and will have begun breathing which can be confirmed by holding the broad end of the egg to the ear and listening for a faint rhythmic clicking noise. At the same time weighing of the egg should also confirm that the target weight loss has been achieved. If the egg has lost the required amount of weight then humidity can be raised to around 70% in anticipation of external pipping over the next 12-24 hour period. For eggs which have lost 13% or less we do not increase the humidity as we try to achieve the highest moisture loss possible. Only when these eggs externally pip do we enter lockdown.
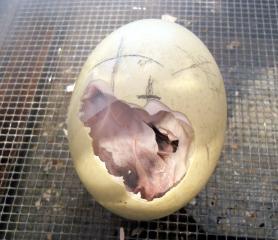
A Gosling's beak can be seen within the air cell and the clicking noise confirmed breathing.
The reason for delaying lockdown is really just common sense. If an egg has lost insufficient moisture 3 days before it is due to hatch there can be no benefit in increasing the incubators humidity which will only slow down or stop further moisture loss. The egg shell has yet to be breached by the chicks beak and conditions remain the same internally. There appears to be no benefit to the chick by increasing humidity when it is simply not required.
Our understanding is that purpose of Lockdown is to provide conditions to enable the chick to hatch. Once a hole and/or pip has been made in the shell then there is a risk of premature drying of the membranes and the higher humidity prevents this happening. Raising the humidity before this time can only be justified if the egg has lost too much weight and further moisture loss needs to be prevented. It is worth considering that many late deaths occur before internal pipping due to insufficient moisture loss. The chicks blood system is over-loaded with fluid and causes swelling of the bodys soft tissues as the heart fails due to its increased workload. The chicks is simply too congested and weakened to undergo the stressors of the hatching process.
If these eggs are later examined then often they appear shrink-wrapped; but even eggs that are opened with live chicks appear that way as the membrane follows the contours of the chick. As a good rule of thumb small sticky chicks have usually lost too much moisture whereas large bulky chicks that are wet have usually lost insufficient moisture.
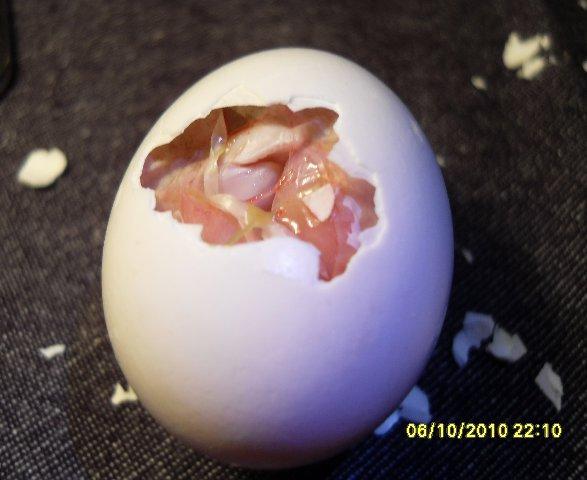
Even though this Greenwing Macaw egg has been opened to assist it the higher humidity has prevented excessive drying and the chick sucessfully hatched.
A Rhea is assisted and the slit made on internal pipping can be seen. The egg was taped and hatched 24 hours later.
So in summary it can be seen that hatching success can be increased by sound preparation before incubation commences. One of the useful and best scientific tools available to aid hatching is a set of scales. By measuring and monitoring the rate of weight loss from an egg the owner can adjust their incubation parameters to suit their environment conditions, their incubator and individual egg.
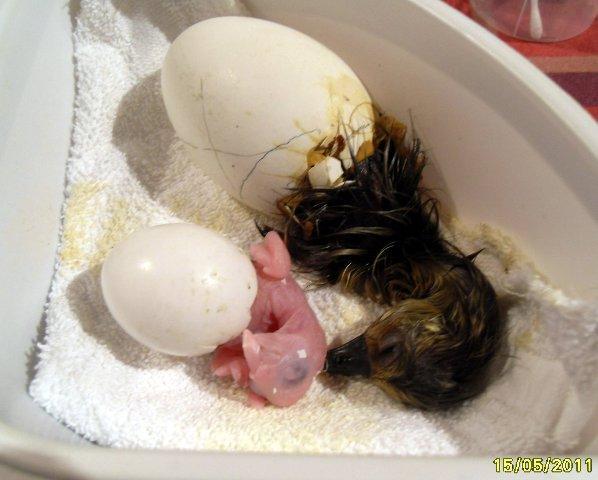
A baby Blue & Gold Macaw and a Gosling hatch together. Both eggs lost 16% weight and were incubated in the same incubator.
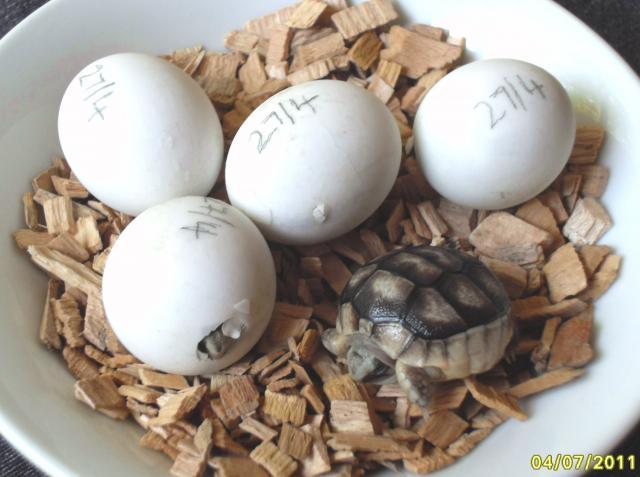
Even our Tortoise eggs show shadowing of the air cell and the principles of incubation applied.
We hope this information helps you and increases your incubation sucess rates. Good luck with all your hatchings
At the moment many of the questions we answer are usually related to humidity problems. This is our new Guide to Humidity, Weighing and Lockdown. I hope readers will find it useful and that it helps to increase their sucess rates
Links to our other articles and incubation information can be found on our website; http://oakgarthgeese.com
Pete
Guide to Humidity, Weighing and Lockdown
In all the incubation questions we are asked humidity and lockdown appear to be the commonest problematic areas. Frequently we are asked for the correct humidity levels for eggs and when lockdown should commence. However there is NO single prescriptive answer and the owner must accept that they have to flexible in their approach to incubation of their own eggs and consider local environment variations. Hopefully this article will help the operator in deciding what conditions are best for their own incubation practices and make the required adjustments to improve their hatch rates.
In deciding the required humidity level for incubation most owners opt for around 50% relative humidity with an increase to around 70% about 3 days before hatching is due. However although incubation practices at these levels brings success for many, others struggle to obtain a successful hatch. The main cause of failure is that the owner has not considered their eggs as individual or accounted for local humidity levels. An increased success rate is usually obtained when these issues are addressed. It appears that there are 6 key areas for the owner to address before hatch rates improve;
Egg Quality and Viability
Egg Marking, Weighing and Storage
Stable Incubation Conditions
Adequate Turning Programme
Monitoring and Adjustment
Lockdown
Egg Quality and Viability
Improved hatch rates starts with the stock birds and the quality of the eggs. The stock birds should be from healthy and vigorous lines. Using weak or unhealthy stock will result in poor quality eggs and embryos which also lack health and vigour. The parent birds should also be on a good nutritional diet that helps them to produce eggs of high quality. Certainly it has been demonstrated with geese that early season eggs often have thicker shells than eggs produced towards the end of the season. To produce the egg the female draws upon her food reserves and to make the shell utilises calcium that has been stored in the bones prior to the breeding season. Giving the birds access to calcium and grit helps but this should be done year round so the female starts to lay down new reserves once egg laying has finished. The quality of the egg shell will influence the required humidity level as thin shelled or porous eggs will lose moisture at a faster rate and may require an overall higher humidity to compensate for this.
Egg Marking, Weighing and Storage
This is one of the most critical areas that owners should address as success may depend on the work done at this point. Eggs should be collected fresh and checked for damage. If badly soiled then we will usually wash them in tepid running water and dry them with paper kitchen roll. Next the eggs are weighed on a gram scale. We use a cheap kitchen weighing scale which measures up to 500 gram and easily obtainable. Then using a soft pencil, eggs are coded with parents details, date of laying and the weight. A cross is drawn on one side and a circle on the opposite. Eggs are then stored in a cool room (about 50F), laid on their sides and turned once daily. Usually we like to set eggs that are no more than 10 days old for best results.
This simple procedure pays dividends later. By checking and weighing the eggs fresh the owner has a starting point for incubation humidity settings. Once eggs are stored for any length of time then the weight becomes less accurate. For healthy chicks to hatch, eggs must lose approximately 15-16% of their fresh laid weight. Even in storage eggs will start to lose moisture (and therefore weight) which is why a cool room helps to maintain stable conditions. For shipped eggs we would recommend the same procedure as soon as received and then leave the eggs to stand for 24 hours. It is even more helpful if the owner candles the shipped eggs as this may reveal damage to the air cell and even hairline cracks.
Overall we aim for our eggs to lose approx. 15-16% of their fresh laid weight by External Pipping to produce healthy hatchlings. For example, if a fresh laid Goose egg weighs 150 grams then its needs to lose 22.5 grams by approx Day 28 to achieve a 15% weight loss. This would be a weekly weight loss of 5.6 grams. By checking weekly weights the incubator humidity can be adjusted accordingly so the target weight is achieved. After experience is gained then the owner will be able to assess weight loss visually by checking the size of the developing air cells but its not as precise as weighing.
A Goose egg is weighed before marking.
Information about the egg is written onto the shell to avoid later confusion.
Stable Incubation Conditions
Once again preparation before incubation is one of the keys to success at hatching. Try to obtain the best thermometers you can afford and purchase at least two to be certain. Also try to purchase a good quality humidity gauge, the dial type gives a fairly accurate reading but should be replaced annually. Some incubators have automatic temperature and humidity settings but do double check the readings are accurate. Incubators should be run for days to fine tune adjustments before the eggs are incubated. The owner should check the incubation requirement for their breed or species and set the incubator conditions accordingly. It is often useful to experiment with varying amounts of water in the trays and/or vents open/closed to determine what is required to increase or lower humidity. For example, half the trays full of water may give a humidity reading of 50%, no water in the trays may give a reading of 30% etc. Also this gives the owner time to adjust and account for their local weather humidity. Somebody living in a humid area will get a very different humidity reading compared to somebody living in a dry arid area even if they were using identical incubators and settings. Once the eggs are in the incubator this is NOT the time to experiment, give yourself time to become completely familiar with your incubator. One final tip is to perform your test runs with infertile eggs in the incubator. Often people test run their incubators empty only to find the settings are different once eggs are added. However be aware that settings should be left alone over the first 24 hours as the eggs heat up and the incubators thermostat begins to finely regulate the temperature. Once set, eggs require stable incubation conditions and embryos may be weakened by repeated adjustments. One final point is that if you are unsure of the temperature to select then always err on the low side. Most viable chicks will hatch if the eggs have been incubated at a slightly lower temperature whereas higher temperatures will often prove lethal. For example we like to incubate Goose eggs at 37.30C but if our incubators thermostat had a half degree swing between cycles then our range would be 36.8 37.30C.
These are our average settings for a variety of breeds and species;
Geese - 37.3C/99.1F, Humidity 35 - 45%
Ducks - 37.5C/99.5F, Humidity - 55%
Chickens - 37.5C/99.5F, Humidity 45 - 50%
Parrots - 37.3C/99.1F, Humidity - 50%
Rheas - 36.3C/97.3F, Humidity - 50%
Adequate Turning Programme
The importance of adequate turning is often overlooked and yet the embryos health and moisture loss can be linked indirectly to turning. For most eggs we incubate on their sides unless they have damaged air cells in which case we incubate vertically. They are not turned at all for the first 24 hours and then we switch on the auto-turning mechanism of the incubator which turns them hourly. Once a day we also hand turn them and place them on the opposite side which is why theyre marked with a cross and a circle. This ensures complete turning of the egg over a 24 hour period. For hand turning the minimum would be three times but five times daily is better. Always hand turn the eggs an odd number of times daily as this ensures that each night the opposite side of the egg is incubated upwards.
It is widely assumed that turning is to prevent sticking of the membranes and to ensure the growing embryo has access to fresh nutrients and fluid within the whole egg. However from the first week a sac develops from the embryos naval area and rapidly grows as a vascular balloon which encases the embryo, yolk and amniotic sac. This 'balloon' is covered with a generous supply of blood vessels that lead directly back to the embryo. Over the first weeks the Chorio-Allantoic membrane grows to completely line the inner surface of the entire egg-shell. As the membrane and its blood vessels lie adjacent to the shell it places the blood vessels in near contact with the pores of the egg-shell. Therefore gas and moisture exchange can occur easily, ridding the embryo of carbon dioxide and excess water molecules and also absorbing oxygen for the growing chicks needs. This vital membrane meets the growing embryos internal respiration needs until it is mature enough to use its own lungs for pulmonary (lung) respiration. Research has shown that inadequate turning of the egg in the first two thirds of incubation can lead to stunting in the growth of the chorio-allantoic membrane. This would reduce the membrane's ability to provide adequate gas and water molecule exchange to meet the growing chicks needs and lead to a late death.
Monitoring and Adjustment
We monitor the eggs progress throughout incubation without any negative effect on our hatching rate. We have often performed daily candling, photographed the developing embryo and weighed the eggs without any harm coming to the growing chick. It is in fact VITAL to continue to weigh the egg. We start after one weeks incubation and record the new weight. What you are aiming to do is keep a record of the eggs weight as it progresses through incubation. After one third of the incubation period it should have lost 5% of its weight, after two thirds of the incubation period the egg should have lost 10% of the original weight etc. Overall the egg should be on course to lose the required 16% by hatching. If the egg has lost too much then adjust the humidity higher. If insufficient weight has been lost then lower the humidity. After the first week eggs can be weighed every three days if they appear to be off target and require more careful monitoring and incubator adjustments.
The important rule here is that almost all birds eggs need to lose 16% of their weight through moisture loss to produce a healthy hatchling. We have applied this to many species including poultry, waterfowl, parrots, doves, rheas, soft billed birds etc. By weighing the egg the owner can adjust the humidity to reach the target weight loss. That way different sized eggs, thick or thin shelled eggs, different species can all be incubated successfully at optimum conditions which produces the target weight for the individual egg.
Fertile Goose eggs being weighed and monitored. The outline of the air cell is drawn onto the shell to show its rapid size increase. These eggs are now not turned.
Lockdown
We find this one of the most controversial topics of incubation which appears to be often used as a blanket approach to all eggs without consideration of the individual eggs requirements. The term Lockdown is usually used to describe the conditions required by eggs in the final phase of incubation. Popular opinion appears to suggest that the egg should not be turned and the humidity increased to around 70% from about 3 days before hatching is expected.
We do not use the same method as we believe a more flexible approach is required to account for variations within eggs. If the owner has observed the development of the air cell during incubation then at about 3-4 days before hatching is expected the air cell suddenly enlarges and tends to dip down one side. Within a day shadows can usually be seen entering the air cell as the chick manoeuvres into its final hatching position. At this point the owner should stop turning and place the eggs in a position where the greater amount of air cell is uppermost. All eggs enter this same sequence and the movement of shadows within the air cell is an indicator that the egg should not be turned, however we do not change the temperature or humidity. Even if eggs cannot be candled to see the shadows the change in air cell can be seen through the thickest of egg shells.
A Rhea egg can be viewed on candling to detect shadows in the air cell and confirm internal pipping.
Within another day the shadows have become even larger and sometimes the outline of the beak can be seen in the air cell itself. By now the chick should have pierced the membrane of the air cell and will have begun breathing which can be confirmed by holding the broad end of the egg to the ear and listening for a faint rhythmic clicking noise. At the same time weighing of the egg should also confirm that the target weight loss has been achieved. If the egg has lost the required amount of weight then humidity can be raised to around 70% in anticipation of external pipping over the next 12-24 hour period. For eggs which have lost 13% or less we do not increase the humidity as we try to achieve the highest moisture loss possible. Only when these eggs externally pip do we enter lockdown.
A Gosling's beak can be seen within the air cell and the clicking noise confirmed breathing.
The reason for delaying lockdown is really just common sense. If an egg has lost insufficient moisture 3 days before it is due to hatch there can be no benefit in increasing the incubators humidity which will only slow down or stop further moisture loss. The egg shell has yet to be breached by the chicks beak and conditions remain the same internally. There appears to be no benefit to the chick by increasing humidity when it is simply not required.
Our understanding is that purpose of Lockdown is to provide conditions to enable the chick to hatch. Once a hole and/or pip has been made in the shell then there is a risk of premature drying of the membranes and the higher humidity prevents this happening. Raising the humidity before this time can only be justified if the egg has lost too much weight and further moisture loss needs to be prevented. It is worth considering that many late deaths occur before internal pipping due to insufficient moisture loss. The chicks blood system is over-loaded with fluid and causes swelling of the bodys soft tissues as the heart fails due to its increased workload. The chicks is simply too congested and weakened to undergo the stressors of the hatching process.
If these eggs are later examined then often they appear shrink-wrapped; but even eggs that are opened with live chicks appear that way as the membrane follows the contours of the chick. As a good rule of thumb small sticky chicks have usually lost too much moisture whereas large bulky chicks that are wet have usually lost insufficient moisture.
Even though this Greenwing Macaw egg has been opened to assist it the higher humidity has prevented excessive drying and the chick sucessfully hatched.
A Rhea is assisted and the slit made on internal pipping can be seen. The egg was taped and hatched 24 hours later.
So in summary it can be seen that hatching success can be increased by sound preparation before incubation commences. One of the useful and best scientific tools available to aid hatching is a set of scales. By measuring and monitoring the rate of weight loss from an egg the owner can adjust their incubation parameters to suit their environment conditions, their incubator and individual egg.
A baby Blue & Gold Macaw and a Gosling hatch together. Both eggs lost 16% weight and were incubated in the same incubator.
Even our Tortoise eggs show shadowing of the air cell and the principles of incubation applied.
We hope this information helps you and increases your incubation sucess rates. Good luck with all your hatchings
Last edited:


")
