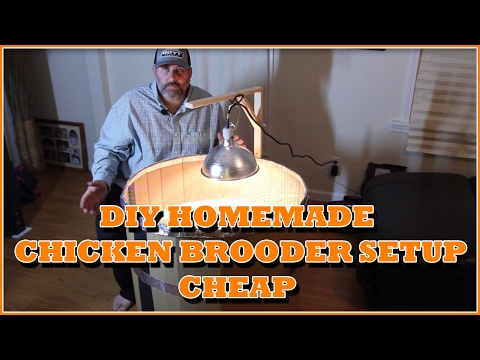
Here is my DIY Homemade Chicken Brooder Setup

FourShuesFarm

In the Brooder
Jan 16, 2017
69
14
46
0.jpg


This brooder cost me almost nothing, and I don't have to worry about chicks trampling and smashing each other in the corner. Also its raised up off the floor so drafts and cold floors don't affect it. It safe from cats and such,it can hold a bunch of chicks, and the chicks seem to really like it. Ill post an update video showing the babies at home in it.
 
This brooder cost me almost nothing, and I don't have to worry about chicks trampling and smashing each other in the corner. Also its raised up off the floor so drafts and cold floors don't affect it. It safe from cats and such,it can hold a bunch of chicks, and the chicks seem to really like it. Ill post an update video showing the babies at home in it.

Have you put the chicks in it yet?? They will probably fry from the heat! All brooders need to be built with a heated end and a non heated in----Not the whole thing one temp. The chicks need a area to cool down. I would highly suggest not to build like this---I am sorry man---just looking out for the chicks. Now if you were to vent one side--good---just wire mesh, put a smaller bulb in and drop the light way down about a foot off their floor on the other side to where it would be around 95 to 100(for the first few days) just on that side it would be safer---then they could move to the cooler area if needed. Their food and water needs to not be in the heated area. Good Luck!!
 
Last edited:
They have been in there for 2 days (actually day 3 now). The light is on the edge of one side of the 3 foot circle. The temp in the middle is 100 degrees, then it lowers as you move away from the light. They are all happy and enjoying life. I used a laser thermometer to measure temps well before the chicks went in. It works great actually,
 
They have been in there for 2 days (actually day 3 now). The light is on the edge of one side of the 3 foot circle. The temp in the middle is 100 degrees, then it lowers as you move away from the light. They are all happy and enjoying life. I used a laser thermometer to measure temps well before the chicks went in. It works great actually,

I am glad they are doing good for you, some might build one and would not know how to check the temp or a laser and deeeeep fry them in there. I have raised more than 6000 in one year, with 19 heated brooders and Have never used a 250 watt heat bulb because I have never seen where it was needed and they draw a lot of electricity---so I worry when some do use them. I use a lower wattage bulbs and lower the light where the temp is 100 or so on one side the brooder which allows them the far side as a cool down. In the wrong hands those 250 watt heat lights have kill a many chicks. Good Luck!!
 
Last edited:
I commend you on how well done and clear your video is, and I really like the hardware cloth "lid" you put on there. It's a neat, clean looking brooder. I have the same concerns as everyone has already expressed, but then as my friends @PD-Riverman and @dhelzel know, I don't ever use heat lamps for chicks and I brood them directly outside where they'll be living for the rest of their lives. That's simply my choice. It seems to me that 100 degrees anywhere in the brooder is simply too too high. They might be doing okay now, but in your measurements you didn't take into account their own body heat being given off, heat radiating off the water, the water container and the feeder, and their activity level. Water absorbed into the wood and the bedding is going to raise humidity in there as well. It also doesn't seem to me that they have any respite from the glare of the light itself - no darker little area where they can have a few minutes out of that spotlight.

But one of the things that caught my eye was in the first post where you said it would hold "a bunch of chicks" and then further down in another post you said that they have a 3 foot circle. Um, I'm not the brightest crayon in the box, and math is not my strong suit, so while I know how to find the square footage of a rectangle or square, I don't know how to find the area of a circle. I can tell you that by the time a feeder and a waterer are in there and you have chicks added to the mix, they will be out of adequate space yesterday.

I think there's a simple solution to those issues without scrapping your entire brooder, which looks great, by the way. How about putting another box, same basic configuration, off to one side and connected with a little opening? They could get away from the heat and brightness, you could put the food and water in the "dining room" which would keep those at a nicer temperature, and still give them a lot more space.

It's so hard, when you know that someone has put so much effort into something, to say, "Wait, I think there are some problems." And it's even harder to be the one who put in all the hard work and shared it only to feel like folks don't like it. It's not a matter of "not liking" it....I just think that the key here that none of us want chicks that survive, we want chicks that thrive. So I hope you take what we're saying in the spirit it was intended.
Well I feel so dumb now, The bulb is actually 125 watts. The 250 watt bulbs were right next to bulb I purchased. I noticed it today when I was at the store. I was wondering why my temps were so low as compared to what a 250 watt would be doing. Anyways, it's really only a 125 watt.

Thanks for the feedback. I really appreciate it. I suppose I didn't choose my words wisely when making that video. I knew when building this brooder that they would need an upgrade if my hatch rate was above normal (which it was considering). I really didn't know what size brooder I needed when I built it. I wasn't sure what the hatch rate was going to be. I got 22 eggs and all but four had major detached air cells. Also when I was considering a DIY brooder, I was seeing folks use Rubbermaid containers, cardboard boxes ect.. Many of these options were on the floor, and that's one of the reasons I came up with the spool brooder. I don't like working on the floor unless I have to.

When these buys get bigger week 3 or so I will move them. Ill be sure to post a video of DIY brooder Ver. 2.0. It will most likely be outside in the garage (no heat), but It will be off the floor and I will try to make another round design.

Lastly for the amount of time and money I have in this brooder (hardly none). I will view it as a good design for a small brooder and consider it a stepping stone on my journey to learn to raise chickens. Again thanks for the feedback. Have a great day, Tom
 
Last edited:
Here's another stepping stone you may consider....raising them outside in the coop from day one. That way you don't have the mess in your house and the chicks are acclimated to the outdoors and where they will be living more quickly. No need for building brooders at all that way....many even use a cardboard box. Some brood out in utility wagons, especially with large numbers of chicks. I brood in the coop with the flock and use hay bales for my brooder surround.

Here's another stepping stone..... https://www.backyardchickens.com/t/956958/mama-heating-pad-in-the-brooder-picture-heavy-update

More stepping stones....

  1. A true, cultivated deep litter in the coop and run using a variety of materials and building it deep.
  2. Fermented feed from day one
  3. Brooding right on the adult coop litter for exposure to the flock's pathogens when it can do the most good
  4. Nipple waterers to keep brooder and water clean and dry
  5. If absolutely having to use a lamp, use a red bulb and a long style brooder, giving chicks relief from the lamp by providing a cool end and warm end. Wouldn't even go amiss to give them shelter under which to huddle away from the light when they are sleeping. It's not natural to have a light burning all the time on chicks and can give them pasty butt issues.
 

New posts New threads Active threads

Back
Top Bottom