Hi All from Australia,
The following is a "Sticky" post that i wrote for an Aussie website that I would like to share here.
It is basically a collection of information to try to help people whether they are experienced or not and includes a number of links to posts by members of backyardpoulty an Australian website dedicated to keeping poultry in our backyards.
Now I am treading an fairly fine line, as I am including links to an outside forum., but please be assured it is to only share information. To this end I would invite any members of BYC to message me with links to topics on BYC about homemade incubators or other resources out on the WWW that you think would be good to add.
As I get to know and explore BYC I will also add as much content as I can.
Regards
Trev
"I have thought for awhile that a centralized resource for members and visitors who are interested in making their own incubator would be really handy.
So here it is, a work in progress that I will add some photos to soon.
I must say a huge thanks to Fizzle for taking the time to track down a bunch of links to posts by other members and external links.
If you find any thing that needs to be added, edited or seems incorrect please dont hesitate to let me know.
Finally a disclaimer.
At a number of points I have stated that some of the work should be done by an Electrician. Please dont ask myself or any of the other members of BYP for advice or instructions on how to do this yourself. While we are more than happy to give what help we can on any other subject, this is one thing that we will refuse every time.
Ignorance/inexperience plus 110/240volts is a fatal mix.
A homemade incubator can be as simple or as complex as you wish to make it.
This will depend on your budget, your making skills/abilities and what materials you are able to source to make it.
Like a recipe, there are a number of essential ingredients that cannot be left out otherwise the recipe fails or gives very poor results. Then there are optional ingredients that add to the success of the end result.
Essential ingredients to make a successful incubator. (Still air type)
a. Some form of enclosure. It could be a foam esky, a cardboard box or a purpose made enclosure made of wood. The purpose of the enclosure is to maintain a stable environment within it and as a support for all the other bits needed.
b. A heat source. This could be a lamp, wired in lights or a heating element.
I have seen old fashioned incubators that used a kerosene lantern to provide the heat and others LPG, these forms of heating must be external to the incubation chamber as they consume oxygen from inside it and produce noxious exhaust gasses.
c. A thermostat to maintain the temperature within the incubator at the correct level for the type of eggs in it e.g. Chooks eggs require 37.75 degrees Celsius.
d. A reliable thermometer to monitor the temperature inside the incubator.
You need to calibrate the thermometer against a known standard so that you know exactly how far out it is. You can then compensate for any inaccuracies, for example if you had a thermometer that reads 2 degrees low and incubated eggs at 37.75 indicated by that thermometer, you would actually be cooking the eggs at 39.75 degrees. This would result in a poor hatch rate, a higher incidence of chicks with problems leading to early deaths and also some suggest that female embryos are more susceptible to high temps leading to a higher rate of males hatching.
e. Moisture in the form of Humidity. We provide this by putting a tray of water in the incubator that slowly evaporates keeping the air moist inside the incubator.
The eggs breathe via pores in the shells as the embryos form to exhaust waste products, CO2 etc, part of this respiration includes water. If the eggs loose too much water, this results in a poor hatch rate and a higher incidence of chicks with problems leading to early deaths.
f. Ventilation. You need to provide ventilation holes to allow stale air out and fresh air in. This can be a juggling act to provide sufficient ventilation and still maintain the correct temp in the incubator.
One member of BYP (chookyinoz) places a desk lamp near the vent holes on his foam incubator so that the air being drawn into the incubator is already warm. Chookyinoz uses this strategy to minimize the effect of large ambient temperature drops impacting on the operation of his incubator.
g. Turning the eggs. Chooks turn the eggs that they are brooding constantly. In an artificial incubation environment we need to turn the eggs 180 degrees at least twice a day. To aid this, when setting the eggs in the incubator, mark them with a cross on one side and an O on the other directly opposite. This way when you turn the eggs you know that they are right. The reason the eggs need to be turned is to prevent the embryo from floating against the inside of the shell and sticking to it. This will result in the embryo dying or not being able to hatch correctly.
Optional ingredients or Garnish. (Fan forced and turning mechanisms)
a. A small fan to circulate the air inside the incubator to ensure a constant temperature at any point in the incubator. The easiest way to do this is to use a computer fan wired up to a 12v wall transformer or power pack.
b. A semi-auto or fully automatic turning system to reduce the time it takes to turn a large number of eggs.
c. An external refill method for refilling the water trays.
d. A humidity measurement device (Hygrometer) or use a wet bulb thermometer. This is really optional as an accurate hygrometer is expensive.
Thermometers.
You can purchase a number of different types.
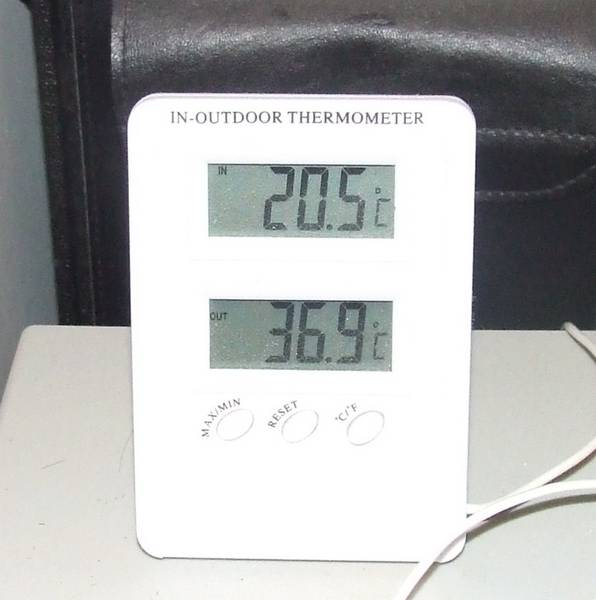
Electronic or digital style.
The ones that measure inside and outside temp are handy as you can place the thermometer outside the incubator and run the external sensor lead into the incubator. This way you can monitor ambient and internal temp.

How accurate these are is totally dependant on the makers tolerances. On the instruction sheet or package it will state accuracy within plus/minus X degrees. Obviously the smaller X is the better. If the literature doesnt state accuracy at all, dont buy it!
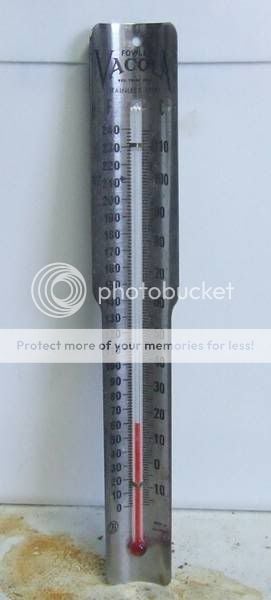
Alcohol filled.
Easily identified as they are filled with red or blue liquid, again how accurate they are is dependant on the manufacturer. An example of an alcohol filled thermometer is the Vacola thermometers used for bottling fruit and veg. I have three of them and they differ in readings across a range of 3 degrees.
Purpose made incubator thermometers.
Are available from most incubator manufacturers including wet bulb thermometers. They can be quite expensive.
Oral or Rectal mercury filled.
Are useless for incubation, dont even bother.
Calibration.
Compare the thermometer against a known standard, this could be a professionally calibrated thermometer or simply use it to measure the body temp of a healthy adult. Note the difference between the readings on the back of the unit (so you dont forget) and add or subtract this difference from what the thermometer reads.
Thermostats.
Due to the nature of how they work, thermostats will not give a perfect flat temperature inside the incubator. As they switch the heat on and off there is a slight lag which results in slightly higher temperature than the set point at switch off and a slightly lower temperature at switch on. This as called the temperature swing. What we are interested in is the average between these 2 points.
Again you can purchase a number of different types.
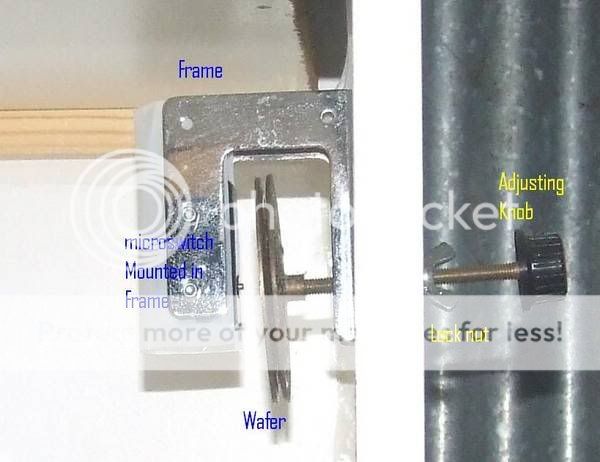
Wafer/micro switch style.
This has a sealed metal wafer that expands as it heats up and contacts a micro switch turning off the heat source, as the wafer cools it contracts away from the micro switch turning the heat back on. It is adjusted by screwing the wafer closer or further from the micro switch. When they are set up correctly they have a fairly low swing between high and low switch points.
Requires wiring that should be performed by an electrician.
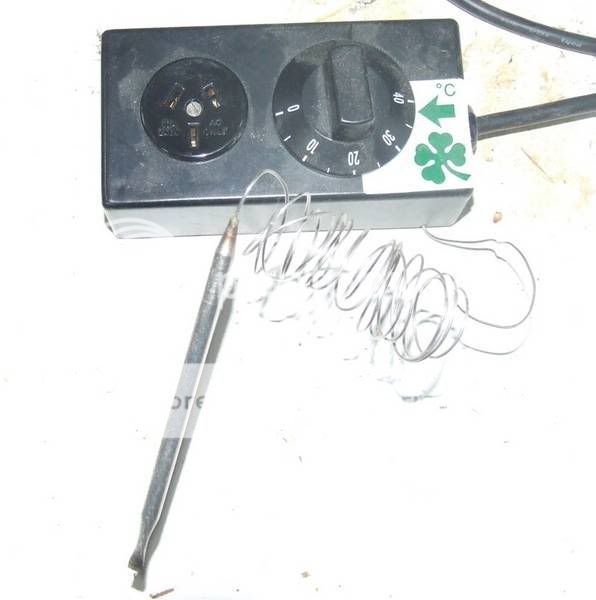
Electric capillary style.
This has a sealed capillary tube with a sensor bulb on the end and a wafer on the other end inside the control box. The tube is filled with a liquid that expands and contracts as it heats and cools, this in turn expands and contracts the wafer activating a micro switch in the same way as a WAFER STYLE unit does.
They are commonly sold as reptile enclosure thermostats and have a large swing between high and low switch points due to the nature of their design. These units are normally self contained and fitted with a 3 pin socket to plug lights etc into.
I have found this type of thermostat to be totally unsuited to incubating chicken eggs
Electronic or digital.
These use an electronic sensor to monitor temperature inside the incubator, a Microprocessor then decides whether to turn the heat on or off based on the sensor reading and its programmed set points.
You can purchase units with and without digital temperature read outs, units that are preset to 37.75 degrees or can be set for different temperatures (allows different species to be incubated), some even have audible alarms for overtemp and undertemp.
A good example of a digital thermostat will have a very small swing between high and low temperature.
Some types may require wiring that should be performed by an electrician.
Heat source.
The most common method is to use incandescent light globes. Either use a prewired lamp or wired in light fittings.
If you do use light globes, fit at least two incase one blows during incubation. This way way you wont loose all of your heating.
Any method used that requires wiring 240volt AC electrical supply should be performed by a qualified licensed electrician."
*edited to remove links to outside message board*
External Links and resources.
How to build an incubator
http://members.aol.com/CGFARMS/buildincubator.html
How to build a candler
http://www.urbanext.uiuc.edu/eggs/res25-candler.html
Brinsea incubation handbook link page
Andy suggests page 16 for relative humidity chart.
http://www.brinsea.co.uk/information/free-downloads/39/
MULTIQUIP, the company that makes the E1 and E2 incubators sell a "do it yourself" thermostat and heater element kit. Expensive but might save some headaches.
http://www.multiquip.com.au/searchdb.php?search_terms=Thermostat Kits
Incubator made from a foam esky
http://www.bigredcouch.com/journal/archives/2007/08/homemade_incuba.html
And another one in a foam box
http://www.homemadeincubator.co.uk/2008/06/how-to-build-a-homemade-incubator/
Incubators in an old fridge and pie oven.
http://www.utm.edu/departments/cece/idea/incu.shtml
A forum discussion about home made incubators from a USA chook forum.
https://www.backyardchickens.com/forum/viewtopic.php?pid=927013
A potential source for heat cords and thermostats used by reptile breeders that could be used for chookens.
http://www.ultimatereptiles.com.au/...e&category_id=39&Itemid=64&vmcchk=1&Itemid=64
A PDF article on making a Kerosene incubator, it is also a gold mine of info on natural and artificial incubation process
http://www.fastonline.org/CD3WD_40/LSTOCK/001/agrodoks/34-e-2004_screen.pdf
I will add more to this as time allows.
Trev
The following is a "Sticky" post that i wrote for an Aussie website that I would like to share here.
It is basically a collection of information to try to help people whether they are experienced or not and includes a number of links to posts by members of backyardpoulty an Australian website dedicated to keeping poultry in our backyards.
Now I am treading an fairly fine line, as I am including links to an outside forum., but please be assured it is to only share information. To this end I would invite any members of BYC to message me with links to topics on BYC about homemade incubators or other resources out on the WWW that you think would be good to add.
As I get to know and explore BYC I will also add as much content as I can.
Regards
Trev
"I have thought for awhile that a centralized resource for members and visitors who are interested in making their own incubator would be really handy.
So here it is, a work in progress that I will add some photos to soon.
I must say a huge thanks to Fizzle for taking the time to track down a bunch of links to posts by other members and external links.
If you find any thing that needs to be added, edited or seems incorrect please dont hesitate to let me know.
Finally a disclaimer.
At a number of points I have stated that some of the work should be done by an Electrician. Please dont ask myself or any of the other members of BYP for advice or instructions on how to do this yourself. While we are more than happy to give what help we can on any other subject, this is one thing that we will refuse every time.
Ignorance/inexperience plus 110/240volts is a fatal mix.
A homemade incubator can be as simple or as complex as you wish to make it.
This will depend on your budget, your making skills/abilities and what materials you are able to source to make it.
Like a recipe, there are a number of essential ingredients that cannot be left out otherwise the recipe fails or gives very poor results. Then there are optional ingredients that add to the success of the end result.
Essential ingredients to make a successful incubator. (Still air type)
a. Some form of enclosure. It could be a foam esky, a cardboard box or a purpose made enclosure made of wood. The purpose of the enclosure is to maintain a stable environment within it and as a support for all the other bits needed.
b. A heat source. This could be a lamp, wired in lights or a heating element.
I have seen old fashioned incubators that used a kerosene lantern to provide the heat and others LPG, these forms of heating must be external to the incubation chamber as they consume oxygen from inside it and produce noxious exhaust gasses.
c. A thermostat to maintain the temperature within the incubator at the correct level for the type of eggs in it e.g. Chooks eggs require 37.75 degrees Celsius.
d. A reliable thermometer to monitor the temperature inside the incubator.
You need to calibrate the thermometer against a known standard so that you know exactly how far out it is. You can then compensate for any inaccuracies, for example if you had a thermometer that reads 2 degrees low and incubated eggs at 37.75 indicated by that thermometer, you would actually be cooking the eggs at 39.75 degrees. This would result in a poor hatch rate, a higher incidence of chicks with problems leading to early deaths and also some suggest that female embryos are more susceptible to high temps leading to a higher rate of males hatching.
e. Moisture in the form of Humidity. We provide this by putting a tray of water in the incubator that slowly evaporates keeping the air moist inside the incubator.
The eggs breathe via pores in the shells as the embryos form to exhaust waste products, CO2 etc, part of this respiration includes water. If the eggs loose too much water, this results in a poor hatch rate and a higher incidence of chicks with problems leading to early deaths.
f. Ventilation. You need to provide ventilation holes to allow stale air out and fresh air in. This can be a juggling act to provide sufficient ventilation and still maintain the correct temp in the incubator.
One member of BYP (chookyinoz) places a desk lamp near the vent holes on his foam incubator so that the air being drawn into the incubator is already warm. Chookyinoz uses this strategy to minimize the effect of large ambient temperature drops impacting on the operation of his incubator.
g. Turning the eggs. Chooks turn the eggs that they are brooding constantly. In an artificial incubation environment we need to turn the eggs 180 degrees at least twice a day. To aid this, when setting the eggs in the incubator, mark them with a cross on one side and an O on the other directly opposite. This way when you turn the eggs you know that they are right. The reason the eggs need to be turned is to prevent the embryo from floating against the inside of the shell and sticking to it. This will result in the embryo dying or not being able to hatch correctly.
Optional ingredients or Garnish. (Fan forced and turning mechanisms)
a. A small fan to circulate the air inside the incubator to ensure a constant temperature at any point in the incubator. The easiest way to do this is to use a computer fan wired up to a 12v wall transformer or power pack.
b. A semi-auto or fully automatic turning system to reduce the time it takes to turn a large number of eggs.
c. An external refill method for refilling the water trays.
d. A humidity measurement device (Hygrometer) or use a wet bulb thermometer. This is really optional as an accurate hygrometer is expensive.
Thermometers.
You can purchase a number of different types.
Electronic or digital style.
The ones that measure inside and outside temp are handy as you can place the thermometer outside the incubator and run the external sensor lead into the incubator. This way you can monitor ambient and internal temp.
How accurate these are is totally dependant on the makers tolerances. On the instruction sheet or package it will state accuracy within plus/minus X degrees. Obviously the smaller X is the better. If the literature doesnt state accuracy at all, dont buy it!
Alcohol filled.
Easily identified as they are filled with red or blue liquid, again how accurate they are is dependant on the manufacturer. An example of an alcohol filled thermometer is the Vacola thermometers used for bottling fruit and veg. I have three of them and they differ in readings across a range of 3 degrees.
Purpose made incubator thermometers.
Are available from most incubator manufacturers including wet bulb thermometers. They can be quite expensive.
Oral or Rectal mercury filled.
Are useless for incubation, dont even bother.
Calibration.
Compare the thermometer against a known standard, this could be a professionally calibrated thermometer or simply use it to measure the body temp of a healthy adult. Note the difference between the readings on the back of the unit (so you dont forget) and add or subtract this difference from what the thermometer reads.
Thermostats.
Due to the nature of how they work, thermostats will not give a perfect flat temperature inside the incubator. As they switch the heat on and off there is a slight lag which results in slightly higher temperature than the set point at switch off and a slightly lower temperature at switch on. This as called the temperature swing. What we are interested in is the average between these 2 points.
Again you can purchase a number of different types.
Wafer/micro switch style.
This has a sealed metal wafer that expands as it heats up and contacts a micro switch turning off the heat source, as the wafer cools it contracts away from the micro switch turning the heat back on. It is adjusted by screwing the wafer closer or further from the micro switch. When they are set up correctly they have a fairly low swing between high and low switch points.
Requires wiring that should be performed by an electrician.
Electric capillary style.
This has a sealed capillary tube with a sensor bulb on the end and a wafer on the other end inside the control box. The tube is filled with a liquid that expands and contracts as it heats and cools, this in turn expands and contracts the wafer activating a micro switch in the same way as a WAFER STYLE unit does.
They are commonly sold as reptile enclosure thermostats and have a large swing between high and low switch points due to the nature of their design. These units are normally self contained and fitted with a 3 pin socket to plug lights etc into.
I have found this type of thermostat to be totally unsuited to incubating chicken eggs
Electronic or digital.
These use an electronic sensor to monitor temperature inside the incubator, a Microprocessor then decides whether to turn the heat on or off based on the sensor reading and its programmed set points.
You can purchase units with and without digital temperature read outs, units that are preset to 37.75 degrees or can be set for different temperatures (allows different species to be incubated), some even have audible alarms for overtemp and undertemp.
A good example of a digital thermostat will have a very small swing between high and low temperature.
Some types may require wiring that should be performed by an electrician.
Heat source.
The most common method is to use incandescent light globes. Either use a prewired lamp or wired in light fittings.
If you do use light globes, fit at least two incase one blows during incubation. This way way you wont loose all of your heating.
Any method used that requires wiring 240volt AC electrical supply should be performed by a qualified licensed electrician."
*edited to remove links to outside message board*
External Links and resources.
How to build an incubator
http://members.aol.com/CGFARMS/buildincubator.html
How to build a candler
http://www.urbanext.uiuc.edu/eggs/res25-candler.html
Brinsea incubation handbook link page
Andy suggests page 16 for relative humidity chart.
http://www.brinsea.co.uk/information/free-downloads/39/
MULTIQUIP, the company that makes the E1 and E2 incubators sell a "do it yourself" thermostat and heater element kit. Expensive but might save some headaches.
http://www.multiquip.com.au/searchdb.php?search_terms=Thermostat Kits
Incubator made from a foam esky
http://www.bigredcouch.com/journal/archives/2007/08/homemade_incuba.html
And another one in a foam box
http://www.homemadeincubator.co.uk/2008/06/how-to-build-a-homemade-incubator/
Incubators in an old fridge and pie oven.
http://www.utm.edu/departments/cece/idea/incu.shtml
A forum discussion about home made incubators from a USA chook forum.
https://www.backyardchickens.com/forum/viewtopic.php?pid=927013
A potential source for heat cords and thermostats used by reptile breeders that could be used for chookens.
http://www.ultimatereptiles.com.au/...e&category_id=39&Itemid=64&vmcchk=1&Itemid=64
A PDF article on making a Kerosene incubator, it is also a gold mine of info on natural and artificial incubation process
http://www.fastonline.org/CD3WD_40/LSTOCK/001/agrodoks/34-e-2004_screen.pdf
I will add more to this as time allows.
Trev
Last edited by a moderator:


