If You Build It -They Will Come! How to encourage EARTHWORMS to colonize your RAISED-BED Organic Vegetable Garden.
I've been an avid Backyard Organic Gardener since my like-minded Mother introduced me to the wonder of it all as a child.I've always loved the MAGIC of planting the smallest of seeds,caring for it,ending up with a BIG, BEAUTIFUL Plant that then produces such WONDERFUL Vegetables!
In recent years,I've enjoyed having HUNDREDS of willing partners at work beside me (or rather beneath me)helping to improve the soil thru aeration, and by leaving the BEST Organic Fertilizer ever made by GOD - Worm Castings!These amazing little partners toil endlessly and accomplish their beneficial task selflessly behind the scenes with minimal encouragement.All one has to do is provide the proper environment and they will do the rest!I will show you what I've done for the past several seasons to prepare my beds as an INVITATION to EARTHWORMS.
First I move half of last years existing soil over toward the center of the bed.I find doing the job in two parts works for me.Otherwise where are you going to put all that dirt?

Then I use my push mower with it's bag attachment to pick up (and partially shred) this past winter's leaf litter around my heavily wooded yard.If there's anything I have in abundance it's lotsa LEAVES!
And no-I didn't rake them last fall-I was SAVING them!
The bag fills up in like 2 mins!
Now, how many bags should I use?
There's ONE.
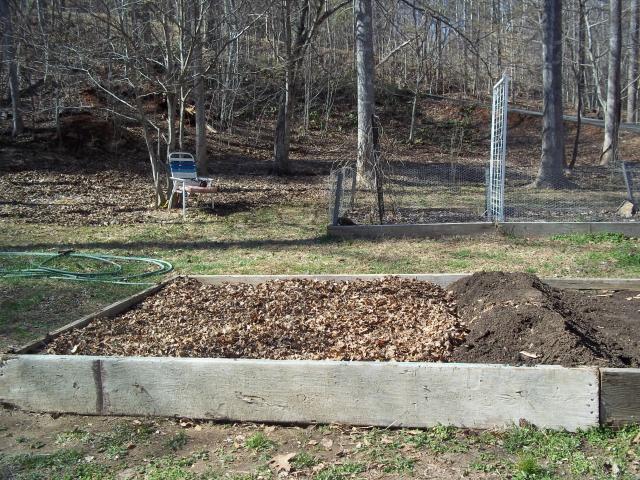
Here's NINE bags of leaves spread out in half the bed on the bare ground where the removed soil used to be.
Looks like TOO MUCH,but wait...
A water hose and some STOMPIN' reduces the height and "fluffiness" considerably.Past experience has proven that worms LOVE leaf layers as a means of travel to get from place to place.A nice bottom layer will provide a good entry point. I've never had to introduce PURCHASED worms to my beds,they just kinda show up.I HAVE "Seeded"my beds with worms un-earthed in other parts of the yard to boost populations.I've been lucky to live in a country setting with a large native population.Truth be told, there are earthworms beneath our feet in most soils just waiting for that invitation to start workin' for us!
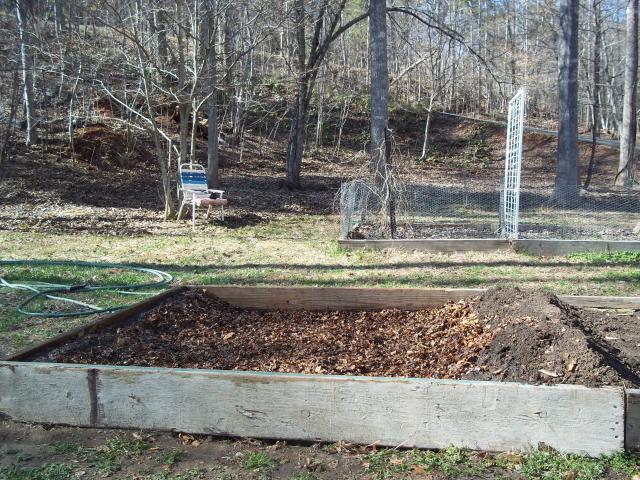
Now to cover it all with the soil moved aside in the first step.
All covered and raked smooth.Some more settling may occur with rainfall and supplimental watering,but one of the many advantages of raised beds is the LACK of soil COMPACTION.From this point on I'll be using my "HOKEY-POKEY" gardening style (you put your right foot in-you take your right foot out) to keep compaction to a minimum.The size of the beds makes this possible,although some extreme streatching and reaching may be required during planting,weeding,and the BEST part-HARVESTING!
After planting,I plan to add a couple of inches of the same shredded leaves to the TOP of the bed in and around the plants or hills (or rows) leaving plants uncovered-but barely.This provides several benefits including weed suppression and moisture conservation. Also this top layer will provide another "avenue" for the little wormies to travel about (mostly at night) to socialize before diving below to continue their important work.
Some organic gardeners do only this top layer with some success.I've read(but not tried)using layers of newspaper to accomplish the cover that earthworms crave.Some have even "fed" the worms with oats or grits between these top layers.I haven't seen the need to feed mine.Once established they seem to thrive!
My earthworm population has declined in recent years as my CHICKEN population has increased.I'm up to 11 birds (an AWESOME rooster and his 10 hens)all FREE RANGE! Chickens have got to be the BEST worm finders in the world.I may have to seed my beds this year.We'll see...
Now for the other half.I'll be using COMPOST as a bottom layer, but the concept is the same.
Moving the soil over.
My small "LAZY MAN'S" never-turned compost pile.
First of about five loads in my "DRAG-BARROW" I can NOT keep air in those darn tires!
A nice layer of water hose saturated compost ready to be covered over with exsisting soil removed in previous step.
After covering with soil,it's time for my FINAL STEP!!!
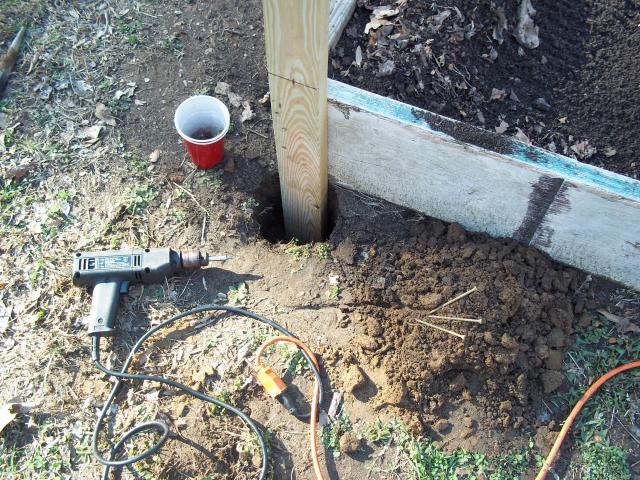
I MUST Chicken-proof my bed!These guys are just a little too enthusiastic in their desire to help Daddy "Cultivate"
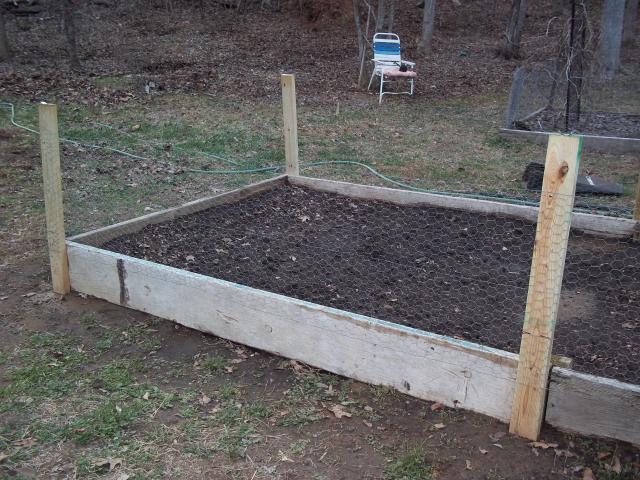
Tried temporary fencing last season,this year something a little more permanent.
Maybe not "Chicken-Proof" but might discourage the curious.(and the bunnies!)
If there's interest(and there should be-we're all "Chicken People")Let me show you all my FLOCK!
they all wanted to see what I was doing today...
My awesome rooster "G.Q. PIMPIN" or just "G.Q." for short took his supervisory role as the Foreman of today's project VERY Seriously!He stopped by regularly to ensure I was on task even as he went about his own Rooster duties.
If I happened to be on a break,he would scold me loudly(he makes this growling noise)as if to say"Boy,get back to work!"
Is it weird(or somehow GAY)to say I'm more than a little in LOVE with this GORGEOUS guy???
The young farmer I got him from said he thought he was WELSUMER with a little Game thrown in.What do you guys think?(feedback please)Here's another look...
What a HAM!He's actually POSING!He certainly has earned his name as "G.Q." You know,like the magazine with all the male models posing in the latest fine fashions! "SLURP" OMG I'm actually DROOLING! LOL!
I hope this post was helpful to you(or at least interesting)Just remember-earthworms will be your willing accomplises just waiting for their invite.(welcoming enviroment)
Any and all FEEDBACK is welcome and desired.Tell me what you think.Have you tried this? Will you try this?
HAPPY GARDENING CHICKEN PEOPLE!!!
***UPDATE*** Not sure I'm doing this right - Not sure if only my post will show up when you click this link,or the entire thread! Anyway,here's a link to my post in the Square-foot-gardening thread.Update on my experiment in growing potatoes in this bed - https://www.backyardchickens.com/forum/viewtopic.php?pid=6245477#p6245477
I've been an avid Backyard Organic Gardener since my like-minded Mother introduced me to the wonder of it all as a child.I've always loved the MAGIC of planting the smallest of seeds,caring for it,ending up with a BIG, BEAUTIFUL Plant that then produces such WONDERFUL Vegetables!
In recent years,I've enjoyed having HUNDREDS of willing partners at work beside me (or rather beneath me)helping to improve the soil thru aeration, and by leaving the BEST Organic Fertilizer ever made by GOD - Worm Castings!These amazing little partners toil endlessly and accomplish their beneficial task selflessly behind the scenes with minimal encouragement.All one has to do is provide the proper environment and they will do the rest!I will show you what I've done for the past several seasons to prepare my beds as an INVITATION to EARTHWORMS.
First I move half of last years existing soil over toward the center of the bed.I find doing the job in two parts works for me.Otherwise where are you going to put all that dirt?


Then I use my push mower with it's bag attachment to pick up (and partially shred) this past winter's leaf litter around my heavily wooded yard.If there's anything I have in abundance it's lotsa LEAVES!
And no-I didn't rake them last fall-I was SAVING them!
The bag fills up in like 2 mins!

Now, how many bags should I use?
There's ONE.

Here's NINE bags of leaves spread out in half the bed on the bare ground where the removed soil used to be.
Looks like TOO MUCH,but wait...
A water hose and some STOMPIN' reduces the height and "fluffiness" considerably.Past experience has proven that worms LOVE leaf layers as a means of travel to get from place to place.A nice bottom layer will provide a good entry point. I've never had to introduce PURCHASED worms to my beds,they just kinda show up.I HAVE "Seeded"my beds with worms un-earthed in other parts of the yard to boost populations.I've been lucky to live in a country setting with a large native population.Truth be told, there are earthworms beneath our feet in most soils just waiting for that invitation to start workin' for us!
Now to cover it all with the soil moved aside in the first step.

All covered and raked smooth.Some more settling may occur with rainfall and supplimental watering,but one of the many advantages of raised beds is the LACK of soil COMPACTION.From this point on I'll be using my "HOKEY-POKEY" gardening style (you put your right foot in-you take your right foot out) to keep compaction to a minimum.The size of the beds makes this possible,although some extreme streatching and reaching may be required during planting,weeding,and the BEST part-HARVESTING!

After planting,I plan to add a couple of inches of the same shredded leaves to the TOP of the bed in and around the plants or hills (or rows) leaving plants uncovered-but barely.This provides several benefits including weed suppression and moisture conservation. Also this top layer will provide another "avenue" for the little wormies to travel about (mostly at night) to socialize before diving below to continue their important work.
Some organic gardeners do only this top layer with some success.I've read(but not tried)using layers of newspaper to accomplish the cover that earthworms crave.Some have even "fed" the worms with oats or grits between these top layers.I haven't seen the need to feed mine.Once established they seem to thrive!
My earthworm population has declined in recent years as my CHICKEN population has increased.I'm up to 11 birds (an AWESOME rooster and his 10 hens)all FREE RANGE! Chickens have got to be the BEST worm finders in the world.I may have to seed my beds this year.We'll see...
Now for the other half.I'll be using COMPOST as a bottom layer, but the concept is the same.
Moving the soil over.

My small "LAZY MAN'S" never-turned compost pile.

First of about five loads in my "DRAG-BARROW" I can NOT keep air in those darn tires!

A nice layer of water hose saturated compost ready to be covered over with exsisting soil removed in previous step.

After covering with soil,it's time for my FINAL STEP!!!
I MUST Chicken-proof my bed!These guys are just a little too enthusiastic in their desire to help Daddy "Cultivate"
Tried temporary fencing last season,this year something a little more permanent.
Maybe not "Chicken-Proof" but might discourage the curious.(and the bunnies!)
If there's interest(and there should be-we're all "Chicken People")Let me show you all my FLOCK!
they all wanted to see what I was doing today...


My awesome rooster "G.Q. PIMPIN" or just "G.Q." for short took his supervisory role as the Foreman of today's project VERY Seriously!He stopped by regularly to ensure I was on task even as he went about his own Rooster duties.
If I happened to be on a break,he would scold me loudly(he makes this growling noise)as if to say"Boy,get back to work!"

Is it weird(or somehow GAY)to say I'm more than a little in LOVE with this GORGEOUS guy???
The young farmer I got him from said he thought he was WELSUMER with a little Game thrown in.What do you guys think?(feedback please)Here's another look...

What a HAM!He's actually POSING!He certainly has earned his name as "G.Q." You know,like the magazine with all the male models posing in the latest fine fashions! "SLURP" OMG I'm actually DROOLING! LOL!
I hope this post was helpful to you(or at least interesting)Just remember-earthworms will be your willing accomplises just waiting for their invite.(welcoming enviroment)
Any and all FEEDBACK is welcome and desired.Tell me what you think.Have you tried this? Will you try this?
HAPPY GARDENING CHICKEN PEOPLE!!!
***UPDATE*** Not sure I'm doing this right - Not sure if only my post will show up when you click this link,or the entire thread! Anyway,here's a link to my post in the Square-foot-gardening thread.Update on my experiment in growing potatoes in this bed - https://www.backyardchickens.com/forum/viewtopic.php?pid=6245477#p6245477
Last edited:

