Laying out your wire to your run?

wannabchick

Songster
9 Years
Nov 27, 2010
1,702
30
194
Northen Va
Once the post are all set

Do you go around with wire..or do you cut to fit each section from post to post..you all see what I mean..

What is the most effective way to do this

Up and down, wrap it all the way around horizontally and then cut when u get to the final post?

Share please how you did it, and what you learned along the way as far as attaching the wire to all post.
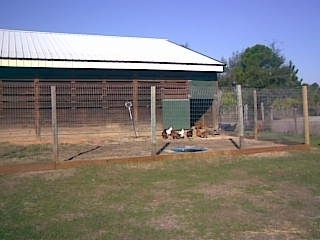
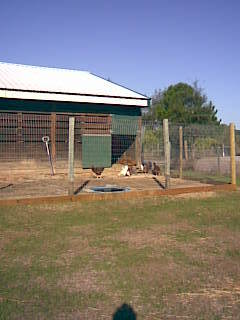
My goal

6 foot height
At least a 200 square foot run somehow
Or 10x 20

Yes I will need all 4 sides..one side will be 10 foot in length, then their are 3 other sides..

Just ordered the 100 ft hardware cloth 48 inches - 3 foot on bottom, one foot out for diggers
Now I was going to order 100 foot 36 inch welded wire or maybe the 48 inch- place for top half

I suck at math..how much more should I purchase for the top, and can I do the top also in the welded wire or should I do it in the
Hardware cloth

Also, what size run should I be able to build with what I just ordered?

Thank u all
 
Last edited:
Definitely the best thing is to have it as much all-in-one-piece as you can... any seam is a weak point (also more work
tongue.png
)

Best to unroll it all the way down the first side, preferably CURVED SIDE DOWN (this will be harder to do b/c you can't just kick it along to literally unroll, you have to lift the roll up a bit to "unroll from the bottom side" if that makes any sense) because it discourages the material from sproinging up into a huge recoiling circle and hitting you very hard with sharp pointy bits, which is not only unpleasant but potentially dangerous. Even if you (quite sensibly) weight or stake the free end down it is always possible for it to work free, especially once you get ready to put the fencing up on the posts, and having it curved the other way really makes it a lot easier to work with.

Stand that first-side's-worth up against the posts. Ideally you've already made marks to indicate a dead-straight line, so that you can merely hold the fencing up and attach according to the marks on the posts rather than having to eyeball "is it straight, or is it tilting upwards or downwards?". Put a single hammer-in fence staple (or whatever you're using) in the upper corner of that first end. Tack the next couple posts' worth at the marks you made, but not permanently. Then go back to the first post and straighten things out and hammer in that whole vertical line of fasteners. Pull your temporary ones, and then either stretch that whole side and staple it in, or proceed from one fencepost to the next. When you get to the corner, keep going down the next side in the same way described above, etc etc, til you're done.

Make sure to keep the wire STRAIGHT. Otherwise you get weird bulges and ripples and sags. Also be aware that pulling hard to pull the mesh tight will pull your corner posts inwards, so it is real smart to have a top horizontal element of the fence made out of 2x4s or whatever, to brace the posts against each other so the corner post can't tilt as you tension the fence.

The kind of fence material you are likely to be using is NOT really tensionable as such (not like high-tensile fencing, or anything with crimps in it) so there is a fine line between pulling it as tight as possible to get the slack out so the fence isn't all woobly, and pulling it so tight that you start to rip welds apart.

As far as a top for your run, in N VA you are going to have to worry a lot about snow load. FOR SURE you should not use hardwarecloth which will catch just about as much snow as a solid roof would; but even 2x4 mesh will catch significant snow in one of those heavy wet "middle of March" type storms. So you need a pretty seriously engineered set of rafter type things SUPPORTING the run top. The extra lumber (especially for something that will be 10x20 and the wire itself are nontrivial in expense, so think about whether you really need this. If you do, build it RIGHT, too many people do weebly versions that then collapse, sometimes taking run *fence* with them.

Good luck, have fun,

Pat
 
Pretty much ditto from patandchickens. I found it helpfull to put a nail on each post at the level you want the top, and then hung the sheet of wire on the nails before I started to fasten it. I used U nails or staples that you use on barbed wire. Worked like a champ. When I ran the ends that our doors were on, we ran it all in 1 sheet, and then cut the wire for the door out after it was all secured. The wire I think was the easiest part of our project,LOL. It would be a good idea to have a trench around the base of the walls to bury the wire down and in too. Makes it pretty predator proof. Helps ya sleep better at nite too. LOL. I have posted pics on this, If you havent read them yet, I would be happy to re post them for you. . Have fun. R.
 
Last edited:
You've gotten good advice so far. I also used continuous sheets of 2x4 welded wire at the top part of the sides and 2' hardware cloth on the bottom of the wall with a 2' apron all the way around the run. I secured it with screws through big fender washers. The washers are a little more expensive than staples but I found them much easier to work with and still keep the wire taut while securing it to the posts and not have it bunch up weirdly in places. For the top a I used heavy duty deer fencing which is a heavier grade plastic mesh than bird fencing. Over that I used old split rails I got from an old horse farm that was taking down it's fences. The run looks a bit like a pergola which I can grow some annual vines up on next spring. The rails give a little more support for both the deer fencing and for snow load as Pat points out. This winter I put tarps on top of the rails to keep the snow to a minimum in the run but where there were gaps in the tarps our epic snow storms this winter put alot of snow on top of the deer fencing so that some it sagged into the run for 2 feet or more for quite awhile this winter. Once the snow melted a bit I was able to rehang the deer fencing securely against predators once again so it works pretty well so far. No unwelcome guests have gotten in there even though I've seen coon prints all around the run several times this winter. Good luck with your project...it sounds like you are on the right track.
 
Last edited:
Newbie in Screamer Al, :

I found it helpfull to put a nail on each post at the level you want the top, and then hung the sheet of wire on the nails before I started to fasten it. I used U nails or staples that you use on barbed wire.

Hey, that's cool, I can't believe I've been putting up mesh and fencing all these years and never thought to do it that way, doh! Super idea, thank you for posting, will promptly steal it and imitate next time I'm doing that
big_smile.png


Pat​
 
55471_177.jpg


55471_image172.jpg


Here is my run took me 2 wks but I'm 5' 100 lbs and 61 yrs old. it is 16 x 48 x 6 . 2 x 4 x welded wire. The short sides are seperate because there is a slight incline. The front long side was a b----. I did it alone so I didn't have anyone to help flip it up so I did it the way they tell you not to. I unrolled it upright as I went fron pole to pole. I tacked it temporary, went back and straightened it and hammered it down. Oh it was straped to a dolly so I could unroll it with out it unrolling more than I needed. To flatten the curved short ends I cut off what I needed and ran it over with the truck a few times. The ground here is all sand so none of the welds broke. The hardware cloth will be 3 ' high around the bottom but it isn't up yet.
 
Quote:
Awesome job..I could never do that..and u did..oh yah that's right iam going to end up doing it alone..lol

Thank u
 
5evfkl.gif


I appreciate all of everyones advise..now iam thinking this is going to be really hard..lol

My dh better kick and help me..no more hot meals for him..if he doesn't..heheh
Xoxox
 
Newbie in Screamer Al, :

Pretty much ditto from patandchickens. I found it helpfull to put a nail on each post at the level you want the top, and then hung the sheet of wire on the nails before I started to fasten it. I used U nails or staples that you use on barbed wire. Worked like a champ. When I ran the ends that our doors were on, we ran it all in 1 sheet, and then cut the wire for the door out after it was all secured. The wire I think was the easiest part of our project,LOL. It would be a good idea to have a trench around the base of the walls to bury the wire down and in too. Makes it pretty predator proof. Helps ya sleep better at nite too. LOL. I have posted pics on this, If you havent read them yet, I would be happy to re post them for you. . Have fun. R.

You are the bomb!!! thanks​
 

New posts New threads Active threads

Back
Top Bottom