I am finally getting my coop together........I have two 13 week olds, TWELVE 10-11 week olds and NINE 2 week olds....and no real coop! The 14 oldest are staying in an old tack shed converted to a mini-coop in my garage at night, and going out into two separate pens during the day.
Let me just tell you that catching and carrying 14 chickens up and down a hill twice a day is NOT FUN. NOT AT ALL. I have been doing it every day for over a month and I am ready to be done!
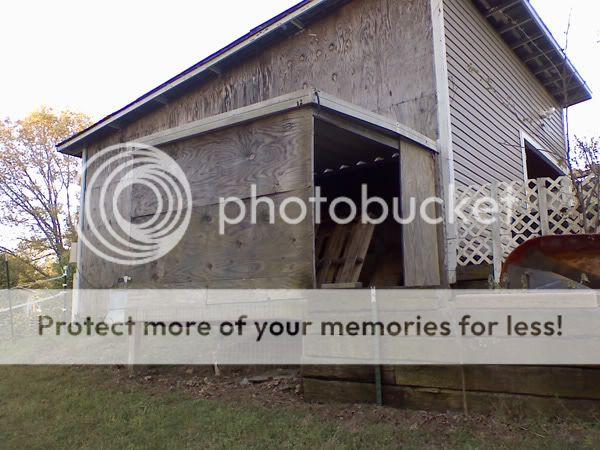
So, there is an old broken down falling apart little shed on the backside of my garage. It has holes in the floors, holes in the walls....missing partial walls, warped plywood, etc etc. It was a mess!

Good part is that there was an old window left in there from the previous house owners.
I built the mini-run about a month ago....it is 8x8 and eventually there will be an additional 16x16 (approximate) pen that backs up to both the coop and pen (running alongside the garage). This is just to hold me over until I can get that built.
So Saturday I did some demo on the old shed. Knocked the front wall out completely, fixed and patched all of the other walls, took apart all of the ridiculous fixes they had done (like nailing five scraps of wood together to make a bigger enough piece to closely mimic a 4x4 and then stapling it onto a 4x4 to make it taller).
Knocked the front wall out.
Started framing.
Trying to get an idea of window height.
That ended day one....doesn't look like much, but I had fixed the other two walls, plus the inside wall that is shared with the garage. There was a bunch of scrap wood nailed to the wall...which was covering a hole underneath the garage......can we say predator entrance? So, I fixed that up, and built a new mini wall over the bad area for double protection (used the old front wall plywood).
Day 2. I fixed half the floor and have most of the front wall done. The hole on the right side is for an exterior nesting box unit. The hole on the left is for the DOOR.
Also, started cutting ventilation windows on the other walls (1 done so far, 2 to go)
Day 3...had to work today so hopped out there for a few hours after work to get the important stuff finished.
I decided to give up on the exterior nesting boxes FOR NOW. I have actually all the pieces cut and dry fit but it will take some work to assemble it all correctly. So i have covered that opening with a piece of plywood for now, and will switch it out for the nesting box unit once I get it completed.
Dry fitting the new door. I measured twice and cut....twice. Couldn't find a pen so I just scratched the measurements onto a piece of scrap wood.
And then couldn't read my writing and cut it to 29.5 instead of 27.5.
Whoops! At least it was bigger rather than smaller.
Then came the actual hanging of the door. Making the gate to the outside pen took me HOURS AND HOURS and I had to backtrack and redo stuff and it was such a pain.
This door was really heavy so I was concerned it might not work.
BUT IT WORKED.
The best part was that, other than the 2x4 framing and plywood for the door and floor....everything else was $0.50 per piece cull wood from Home Depot. That front wall cost less than $10, other than the door. About $15 including the door. Of course, hardware was regular price, but the wood itself was cheap.
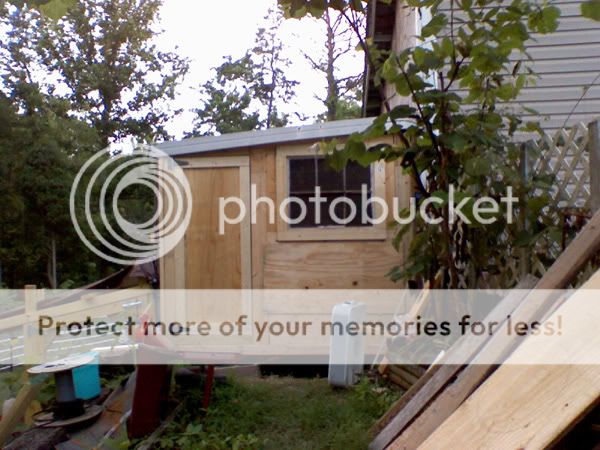
Tomorrow I will cut out the last two windows (and cover with hardware cloth), secure up a few gaps that are iffy to me, get the roosts up and cut and frame a pop door. I also want to get it primed and painted to match the house/garage (tan/khaki color with white trim and green accents), and build and mount a window box with flowers.
I hope to have the chickens moved in and sleeping there by Friday night. My dad is flying in Saturday to visit and the 2 week olds are in the brooder in the extra bedroom. They can move to the tack shed turned mini coop as soon as the big kids move out here........can we say crunch time? Ha ha ha.
This was my first real project project other than a few "pens". Considering I did this alone, I am impressed with myself! Now for those stinking nesting boxes.......
Let me just tell you that catching and carrying 14 chickens up and down a hill twice a day is NOT FUN. NOT AT ALL. I have been doing it every day for over a month and I am ready to be done!
So, there is an old broken down falling apart little shed on the backside of my garage. It has holes in the floors, holes in the walls....missing partial walls, warped plywood, etc etc. It was a mess!


Good part is that there was an old window left in there from the previous house owners.

I built the mini-run about a month ago....it is 8x8 and eventually there will be an additional 16x16 (approximate) pen that backs up to both the coop and pen (running alongside the garage). This is just to hold me over until I can get that built.
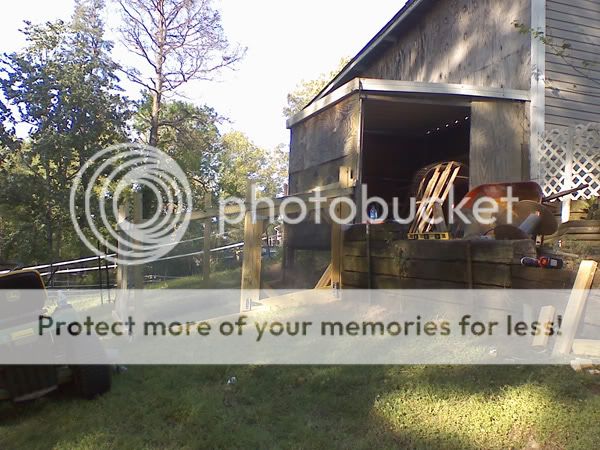
So Saturday I did some demo on the old shed. Knocked the front wall out completely, fixed and patched all of the other walls, took apart all of the ridiculous fixes they had done (like nailing five scraps of wood together to make a bigger enough piece to closely mimic a 4x4 and then stapling it onto a 4x4 to make it taller).
Knocked the front wall out.

Started framing.

Trying to get an idea of window height.

That ended day one....doesn't look like much, but I had fixed the other two walls, plus the inside wall that is shared with the garage. There was a bunch of scrap wood nailed to the wall...which was covering a hole underneath the garage......can we say predator entrance? So, I fixed that up, and built a new mini wall over the bad area for double protection (used the old front wall plywood).
Day 2. I fixed half the floor and have most of the front wall done. The hole on the right side is for an exterior nesting box unit. The hole on the left is for the DOOR.

Also, started cutting ventilation windows on the other walls (1 done so far, 2 to go)

Day 3...had to work today so hopped out there for a few hours after work to get the important stuff finished.
I decided to give up on the exterior nesting boxes FOR NOW. I have actually all the pieces cut and dry fit but it will take some work to assemble it all correctly. So i have covered that opening with a piece of plywood for now, and will switch it out for the nesting box unit once I get it completed.

Dry fitting the new door. I measured twice and cut....twice. Couldn't find a pen so I just scratched the measurements onto a piece of scrap wood.
And then couldn't read my writing and cut it to 29.5 instead of 27.5.
Whoops! At least it was bigger rather than smaller.

Then came the actual hanging of the door. Making the gate to the outside pen took me HOURS AND HOURS and I had to backtrack and redo stuff and it was such a pain.
This door was really heavy so I was concerned it might not work.
BUT IT WORKED.

The best part was that, other than the 2x4 framing and plywood for the door and floor....everything else was $0.50 per piece cull wood from Home Depot. That front wall cost less than $10, other than the door. About $15 including the door. Of course, hardware was regular price, but the wood itself was cheap.
Tomorrow I will cut out the last two windows (and cover with hardware cloth), secure up a few gaps that are iffy to me, get the roosts up and cut and frame a pop door. I also want to get it primed and painted to match the house/garage (tan/khaki color with white trim and green accents), and build and mount a window box with flowers.
I hope to have the chickens moved in and sleeping there by Friday night. My dad is flying in Saturday to visit and the 2 week olds are in the brooder in the extra bedroom. They can move to the tack shed turned mini coop as soon as the big kids move out here........can we say crunch time? Ha ha ha.
This was my first real project project other than a few "pens". Considering I did this alone, I am impressed with myself! Now for those stinking nesting boxes.......

Last edited:


