The Victory House

Howard E

Crowing
5 Years
Feb 18, 2016
2,881
4,038
296
Missouri
Was watching a program on what the US citizens did leading up to and through WW II, and with everything in short supply, how urban folks were pressed into planting gardens, etc. for food. They were the Victory gardens (and Victory just about everything else). An extension of that was the need and desire for urban back lot chickens. But they needed a house to raise them. Enter the Victory House.......

https://www.ag.ndsu.edu/aben-plans/nd727-15-1.pdf

While certainly plain Jane in appearance, it has all the essentials for raising about a dozen birds....more than enough to keep a family in eggs. Even if not this, use it as a guide for what a chicken house should be. Doll it up if you want cute, but do take a look. Simple to build and functional.

From this, either let them out into the fenced in yard or build an attached run of the same or larger size. Just replace the sides with wire. Same roof line with a pop door connecting the house and run.

To improve on this, move the door from the center off to the right (east) side, and put in a 3rd window. Perhaps the windows could be made 2X this size and include plenty of ventilation. In climate zones 6 and warmer, you could replace the front door with nothing but wire to really open it up.

Or go for the Woods 6' x 10'.

But in any case, if at all possible, if you need a chicken house for a small flock......forget the dinky, poorly built death traps. Go for the Victory!
 
Great job Howard!

You're the only guy I know who could find us a complete set of architectural drawings for our chicken coops, and at government expense no less! Finally something of use for our tax dollars! :)

It's interesting, they even have drop boards detailed, they realized it's a great way to lower the ammonia load in the coop, since over half the poop is generated from the roosting bars.

Keep up the great work, you really provide a ton of useful information for anyone looking to step up their game, when it comes to taking the best possible care of their chickens, and using mother nature to do as much of the work as possible for us, rather than us wasting energy fighting her!

People want to do a good job, knowledgeable people like you and @aart make it possible for them save so much time, effort, and money in building the coop right the first time. Waste and inefficiency are such a disappointment to people, you're helping them avoid that with all your efforts here.
 
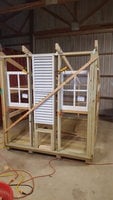
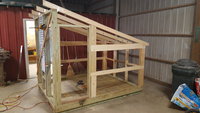
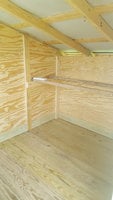
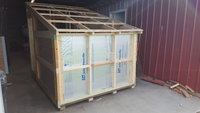
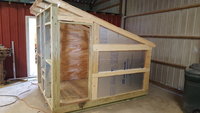
A tease.........still in progress.....but getting there.

20180418_161615.jpg 20180418_161638.jpg

I have a nasty habit of overbuilding things to begin with, and today, while deciding what to do about the rafters, wind was blowing a steady 25 to 30 mpg, with gusts over 40. Barn was humming. So on went the hurricane clips. For a 6' x 8' shed? :rolleyes:
 
Victory has been declared.......at least for now.

Will eventually change some things around, but new replacement birds were getting out of control in their garage brooder, so threw together some doors in great haste and moved them in.

20180516_123328.jpg 20180516_123305.jpg 20180516_123341.jpg 20180516_123359.jpg 20180516_132533.jpg

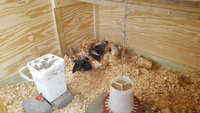
This will be temporary digs for about 20 pullets until they are ready to join the old girls. Will keep notes on how it does and make changes as needed later.

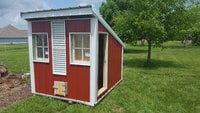
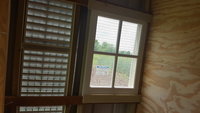
It turns out the Victory house is actually a half scale model of the old Quizzenberry fool proof house, which was also popular about the same time as the Woods house was being promoted. The "fool proof" house was a competing design. It may not look like it, but there is a lot going on here. I made some changes, like putting the windows on the inside and making them sliders vs. opening out. I live in a high wind area and would expect windows of the other design to be ripped right off.

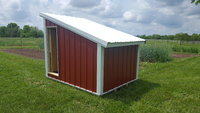
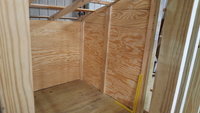
Also used metal siding and roof, both of which are insulated. Sides and back wall also lined with plywood. On a day when it was 82 out, actually cooler inside than outside....even with the dark metal siding.

Can already see some areas to make changes and improvements, but so far, so good!
 
20180531_170702.jpg

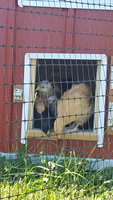
Birds exposed to the great outdoors, and reluctant to leave the nice interior. First day, one of them was pushed out by those crowding in from behind, but quickly forced it's way back in. By the second day, most had been lured outside by the salad bar......but still spend most of the day inside.

This is how I train them to always return to the house......they spend at least a week inside before being allowed outside. Even then it is only a small playpen of a few feet, so they get a lot of practice running in and out of that pop door. Inside is home sweet home and they feel safe and secure in there. So they always go back in there when the sun goes down.
 
One advantage of the wood floor vs dirt is it makes it more portable, PLUS, no need for an apron to defeat digging predators. In fact, I doubt anything short of a bear could get in. And maybe not much larger than a mouse or small snake on the small end. I doubt even a least weasel could find a way in. (when pop door is closed) So overall, about as predator proof, including rats, as you can get. And again, unless something is attached to it, very portable. A person could use this and a section of electric poultry netting and move it around at will.

I have moved it once. From the shed where I built it about 50 yards to its current resting place. It skimmed along nicely and didn't even scuff the grass.
 
BTW, I have started construction on my version of the Victory House. Will post some pictures and descriptions when it is done.
 
Victory house has been populated for about a week now. Birds are 4 weeks old and as of last night, all of them spent the night on the roost bars. That is about 2 to 3 weeks ahead of the last bunch, which stayed huddled on the ground until 7 or 8 weeks. These bars are about 6 inches lower than those were. Still, they are nearly 3 feet off the deck. These guys are using the water bucket as an intermediate step, but one RIR managed to hop flat footed from the floor to the window ledge and can do it with ease. No ramps needed for these kids.

So another feature I put in this house was metal siding......for a durable, maintenance free exterior.....but that normally has issues with the sun and heat in the summer and cold in winter. So this one got a lining of 1/2" foil faced polyiso board insulation. Installed so there is a 1 1/2" air gap between the metal and insulation. Then to protect the insulation from the birds, a 3/8" liner of plywood for the interior. Roof metal is a reflective bright white, but is insulated too.

So around 10 AM this morning, with morning sun shining directly on the side....red metal was so hot you could not put your hand on it. Yet inside wall was as cool as the opposite wall in the shade. Without the insulation, metal would heat up the interior to make it a sweat box death trap. With it.....nice place to be.

20180426_171651.jpg 20180426_171738.jpg 20180426_171757.jpg

So when winter rolls around, I would expect this to reverse. Each bird generates about the same amount of radiant heat as a 10 watt night light. So 10 birds.....about what a 100 watt bulb would put out. Retained inside by the insulation, interior may heat up as much as 10 to 15 degrees or more over the outside. A big deal when it's -20F outside.

Also, tall side with windows faces south. That wall was NOT insulated. In summer, it is shaded by the roof overhang. In winter, sun will shine on dark metal siding....and stream through the windows....and combined, may heat up (and dry out) the interior by a whole lot. Maybe 30 degrees or more.

Point being that while this may appear to be a plain Jane ho hum building, it also retains a lot of design features that are tailored to the comfort and safety of chickens. Subtle stuff you can't see......but there just the same.

Whatever you build........be thinking how you can incorporate some of this in yours. It really does matter and will make a difference.
 
It does say 2 x 4. I used 4 x 4's to get a bit more air space under the coop so the bottom of the floor would not stay wet if the thing settled into the ground. Either way, use pressure treated lumber rated for ground contact.
 

New posts New threads Active threads

Back
Top Bottom