Topic of the Week - Incubators 101

sumi

Rest in Peace 1980-2020
Premium Feather Member
8 Years
Jun 28, 2011
39,162
27,209
1,302
Topic of the Week (44).png

Hatching season is starting and the incubators are coming out, so this week I would like to talk "incubators". Some of us bought an incubator off eBay and it came without instructions, others built their own, many members are unsure which make and model would be best for them. And then there is the art of finding the "perfect" setting, calibrating thermometers, etc. So, some topics to get this discussion started:

- What do you do to make sure your new and "unknown" incubator is set up properly?
- Which incubator makes and models are the best for hatching small or large numbers of eggs?
- Tell me about calibrating thermometers?
- How do you know for sure your thermometer is accurate?
- How do you manage and maintain humidity in your incubator?
- What tips and tricks can you recommend for getting the most from your incubator hatches?
- How do you clean your incubators (before?) and after hatches?

Anything you'd like to add?

SunHwaKwon.jpg

Pic by @SunHwaKwon
Also see: Topic of the Week - Hatching Eggs and Topic of the Week - Incubating eggs

For a complete list of our Topic of the Week threads, see here:

https://www.backyardchickens.com/a/topic-of-the-week-thread-archive
 
Last edited by a moderator:
- What do you do to make sure your new and "unknown" incubator is set up properly?

Start by setting it to the proper temperature and letting it run for at least 24 hours before putting your eggs in. If you have an automatic turner that sits inside the incubator, make sure that it is running too, because the little motors on those do actually put out a little heat, and it will affect the temperature in the incubator. Even though you will not yet know what humidity is going to work best, it's good to start by setting it to 30 or 40 percent to begin with, and you can adjust as necessary from there.

You may want to add some heat sinks too. A heat sink is something that will hold heat, and in the case of the power going out or an incubator failure, it will release that heat back into the incubator and give you time to fix the problem. They can also help hold the temperature steady if your incubator is fluctuating in temperature a lot. A heat sink can be as simple as a bottle of water or some river rocks.

Once you have gotten this all set up and your incubator has been holding temperature for 24 hours, it's time to add the eggs.

- Which incubator makes and models are the best for hatching small or large numbers of eggs?

Which incubator you choose will depend on several factors, such as your budget and how many eggs you need it to be able to hold.

To start with, it is advised to avoid any of the cheap Chinese incubators you can find online at places like eBay, Amazon, AliExpress, etc. While their low prices are tempting, there's a reason the prices are so low - the quality is low too.

If you are looking for a starter incubator and you don't have a large budget, you may want to look into getting a Hovabator. Hovabators are made of Styrofoam, so they are not as good at holding temperature steady as incubators made of other materials, but they are fairly inexpensive as far as incubators go, and you can even get one with a digital readout if you so choose.

If you are willing to spend a little bit more money, and are looking for an incubator that holds around 30 eggs, then an Incuview might be the right choice for you. They are a good, reliable incubator that offers a great view of the chicks hatching when the time comes, and they come in under $200, which includes an automatic turner in the price.

If you are looking to only hatch a small amount of eggs at once, then maybe you would be interested in a Brinsea Mini. While expensive for a small incubator, they offer excellent reliability.

Brinsea also has larger models, and their incubators offer excellent reliability and are practically foolproof, not to mention they come with a warranty. However, they are on the more expensive end of tabletop incubators, especially if you need to be able to hatch more than 30 eggs at once and need one of their larger models. Brinseas are what I use and love.

Or maybe you need to hatch hundreds of eggs at once. In that case, you would want to get a cabinet style incubator. You can see recommendations for those here and here.

If you are handy and have a very small budget or just don't want to spend a lot, you could even make your own incubator. There are lots of plans and ideas to get you started in BYC's Incubators and Brooders section. You might even look at brooders while you're at it and whip yourself up one of those, since you'll need one after the hatch is over.

- Tell me about calibrating thermometers; how do you know for sure your thermometer is accurate?

Before you trust that your thermometer is accurate, you will want to calibrate it. Since, as we discussed before, even the temperature being just a little bit off will affect your eggs, it's best to make sure your thermometer is reading correctly, and if not, to know how to adjust for how off it is.

To calibrate your thermometer, fill a glass with ice and leave it out to melt until the glass is half water and half ice. Put your thermometer in the glass, give it a couple minutes to get to temperature, and check it. It should read 32 degrees Fahrenheit. If it does, great! Your thermometer is accurate and you can use it to set the temperature in your incubator.

If it's not right, not to worry, you can still use it. A little math is in order. First, you need to find out how off it is. For example, if it says 33 degrees instead of 32, you know it's reading one degree higher than the temperature actually is. Therefore, when you put it in your incubator, you want it to read one degree higher than the temperature your incubator is supposed to be set at. So in a forced air incubator, you would want it to read 100.5 instead of 99.5, because when it is reading 100.5 degrees, it means the actual temperature in the incubator is 99.5 degrees.

The same is true if it were reading low, so for instance if the thermometer reads 31 degrees instead of 32. In this case, you would want it to read one degree lower than the temperature you need your incubator to be, for the same reasons as above.

- How do you manage and maintain humidity in your incubator?

To start with, calibrate your hygrometer. In order to make sure your hygrometer is reading correctly, you will want to calibrate it. This is easy to do via the "salt test". Take a teaspoon of salt and put it in a bottle cap or a small cup and add a few drops of water to dampen it. Take this and your hygrometer and put them inside a sealable see-through container. A Ziploc bag can work as long as it seals well. Let it sit for six hours and then check what the reading on your hygrometer is. The hygrometer should read 75%. If it doesn't, you'll know it's off, how much it's off, and you can calculate what the real humidity is by how off it is.

Humidity is determined by how much surface area of water there is in an incubator, not the amount of water. For example, one incubator has a big jug of water in it that holds a quart of water. The opening of the jug is 3 inches square. A second incubator has a damp paper towel on the bottom that only holds one cup of water. The paper towel covers 10 square inches of the incubator. Even though the first incubator has more water in it, the second incubator will have a higher humidity.

Most incubators have water troughs built in that you can add water to for controlling humidity. If you add water to the troughs and you find it's not getting high enough, which can definitely be a concern during lockdown, you can add baby food jars or mason jars full of water with paper towels or sponges sticking out of them to wick water up and add even more surface area. Or just place a damp sponge or paper towel in the incubator (not touching the eggs).

If you add water to your troughs and the humidity is too high, then you can instead just add a folded up damp paper towel and fold it smaller until the surface area is small enough that the humidity is where you need it to be.

Or, if you are in a humid climate or your humidity just naturally stays high enough as is, you may not need to add any water at all for the first stage of incubation, which is referred to as dry hatching. However, dry hatching doesn't mean you never add water. You can see this thread for more details about that. If dry hatching is not appropriate for your area, then you will need to add water.

- How do you clean your incubators (before?) and after hatches?

I personally use a bleach solution. I wipe everything down with a bleach solution, let it dry, then wipe it down again with water. If there's any smell leftover from a hatch, I wipe it down with a vinegar solution too.

I pulled all the above answers from the article I wrote on incubating for beginners.
x2 on everything :goodpost:
 
What I do to make sure my incubator is set up properly I turned it on for 24 hours and let it run. I also added a little bit of water making the humidity as even as possible. TIP: Opening the incubator too often when humidity is running low is not a good idea when hatching eggs. Keeping them open too long will cause them to shrink wrap depending what day it is. I would recommend wrapping a towel around the whole incubator and you will only have to add water to it a few times the least. ;) About different models of incubators I have to agree with @Pyxis that purchasing Chinese incubators is not a good idea, they tend to be cheap and can easily break. Yes, models of incubators are different and are probably used differently. I had the 7 egg incubator and the 48 egg digital incubator. The incubators that hold more eggs tend to be more expensive and are not so cheaply made. You also don't stand a very good chance hatching eggs out of these small incubators but some people do. Usually you hear of them burning out after week 2 after all of the reviews I read. I also have the 48 egg digital incubator that is very well made. Only about $55.00 and works great! Comes with a instruction manual, water bottle to increase humidity and automatic egg Turner. I hatched some beautiful Black Copper Marans out of this beautiful incubator! Reads humitidy, temps, etc.. I bet the ones that hold more eggs probably the better here is a pictrue similar to the one I ordered. The temperature reads in Celsius.
41dtHgSHYTL._SX342_.jpg


About knowing or finding out how my thermometer is accurate or not. I always keep in a back up or two which is an easy way to tell, I usually check the thermometers and check the incubator and mine reads accurately. Humidity is also not a big deal when hatching eggs if you can keep things within 10-15% things should turn out find. Temprature is a big deal though when hatching eggs even though I hate to say just the temp being 2-3 degrees higher or lower is enough to kill the embryo. Eggs are not so hard to hatch as you think, it is actually really easy as long as you can keep the temperature stable. This is why you should keep a damp towel around it.
For keeping humidity and temperature stable in my incubator as I said before the towel works for me.;) Pyxis also made a really good point.

I also understand that after a hatch especially a big one incubators get really, really messy! YUCK! Sometimes your just like what are you supposed to do with this darn thing!:he but actually it's not that hard. I rinse in dawn's soap and really hot water and let it sit out in the sun to dry out. Then I take out the old shells after. Your incubator is as good as new! Well hope everyone has good luck hatching!:jumpy
 
I found this very interesting webpage:
http://www.avianaquamiser.com/archives/2011/09/


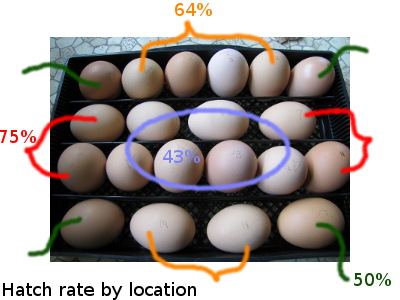
Does egg location in the incubator affect a chick's time of hatch and hatchability? In still air incubators, you'll find relatively wide temperature variations throughout the incubator, but even our top of the line Brinsea Octagon 20 Advance Incubator shows differences in hatch rate related to egg location in the tray. The picture to the right is the summary of my results from two hatches, suggesting that eggs in the center are less likely to hatch than those around the edges, and my notes show that central eggs also tend to hatch later.

The fan in our incubator keeps air moving, so you would think that all of the eggs would be equally warm. However, a reader on our homesteading blog suggested that radiant heat from the central heating element preferentially warms the eggs directly underneath. His hypothesis makes a lot of sense, as does his solution of using some kind of barrier like aluminum foil below the heating unit to block the radiant heat while allowing the fans to continue to circulate warmed air. It looks like I'm going to have to do some experiments with moving thermometers around inside the incubator to find out whether there really are high temperature pockets and how to fix them.
 
This will interesting. :pop

I don’t use incubators, but It’d be nice to learn a little more about them. I prefer the natural way of letting a broody hen sit on them.
 

New posts New threads Active threads

Back
Top Bottom