My old chicken tractor was heavy and too small for my expanding flock, and my hens didn't have the sense to get out of the rain.
...Also, my girls need a secure place to sleep now that I have to separate them from the Roos, who get dibs on the nice secure garage coop, as it muffles their crowing from reaching the neighbors at 4am.
Long story short, I looked at all the ideas here on BYC, and took my favorite parts of each, and built an awesome new tractor for about $80 in total materials. (keeping in mind that I have a habitat for humanity Re-Store near me... yay!)
Sooooo, here it is!!
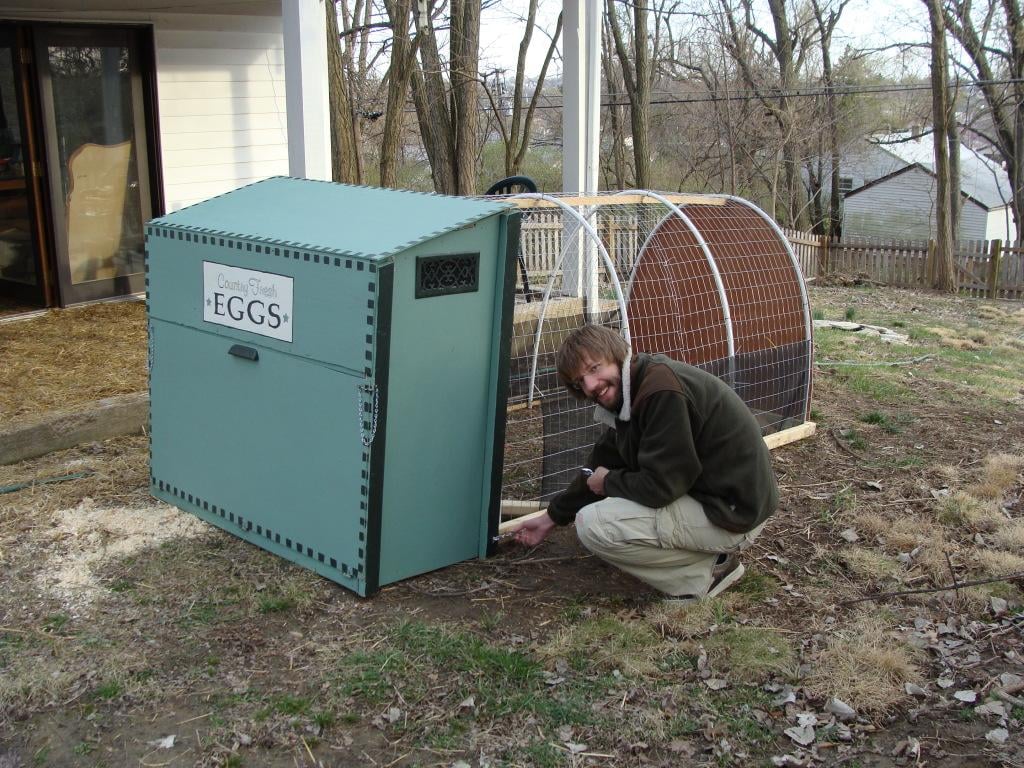
The run can be separated from the coop with turnbuckles. Here's DH doing so! (no, ladies, he did NOT design it, build it, or take any part in the project. Okay, I take it back... he got really romantic the other night and bought me a new Litheon 18V drill since I was complaining that my old one was dying on me...

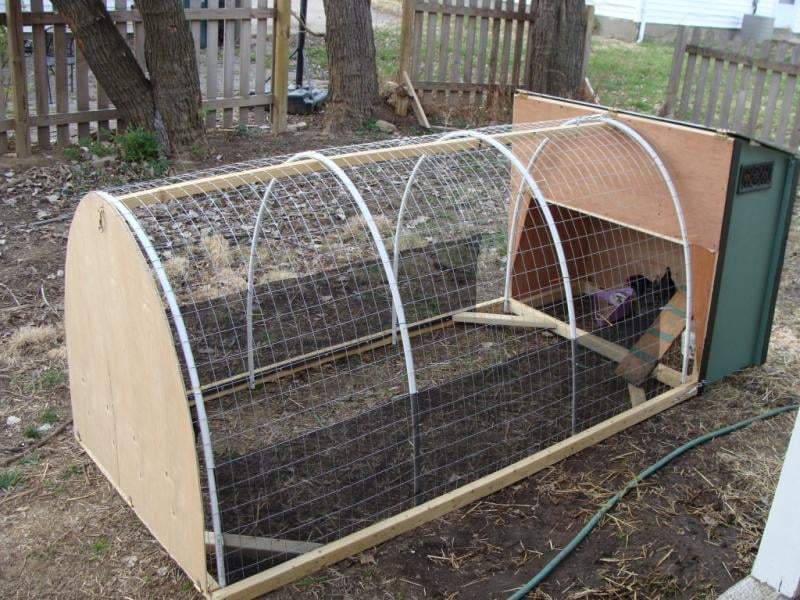
I can carry the run by myself! The coop is a really easy carry too... it's just too awkwardly shaped for one person. Here are the girls enjoying their new digs. Above them, they can enter the roosting/nesting area, which has a trap door I can close at night to keep them safe. Also, this big arched piece of plywood is connected by hinges at the bottom so I can open the whole thing up and get in.
I can open the top to get eggs and to check on the hens. The vents are old floor vents from ReStore!
I searched the web and downloaded an image of a vintage egg sign, and made a stencil... I LOVE it! (all leftover paint from other projects - mine and my neighbor's)
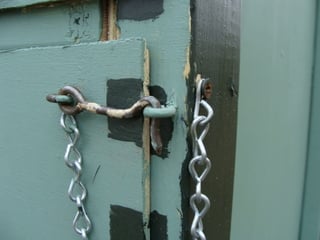
And the front bottom opens up, too, for me to give them water. A chain keeps it from falling all the way down. Oh, and you'll notice the bottom edge of the run is lined with petscreen. This is to keep little animal paws from grabbing the hens' wings, as happened to one of my babies in the first coop I made. A cat got her paw in through the chickenwire and did a number on my baby's wing . Also, once my neighbor's dogs scared the girls and they beat themselves silly on the wire. The screen layer is much softer and won't damage their beaks.
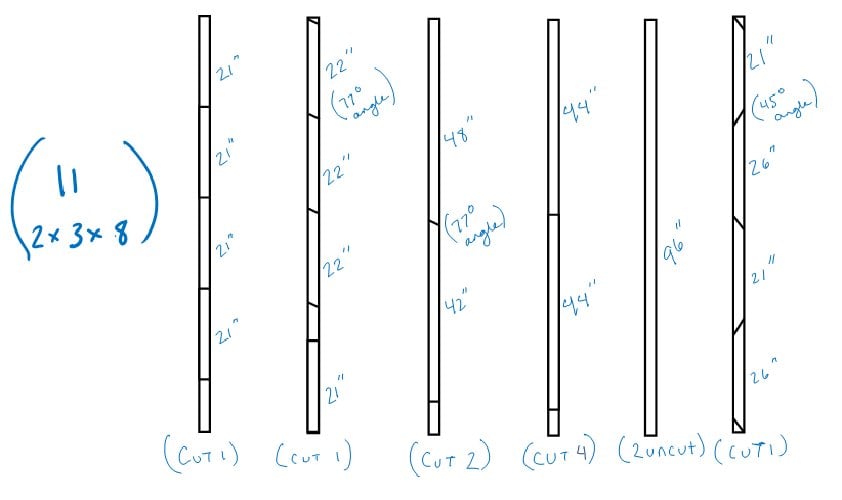
I have drawn up plans, sans hardware. I got all my hinges and chains and metal hardware at Re-Store, so I really can't make recommendcations on that front. But the only lumber you need is 11 2x3x8s, and 3 standard sheets of 1/4 inch ply.
Whaddaya think? The hens have now spent several nights in there, and they seem pretty content. I am proud.
Kycklingar’s Tractor
Plans and Instructions
You will need:
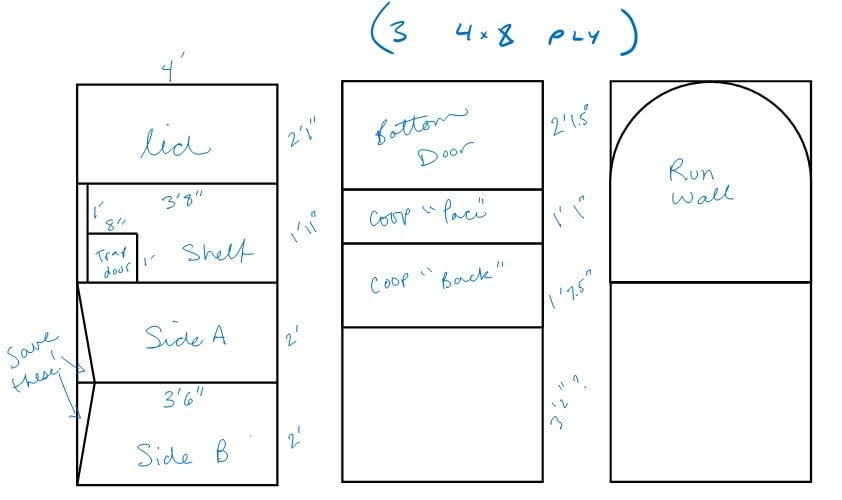
3 4x8 sheets of ¼” plywood
11 2x3x8 lumber
1 2x2x8 lumber
4 10-foot lengths of ¾ in PVC conduit
1 20-foot roll of 48” wide mesh (your choice)
1 5’ length of 1x6 (or similar) for ramp
9 hinges (many types possible)
6 heavy duty eye bolts (many types possible)
6 sturdy s-hooks
3 small turnbuckles
1 box 3.5” drywall screws
1 box 1” drywall screws
1 case small zip-ties (or just use wire.)
fasteners for lid, front door, and run end (see photos – many types possible!)
Recommended additionals:
- “PetScreen” to line lower edge of run
- Cup hooks and eye screws for securing removable ramp
-2 feet of lightweight chain
-Handles
- decorative floor vent-covers for side vents in coop
- paint
Necessary Tools:
Power drill
Bit for pre-drilling screw holes
Bit for pre-drilling eye bolt holes
Phillips head screwdriver bit
Mitre saw
Jigsaw
Wire Snippers
Tape measure
Pencil
Friend (some assembly requires 2 sets of hands!)
Optional (to make straight lines easier to cut):
Circular saw
Instructions:
Using mitre saw, cut 2x3 lumber as directed below.
Using mitre saw, cut 5 inches off the end of each piece of PVC conduit
Using wire snippers, cut two 9’7” lengths of wire mesh
Using circular saw or jigsaw, cut plywood as directed below. (DO NOT cut the arch yet!)
Using or , cut plywood as directed below. (
Measure and mark the following lengths on the 2x2x8: 2 inches from each end, and 33 inches in from each end
Measure and mark the middle of the PVC conduit (57.5”)
Using power drill, pre-drill screw holes through the marked parts of the PVC conduit
Using power drill and 3” screws, screw center of PVC conduit to the marked areas on the 2x2x8
(product should look like a spine with ribs)
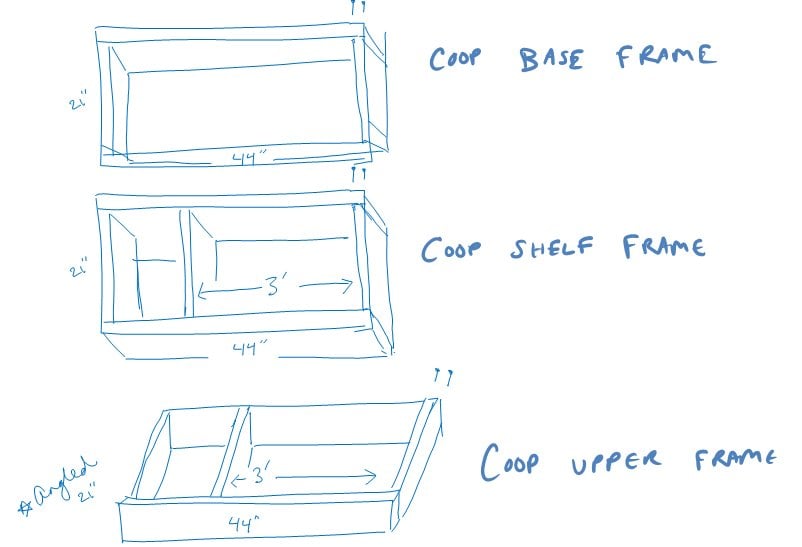
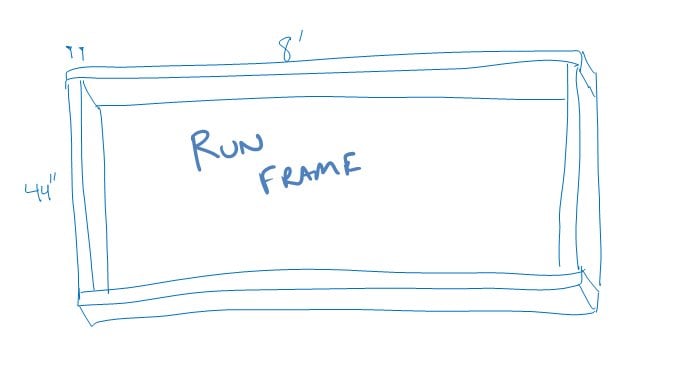
Assemble the following pieces. Use power drill to pre-drill all screw holes. Assemble with 3.5” drywall screws.
Lay your pre-cut lengths of wire mesh over your already-created pvc/2x2 frame.
Connect the mesh pieces to eachother with small zip ties or wire.
Connect the mesh to your frame with small zip ties or wire (as shown with red x-marks).
Make a 2.5” cut in the 4 corners of the mesh, 1.5” from the ends (as directed above.)
Get a FRIEND!
Together, bend the mesh arrangement into an arch and push the ends down into your run frame.
WARNING: The tension should hold the arch in place, but if it comes loose, it can really hurt someone! Havesomeone hold it carefully while you secure the parts.
While your friend keeps the assembly stable, sit inside the run. Pre-drill holes through the PVC, and screw it intothe frame with the 3” drywall screws. Take the 4 pieces of 2x3 cut at a 45 degree angle, and place them on the inner corners of the frame for support.
Have Friend hold them in place while you pre-drill from the outside, and attach them with 3” drywall screws.
Hold uncut sheet of plywood against one end of the run. Trace the arch, and cut with a jigsaw.
Attach the plywood door to the run frame with hinges, and use a closure to attach the top part of the arch to the end of the 2x2 spine.
Place a 48” and 42” angled piece of 2x3 side-by-side on the ground. Lay one of the coop sides over them, and align them with the edges. Using 1.5” drywall screws, tack the pieces together in 2 places.
Repeat the process, making a mirror image of the previous assembly.
Mark a solid line on the plywood, 30 inches from the bottom of each side.
Place coop base frame on ground, and have Friend hold the sides up, with the plywood-side facing in and the 2x3s facing out.
Pre-drill and then screw the pieces together. Use 3” screws through the 2x3s, and 1.5” screws through the plywood.
Repeat the process with the opposite side.
Have Friend hold the coop shelf frame, with its top aligned with the pre-marked line.
Pre-drill screw holes, and attach with 3” screws and 1.5” screws as you did with the base.
Have Friend hold the coop top frame, with its top aligned with the top of the sides.
Pre-drill screw holes, and attach with 3” screws and 1.5” screws as you did with the base.
Using 1.5” drywall screws, attach shelf plywood to shelf frame.
Using 1.5” drywall screws, attach coop “back” to the upper half of the tall end of the coop.
Using 1.5” drywall screws, attach coop “face” to the upper half of the short end of the coop.
Using 1.5” drywall screws, attach the two leftover triangular pieces of wood below the upper half of the tall end of the coop. Align them vertically.
Attach coop bottom door with hinges. Use your choice of fasteners to keep the door closed at the top. Install chains if desired, to keep it from opening too far.
Attach coop lid with hinges. Use your choice of fasteners to keep the door secure from predators.
Attach trap door with hinges. Use choice of fastener to keep the door secure from predators.
Considering the length of your turnbuckles, measure the best location for your eye bolts. Place eye bolts in the sides of the coop, and one centered at the very top. Use large drill bit to create holes for the bolts, and secure them on the other side with a nut.
Attach the s-hooks to your turnbuckles with a quick clamp from a pair of pliers. Connect the coop to the run with the turnbuckles!
(Optional: install vents in the sides of the nesting/roosting area. Trace the vents, use a large drill bit to create the corners of your hole, and then use a jigsaw to cut out the shape.)
PHOTOS:
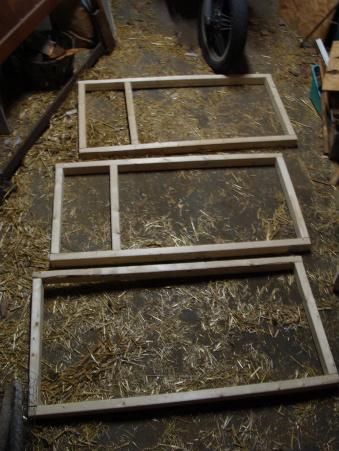
The frames:
The ribs for the run:
(Ignore the corner pieces on the frame… they’re NOT part of the plan!!)(Ignore the corner pieces on the frame… they’re NOT part of the plan!!)
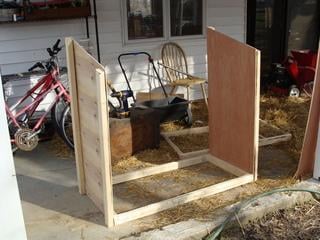
The walls:
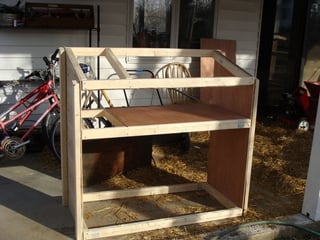
Assembling the coop:
…SO sorry I forgot to get shots of the assembly of the run!!
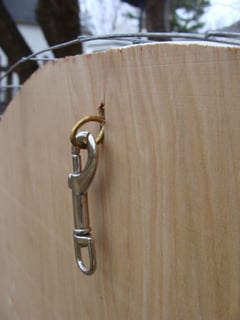
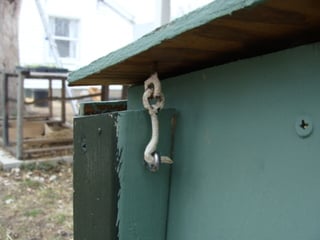
For the end of the run, here’s the fastener. Use a drill bit and jigsaw to make the cut, and an eye screw for the loop. Any type of hook will do.
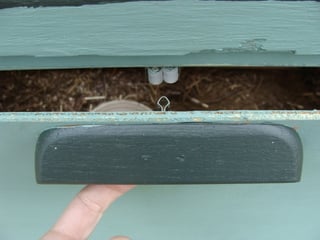
For the bottom door and the roof, it’s best to fasten in 3 places – the middle and the 2 sides.
Here’s what I did for the bottom door middle and sides: A snap fastener in the middle (the screws secure both the nipple AND the door handle… how handy!) And hook and eye fasteners for the sides.
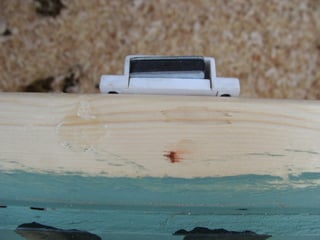
Here’s what I did for the top door middle and sides: A magnetic fastener in the middle (snap fastener would work just as well if not better, but I didn’t have any more around the house), and hook and eye fasteners for the sides.
Here’s how you secure the run to the coop with turnbuckles:
Now here are some improvements I would make, if I were to do it again...
1. I would add a smaller door so I can let the hens out into the yard when I want to allow them to free-range. The large flop-down door at the end of the run is awkward, and my friend's kid stepped on it once and broke a hinge. A simple repair, but it could have been worse. I think I'll just cut a smaller arch into that door and attach another latch.
2. I have stopped closing the trap door at night, since the hens can't get down to their food and water. This makes it a tad less secure, but if I really felt I needed more predator security, I would put wire on the bottom of the coop attachment, and create a drop-down door to cover the opening between the coop and run.
Other than that, the hens and I are enjoying it immensely!!! Many jealous neighbors.")
...Also, my girls need a secure place to sleep now that I have to separate them from the Roos, who get dibs on the nice secure garage coop, as it muffles their crowing from reaching the neighbors at 4am.
Long story short, I looked at all the ideas here on BYC, and took my favorite parts of each, and built an awesome new tractor for about $80 in total materials. (keeping in mind that I have a habitat for humanity Re-Store near me... yay!)
Sooooo, here it is!!
The run can be separated from the coop with turnbuckles. Here's DH doing so! (no, ladies, he did NOT design it, build it, or take any part in the project. Okay, I take it back... he got really romantic the other night and bought me a new Litheon 18V drill since I was complaining that my old one was dying on me...
I can carry the run by myself! The coop is a really easy carry too... it's just too awkwardly shaped for one person. Here are the girls enjoying their new digs. Above them, they can enter the roosting/nesting area, which has a trap door I can close at night to keep them safe. Also, this big arched piece of plywood is connected by hinges at the bottom so I can open the whole thing up and get in.
I can open the top to get eggs and to check on the hens. The vents are old floor vents from ReStore!

I searched the web and downloaded an image of a vintage egg sign, and made a stencil... I LOVE it! (all leftover paint from other projects - mine and my neighbor's)

And the front bottom opens up, too, for me to give them water. A chain keeps it from falling all the way down. Oh, and you'll notice the bottom edge of the run is lined with petscreen. This is to keep little animal paws from grabbing the hens' wings, as happened to one of my babies in the first coop I made. A cat got her paw in through the chickenwire and did a number on my baby's wing
. Also, once my neighbor's dogs scared the girls and they beat themselves silly on the wire. The screen layer is much softer and won't damage their beaks.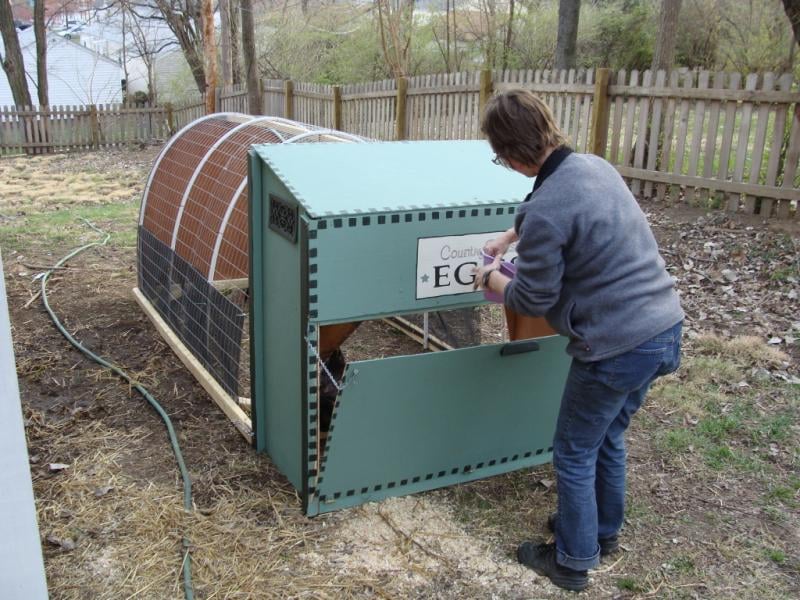
I have drawn up plans, sans hardware. I got all my hinges and chains and metal hardware at Re-Store, so I really can't make recommendcations on that front. But the only lumber you need is 11 2x3x8s, and 3 standard sheets of 1/4 inch ply.
Whaddaya think? The hens have now spent several nights in there, and they seem pretty content. I am proud.
Kycklingar’s Tractor
Plans and Instructions
You will need:
3 4x8 sheets of ¼” plywood
11 2x3x8 lumber
1 2x2x8 lumber
4 10-foot lengths of ¾ in PVC conduit
1 20-foot roll of 48” wide mesh (your choice)
1 5’ length of 1x6 (or similar) for ramp
9 hinges (many types possible)
6 heavy duty eye bolts (many types possible)
6 sturdy s-hooks
3 small turnbuckles
1 box 3.5” drywall screws
1 box 1” drywall screws
1 case small zip-ties (or just use wire.)
fasteners for lid, front door, and run end (see photos – many types possible!)
Recommended additionals:
- “PetScreen” to line lower edge of run
- Cup hooks and eye screws for securing removable ramp
-2 feet of lightweight chain
-Handles
- decorative floor vent-covers for side vents in coop
- paint
Necessary Tools:
Power drill
Bit for pre-drilling screw holes
Bit for pre-drilling eye bolt holes
Phillips head screwdriver bit
Mitre saw
Jigsaw
Wire Snippers
Tape measure
Pencil
Friend (some assembly requires 2 sets of hands!)
Optional (to make straight lines easier to cut):
Circular saw
Instructions:
Using mitre saw, cut 2x3 lumber as directed below.
Using mitre saw, cut 5 inches off the end of each piece of PVC conduit
Using wire snippers, cut two 9’7” lengths of wire mesh
Using circular saw or jigsaw, cut plywood as directed below. (DO NOT cut the arch yet!)
Using or , cut plywood as directed below. (
Measure and mark the following lengths on the 2x2x8: 2 inches from each end, and 33 inches in from each end
Measure and mark the middle of the PVC conduit (57.5”)
Using power drill, pre-drill screw holes through the marked parts of the PVC conduit
Using power drill and 3” screws, screw center of PVC conduit to the marked areas on the 2x2x8
(product should look like a spine with ribs)
Assemble the following pieces. Use power drill to pre-drill all screw holes. Assemble with 3.5” drywall screws.
Lay your pre-cut lengths of wire mesh over your already-created pvc/2x2 frame.
Connect the mesh pieces to eachother with small zip ties or wire.
Connect the mesh to your frame with small zip ties or wire (as shown with red x-marks).
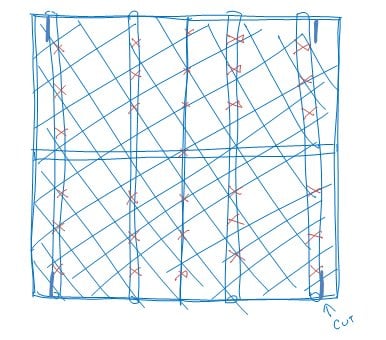
Make a 2.5” cut in the 4 corners of the mesh, 1.5” from the ends (as directed above.)
Get a FRIEND!
Together, bend the mesh arrangement into an arch and push the ends down into your run frame.
WARNING: The tension should hold the arch in place, but if it comes loose, it can really hurt someone! Havesomeone hold it carefully while you secure the parts.
While your friend keeps the assembly stable, sit inside the run. Pre-drill holes through the PVC, and screw it intothe frame with the 3” drywall screws. Take the 4 pieces of 2x3 cut at a 45 degree angle, and place them on the inner corners of the frame for support.
Have Friend hold them in place while you pre-drill from the outside, and attach them with 3” drywall screws.
Hold uncut sheet of plywood against one end of the run. Trace the arch, and cut with a jigsaw.
Attach the plywood door to the run frame with hinges, and use a closure to attach the top part of the arch to the end of the 2x2 spine.
Place a 48” and 42” angled piece of 2x3 side-by-side on the ground. Lay one of the coop sides over them, and align them with the edges. Using 1.5” drywall screws, tack the pieces together in 2 places.
Repeat the process, making a mirror image of the previous assembly.
Mark a solid line on the plywood, 30 inches from the bottom of each side.
Place coop base frame on ground, and have Friend hold the sides up, with the plywood-side facing in and the 2x3s facing out.
Pre-drill and then screw the pieces together. Use 3” screws through the 2x3s, and 1.5” screws through the plywood.
Repeat the process with the opposite side.
Have Friend hold the coop shelf frame, with its top aligned with the pre-marked line.
Pre-drill screw holes, and attach with 3” screws and 1.5” screws as you did with the base.
Have Friend hold the coop top frame, with its top aligned with the top of the sides.
Pre-drill screw holes, and attach with 3” screws and 1.5” screws as you did with the base.
Using 1.5” drywall screws, attach shelf plywood to shelf frame.
Using 1.5” drywall screws, attach coop “back” to the upper half of the tall end of the coop.
Using 1.5” drywall screws, attach coop “face” to the upper half of the short end of the coop.
Using 1.5” drywall screws, attach the two leftover triangular pieces of wood below the upper half of the tall end of the coop. Align them vertically.
Attach coop bottom door with hinges. Use your choice of fasteners to keep the door closed at the top. Install chains if desired, to keep it from opening too far.
Attach coop lid with hinges. Use your choice of fasteners to keep the door secure from predators.
Attach trap door with hinges. Use choice of fastener to keep the door secure from predators.
Considering the length of your turnbuckles, measure the best location for your eye bolts. Place eye bolts in the sides of the coop, and one centered at the very top. Use large drill bit to create holes for the bolts, and secure them on the other side with a nut.
Attach the s-hooks to your turnbuckles with a quick clamp from a pair of pliers. Connect the coop to the run with the turnbuckles!
(Optional: install vents in the sides of the nesting/roosting area. Trace the vents, use a large drill bit to create the corners of your hole, and then use a jigsaw to cut out the shape.)
PHOTOS:
The frames:
The ribs for the run:
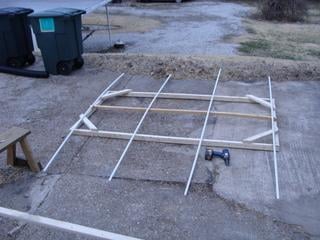
(Ignore the corner pieces on the frame… they’re NOT part of the plan!!)(Ignore the corner pieces on the frame… they’re NOT part of the plan!!)
The walls:

Assembling the coop:
…SO sorry I forgot to get shots of the assembly of the run!!
For the end of the run, here’s the fastener. Use a drill bit and jigsaw to make the cut, and an eye screw for the loop. Any type of hook will do.
For the bottom door and the roof, it’s best to fasten in 3 places – the middle and the 2 sides.
Here’s what I did for the bottom door middle and sides: A snap fastener in the middle (the screws secure both the nipple AND the door handle… how handy!) And hook and eye fasteners for the sides.
Here’s what I did for the top door middle and sides: A magnetic fastener in the middle (snap fastener would work just as well if not better, but I didn’t have any more around the house), and hook and eye fasteners for the sides.
Here’s how you secure the run to the coop with turnbuckles:

Now here are some improvements I would make, if I were to do it again...
1. I would add a smaller door so I can let the hens out into the yard when I want to allow them to free-range. The large flop-down door at the end of the run is awkward, and my friend's kid stepped on it once and broke a hinge. A simple repair, but it could have been worse. I think I'll just cut a smaller arch into that door and attach another latch.
2. I have stopped closing the trap door at night, since the hens can't get down to their food and water. This makes it a tad less secure, but if I really felt I needed more predator security, I would put wire on the bottom of the coop attachment, and create a drop-down door to cover the opening between the coop and run.
Other than that, the hens and I are enjoying it immensely!!! Many jealous neighbors.

