4 Hills Cabinet Incubator.
Hello all. Hope this will help someone like all the great ideas on BYC have helped us. We made a small incubator 5 years ago but I did not know what I was doing. We had a very bad hatch rate so we gave up on it and started using Cochins do the work for us.
After many hours brousing through the BYC pages we decided to make another go at it. I really got tired of having to wait for "Hatchity Hen" to decide to go broody. So here is what we did. We realy liked the cabinet style incubators so that's what we built.
Parts list:
1/2 sheet 3/4 inch plywood (already had)
1 1/2" corse thread screws (already had)
1 Sheet aluminum backed 1/2" foam insulation board (already had)
1 Tube grab-it construction adheisive (already had)
1 - Tube clear latex window and door caulk (already had)
1 Metal conduit junction box (already had)
6' Electrial cord (cut off no good skill saw. already had)
Wire nuts (already had)
12' - 12 guage wire (already had)
5 - Stage 2 baby food jars "cleaned" (already had)
2 - 4" personal fans ($6.00 each @ Walmart)
Aluminum backed HVAC tape (already had)
1 - Aluminum casserole pan (already had)
1 - Large hole sponge ($1.00 @ Dollar Tree)
1 - Hot water heater thermostat ($8.95 @ Home Depot)
1 - Old glass front cabinet door (already had)
1 - Digital indoor/outdoor thermoter/hydrometer ($8.95 @ Walmart)
1 - 8' stick 1/2" PVC pipe (already had)
5 - 1/2" PVC Tee's ($0.59 each @ Home Depot)
3 - 1/2" PVC caps ($0.29 each @ Home Depot)
10 - 1/2" PVC 90's ($0.29 each @ Home Depot)
1 - Wood paint stir stick (already had)
2 - 2 1/2 Dozen cardboard eggs trays (already had)
2 - 3 1/2" 1/4-20 bolts ($.49 each @ Home Depot)
4 - 1/4-20 Flat washers ($0.07 each @ Home Depot)
4 - 1/4-20 Locking nuts ($0.10 each @ Home Depot)
Hot glue gun & glue sticks (already had)
1 - Pair 1 1/2" hinges ($2.39 @ Home Depot)
2 - Screen door hooks ($2.98 @ Walmart)
Cherry Stain (already had)
Foam stain brush (already had)
2 - Light sockets (alreay had)
2 - 100 watt light bulbs (already had)
Total cost of materials $44.65 plus tax!
We have $50.00 in a 60 egg cabinet incubator.
The Process:
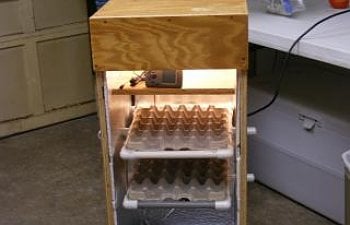
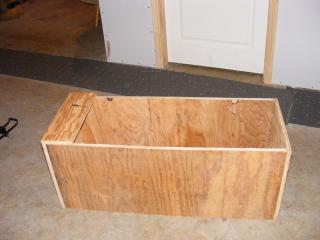
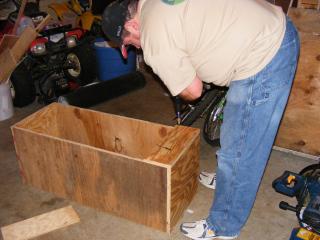
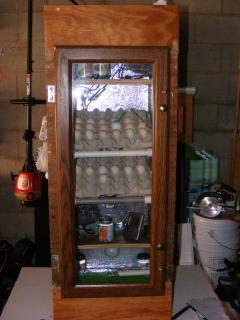
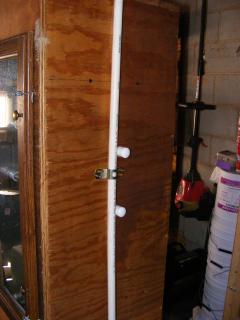
First things first we decided on measurements. We built ours 16" x 16" x 39" outside. So we cut all the pieces. Both side pieces and the back piece are 16" wide x 39" tall. The top and bottom are 16" wide x 16 3/4" tall. The front I cut blocks and strips to frame out for the door I had. Your door may be diffferent than mine.

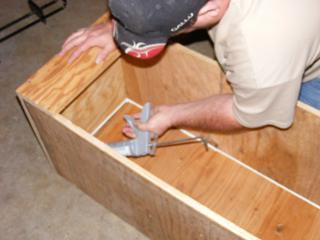
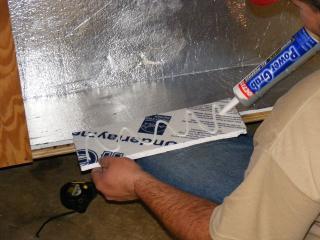
Next I caulked all the seams with latex caulk to ensure air tightness.
Then I started cutting and to glue in all the insulation.
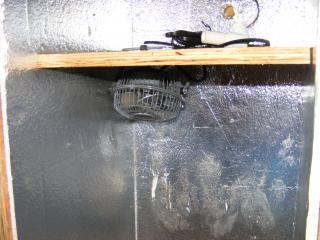
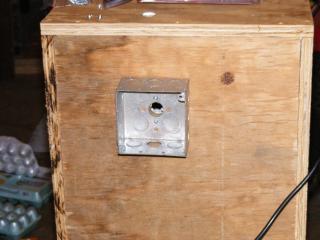
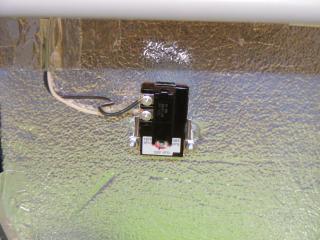
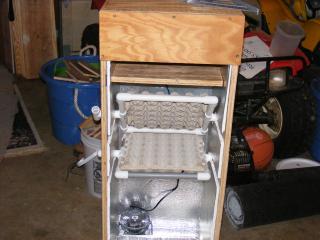
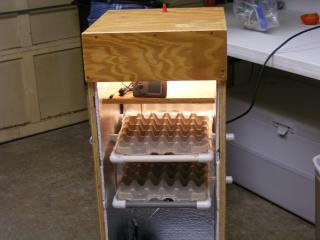
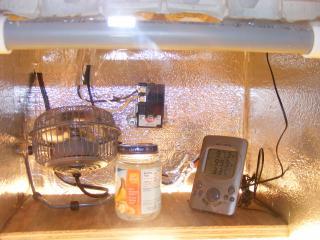
After I got everything in place I went back and taped all the corners and seams with the aluminum backed tape. I also taped the top of the inside above the light bulb to help reflect the heat. Then I put a shelve in the top about 8 - 9" from the top. I made sure to leave a gap at the back and front for the air to circulate. I boared a 3/4" hole in the back of the incubator to install the 1/2" PVC 90 and nipple to conect the metal junction box. Next I added the light socket at the top of the incubator.
I installed and wired the thermostat and fan.
I used 3 1/2" bolts to keep the thermostat off the wall of the incubator. I also taped all the wires inside the incubator to keep them stationary.
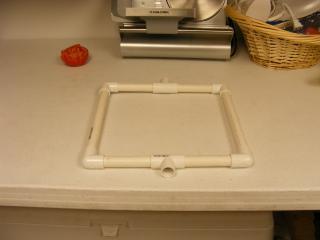
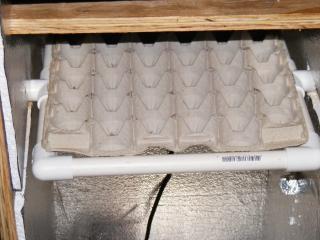
Next I started to design the egg racks. I used the cardboard egg tray to get my layout. I used 4 -1/2" pvc 90's and 2 - 1/2" tee's per rack. The tee's need to be on opposing sides.
( Please overlook the tomato it was lunch time)
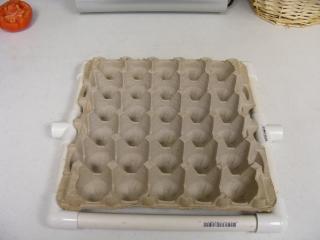
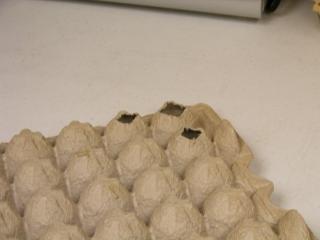
Once I got the layout set I made 2 of them. Then I cut the bottom out of all the egg holes in both the trays with a razor knife.
Next I glued tham into place in the frame of pvc pipe. I made the frame to be about 1/4" of play on each side as it rested in the cabinet. To install them I had to cut a strip of my insulation out to slide the rack into place. If you'll be careful when cutting, you can put in back into place after you get you racks in.
To install racks I placed the tee's in the center of the incubator and made sure that I would not hit the shelve above it when I turned the rack on a angle. Then I marked the centers and used a paddle bit to boar holes for the 1/2" pvc pipe. Once the holes were boared, I took some of the pvc pipe and the caps to make swivel pieces. Put the cap on one end and slide the pipe through the hole and into the tee of the rack. The cap keeps the pipe from comming out. On one I used a tee for a handle to operate the turner.
I repeated this process for the bottom rack.
Now I connected the two racks together with the wooden paint stirrer. I rounded the ends of the paint stirrer and drilled two holes in the ends. Then I bolted the stirrer to the top and the bottom racks so when I turned the top one they both turned.
At first I only used one light in the top. On our first test run we could not get it less than a 12 degree change in temp. No good. So I went back and added another shelve,light, and fan in the bottom of the incubator. I have the fan in the top blowing down and the fan in the bottom blowing up. The shelve in the bottom is just about 3" lower than the thermostat which is great for the thermometer. I also made a fake egg to put in the top rack. I got the idea from another BYCer. I used a large egg knocked a hole in the top. Shook out all the insides and washed it out well and let it dry. Then I placed the probe for the outside temp from the thermometer inside the egg and filled it with hair gell. Sealed it off with some hot glue and their you go, inside temp of the eggs. Seems to work great. Next I installed the door. All the way around the door is a small crack. I left it. So far it looks like it is fine, temp and humidity are great.
Notice the caps on one side and the cap and tee on the other.
Behind the tee, I installed 2 screwes. I drilled a hole in to tee just big enough for the screw head to go through.
I have just enough play in the racks inside to pull the handle, tilt the racks, then push it back in, locking it on the screw. This keep the racks from unwanted turning.
The long pipe beside the caps is the water pipe. It is a piece of pvc the lenght of the incubator that 90s through the side and into the water pan. I have a piece of paper towel in the top of it. I use a funnel and hot water when I add to it.
I placed two baby food jars filled with water as heat sinkes in the bottom of the incubator next to the water pan. One on the bottom shelve with the thermometer and fan blowing up.
And two on the top shelve with the fan blowing down.
The light turnes on at 98.4 and off at 101.5. Inside temp of the egg ranges from 99.2 - 100.2. We have set our first eggs. 23 bantam cochins. they are due to hatch on Mothers Day.
Hope this helps someone spark ideas for their own Incubator. I will post updates on our first hatch to let you all know how well it works.
UPDATE: 5/14/10
Our eggs hatched on Mothers Day as planned. Hatch rate not as good as expected. Out of the 23 eggs we got 6. 7 of the eggs were from a new splash cockerel we got in Feb. Not sure why none of his hatched. We are going to set some more from him and see what happens. All the others were from a Black trio. 6 out of 16 hatched. I think we went wrong by cagging them when we first started collecting the eggs. I don't think they mated in the cage. This would make sence of only getting 6 to hatch. The hens were fertile when we cagged them, so for the next 6 days or so they would stay that way even if they did not mate. We are going to set 24 more this Saturday 5-25-10 to see what happens. These eggs will be from different birds. 6 BLRW, 6 GLW, 6 Columbian Wyndots and 6 Partridge Rocks. I'll update later again after they hatch.
Changes to the Bator after first hatch.
Only adjustment I made to the bator after our first hatch was, I cut the water tube inside the bator alot shorter. When it came time to put the eggs on the bottom to hatch, it blocked the water pan from comming out. Now I can get the pan out quick and easy.
Hello all. Hope this will help someone like all the great ideas on BYC have helped us. We made a small incubator 5 years ago but I did not know what I was doing. We had a very bad hatch rate so we gave up on it and started using Cochins do the work for us.
After many hours brousing through the BYC pages we decided to make another go at it. I really got tired of having to wait for "Hatchity Hen" to decide to go broody. So here is what we did. We realy liked the cabinet style incubators so that's what we built.
Parts list:
1/2 sheet 3/4 inch plywood (already had)
1 1/2" corse thread screws (already had)
1 Sheet aluminum backed 1/2" foam insulation board (already had)
1 Tube grab-it construction adheisive (already had)
1 - Tube clear latex window and door caulk (already had)
1 Metal conduit junction box (already had)
6' Electrial cord (cut off no good skill saw. already had)
Wire nuts (already had)
12' - 12 guage wire (already had)
5 - Stage 2 baby food jars "cleaned" (already had)
2 - 4" personal fans ($6.00 each @ Walmart)
Aluminum backed HVAC tape (already had)
1 - Aluminum casserole pan (already had)
1 - Large hole sponge ($1.00 @ Dollar Tree)
1 - Hot water heater thermostat ($8.95 @ Home Depot)
1 - Old glass front cabinet door (already had)
1 - Digital indoor/outdoor thermoter/hydrometer ($8.95 @ Walmart)
1 - 8' stick 1/2" PVC pipe (already had)
5 - 1/2" PVC Tee's ($0.59 each @ Home Depot)
3 - 1/2" PVC caps ($0.29 each @ Home Depot)
10 - 1/2" PVC 90's ($0.29 each @ Home Depot)
1 - Wood paint stir stick (already had)
2 - 2 1/2 Dozen cardboard eggs trays (already had)
2 - 3 1/2" 1/4-20 bolts ($.49 each @ Home Depot)
4 - 1/4-20 Flat washers ($0.07 each @ Home Depot)
4 - 1/4-20 Locking nuts ($0.10 each @ Home Depot)
Hot glue gun & glue sticks (already had)
1 - Pair 1 1/2" hinges ($2.39 @ Home Depot)
2 - Screen door hooks ($2.98 @ Walmart)
Cherry Stain (already had)
Foam stain brush (already had)
2 - Light sockets (alreay had)
2 - 100 watt light bulbs (already had)
Total cost of materials $44.65 plus tax!
We have $50.00 in a 60 egg cabinet incubator.
The Process:
First things first we decided on measurements. We built ours 16" x 16" x 39" outside. So we cut all the pieces. Both side pieces and the back piece are 16" wide x 39" tall. The top and bottom are 16" wide x 16 3/4" tall. The front I cut blocks and strips to frame out for the door I had. Your door may be diffferent than mine.
Next I caulked all the seams with latex caulk to ensure air tightness.
Then I started cutting and to glue in all the insulation.
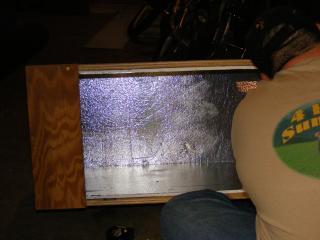
After I got everything in place I went back and taped all the corners and seams with the aluminum backed tape. I also taped the top of the inside above the light bulb to help reflect the heat. Then I put a shelve in the top about 8 - 9" from the top. I made sure to leave a gap at the back and front for the air to circulate. I boared a 3/4" hole in the back of the incubator to install the 1/2" PVC 90 and nipple to conect the metal junction box. Next I added the light socket at the top of the incubator.
I installed and wired the thermostat and fan.
I used 3 1/2" bolts to keep the thermostat off the wall of the incubator. I also taped all the wires inside the incubator to keep them stationary.
Next I started to design the egg racks. I used the cardboard egg tray to get my layout. I used 4 -1/2" pvc 90's and 2 - 1/2" tee's per rack. The tee's need to be on opposing sides.
( Please overlook the tomato it was lunch time)
Once I got the layout set I made 2 of them. Then I cut the bottom out of all the egg holes in both the trays with a razor knife.
Next I glued tham into place in the frame of pvc pipe. I made the frame to be about 1/4" of play on each side as it rested in the cabinet. To install them I had to cut a strip of my insulation out to slide the rack into place. If you'll be careful when cutting, you can put in back into place after you get you racks in.
To install racks I placed the tee's in the center of the incubator and made sure that I would not hit the shelve above it when I turned the rack on a angle. Then I marked the centers and used a paddle bit to boar holes for the 1/2" pvc pipe. Once the holes were boared, I took some of the pvc pipe and the caps to make swivel pieces. Put the cap on one end and slide the pipe through the hole and into the tee of the rack. The cap keeps the pipe from comming out. On one I used a tee for a handle to operate the turner.
I repeated this process for the bottom rack.
Now I connected the two racks together with the wooden paint stirrer. I rounded the ends of the paint stirrer and drilled two holes in the ends. Then I bolted the stirrer to the top and the bottom racks so when I turned the top one they both turned.
At first I only used one light in the top. On our first test run we could not get it less than a 12 degree change in temp. No good. So I went back and added another shelve,light, and fan in the bottom of the incubator. I have the fan in the top blowing down and the fan in the bottom blowing up. The shelve in the bottom is just about 3" lower than the thermostat which is great for the thermometer. I also made a fake egg to put in the top rack. I got the idea from another BYCer. I used a large egg knocked a hole in the top. Shook out all the insides and washed it out well and let it dry. Then I placed the probe for the outside temp from the thermometer inside the egg and filled it with hair gell. Sealed it off with some hot glue and their you go, inside temp of the eggs. Seems to work great. Next I installed the door. All the way around the door is a small crack. I left it. So far it looks like it is fine, temp and humidity are great.
Notice the caps on one side and the cap and tee on the other.
Behind the tee, I installed 2 screwes. I drilled a hole in to tee just big enough for the screw head to go through.
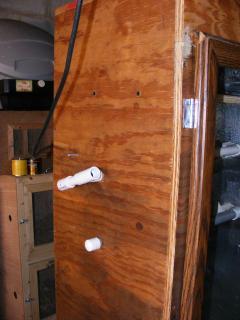
I have just enough play in the racks inside to pull the handle, tilt the racks, then push it back in, locking it on the screw. This keep the racks from unwanted turning.
The long pipe beside the caps is the water pipe. It is a piece of pvc the lenght of the incubator that 90s through the side and into the water pan. I have a piece of paper towel in the top of it. I use a funnel and hot water when I add to it.

I placed two baby food jars filled with water as heat sinkes in the bottom of the incubator next to the water pan. One on the bottom shelve with the thermometer and fan blowing up.
And two on the top shelve with the fan blowing down.

The light turnes on at 98.4 and off at 101.5. Inside temp of the egg ranges from 99.2 - 100.2. We have set our first eggs. 23 bantam cochins. they are due to hatch on Mothers Day.

Hope this helps someone spark ideas for their own Incubator. I will post updates on our first hatch to let you all know how well it works.
UPDATE: 5/14/10
Our eggs hatched on Mothers Day as planned. Hatch rate not as good as expected. Out of the 23 eggs we got 6. 7 of the eggs were from a new splash cockerel we got in Feb. Not sure why none of his hatched. We are going to set some more from him and see what happens. All the others were from a Black trio. 6 out of 16 hatched. I think we went wrong by cagging them when we first started collecting the eggs. I don't think they mated in the cage. This would make sence of only getting 6 to hatch. The hens were fertile when we cagged them, so for the next 6 days or so they would stay that way even if they did not mate. We are going to set 24 more this Saturday 5-25-10 to see what happens. These eggs will be from different birds. 6 BLRW, 6 GLW, 6 Columbian Wyndots and 6 Partridge Rocks. I'll update later again after they hatch.
Changes to the Bator after first hatch.
Only adjustment I made to the bator after our first hatch was, I cut the water tube inside the bator alot shorter. When it came time to put the eggs on the bottom to hatch, it blocked the water pan from comming out. Now I can get the pan out quick and easy.