After becoming dissatisfied with my Little Giant's propensity to temperature swings, I went on the market for a new incubator. I wanted something of a medium size that was cheap and reliable. Unfortunately, I discovered that finding all three of those qualities in the average commercial incubator was about as difficult as hatching a double yolker egg—if not harder. I located a few Hovabator models that seemed to fit the bill somewhat, but they were still over $150 and made of Styrofoam, which I am not a fan of due to sanitation and insulative difficulties. I ended up at the conclusion that making my own was the only way I could include all of the features I desired without spending exorbitant amounts. Since my first attempt, I have re-built the original twice and made another miniature version for small hatches, all three of which have their own articles linked below. I enjoy fiddling with incubators and frequently do pointless upgrades in the name of experimentation. DIY incubators can be as simple or as complex as you wish; there is no need to copy all of my inane modifications.
It is my hope that this article will aid and encourage others in building their own incubators. There is no need for expensive materials or hundreds of hours of design and construction-work—I have even seen 5-gallon buckets or electric frying pans modified and used successfully. There will be links included to a few on-line sources for suitable supplies, but I suggest trying to use largely what you already have or else the total cost for the build will escalate rapidly. With some re-purposing and basement digging involved, the total cost for this incubator was about $45.
Linked below are some articles and videos that may be helpful.
Rush Lane Poultry's Video Series
Part 1 / Part 2 / Part 3 / Part 4
This video series is almost solely what I used to come up with the plans for my first build. The wiring schematics and the element locations are based directly off of this video. I highly recommend watching it if you are building a tabletop incubator of a similar shape. On the off chance that the videos have been deleted in the future, I will still include diagrams for wiring in this article.
BinBator Mark Two
After several issues with this build that I will delineate later on, I decided to create a second iteration using mostly the same parts and a different body. This article covers the construction and operation of that build.
Cabinet BinBator
This is the build I made when I outgrew standard tabletop models. It has a capacity high enough that I cannot see a future in which I will need another incubator for the pre-lockdown period. This is a good choice for large backyard operations.
MiniBator
These large tabletop models can be excessive for hatching only a few eggs. I built this incubator with that in mind.
DIY Cabinet Incubator
This thread is what I based my cabinet incubator off of. It may seem overwhelming at first, but if you pay attention and break down the wiring and installation into discrete pieces it will seem more manageable. Building an incubator is not difficult!
Tools

Adapter label.

The whole adapter. This part is needed because the plug on the fan is not compatible with a wall outlet. The ends of each respective piece will be cut off and spliced together.

Extension cord.

Gaming fan—64.4 CFM. Note the ends. The white casings will be cut off and the wire will be spliced with the adapter. There are 3 wires. The yellow is not the live or ground and so can be disregarded.

Here are the wires coming out from the fan.

Here is the first end. You can cut in this location if you wish, or at the next end if the yellow wire is to be avoided entirely.

Note how the yellow wire stops here, but the red and the black keep going.

The second end.

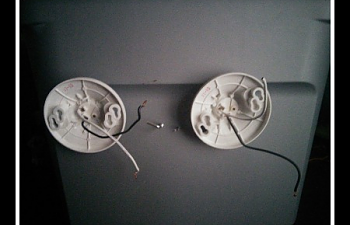
The light sockets. I am using this style because it is what I have on hand. Due to space concerns, they will need to be installed with the majority of the socket on the outside of the incubator.

This tote will make up the incubator body. The sides slant inwards which will make installation of some parts more difficult.

Here is the tote with the bubble wrap insulation duct-taped on.

After wrapping the incubator up I cut the hole in the lid for the viewing window. What good is an incubator if you can't watch the chicks? The dimensions of the hole are 7 x 10 inches.
After that, I duct-taped a square of insulation on the underneath and cut out the excess.
I ran a bead of hot glue between the insulation and the plastic to keep it secure. I didn't want it getting caught or torn.
Next comes the plexiglass. I used hot glue once again.
Next, I cut holes in the back of the tote. I used a utility knife and cut a hole for the head to stick through. I also removed some of the insulation around it so it wouldn't touch the lightbulb.

A picture of the socket being hot-glued in.
Back view of the tote, wiring completed (shown later.)

Make sure you lay everything out before gluing/screwing it in. Here is an image of approximatelyhow far away from the side I have the fan to ensure adequate airflow.
Here is the wafer thermostat being installed. I used two screws that were about an inch long. Later, you will drill a 1/4 inch hole next to the thermostat for the blue wires to come through to the other side.
Here's a sketch of how the wires are connected. This setup is created from the wiring method used in the Rush Lane Poultry video links used above. Note that I am not an electrician and cannot verify the safety of this, but I have personally have no issues with following this setup in the many years my incubators have been active. Both black wires are connected to one of the thermostat wires, and the other thermostat wire is connected to one side of the extension cord. Both white wires are spliced with the second side of the extension cord. The side of the extension cord with the wide plug is the ground or neutral side. The smaller one indicates the hot wire.
Purple = fan wire
Green = adapter wire
Blue = white wire
Yellow = thermostat wire/extension
Brown = black wire
Orange = extension cord

If you wish to see a more fluid compilation of wiring this incubator style, refer to the Rush Lane Poultry video links at the beginning of this article. They have a very nice step-by-step view of the entire process.
The lights turn on now. The fan is the only element left before this build is completed.

These are the fan and adapter wires. The actual copper wire part was too thin for the wire nuts I had to hold, so I covered the joint between both black wires and the joint between both red wires in electrical tape separately and then duct-taped it all to the side.


I mounted the fan on 2 pieces of scrap wood because I didn't have long enough screws to keep an air space between the insulation and the fan.

The thermostat turns the bulbs on and off, and the fan runs. Success!
Make sure you add several vent holes around the bottom and top to ensure adequate airflow. I was slightly excessive with mine, but it did not seem to have undue issues.

As far as turning, I mostly laid my eggs on their side and turned them manually. This build can fit a slightly modified Little Giant turner, or you can DIY turners from egg cartons cut into strips and tilted back and forth.
6/16/16 Update
2/3 eggs from the test run hatched out cleanly. I would say this incubator build is a success; I did not note any undue operation issues that may have stemmed from the design itself.
Upgrade #1
I've been thinking about past hatches in my spare time and how to improve hatch rates. I have noticed that despite air cells looking fine at lockdown, the resulting chicks are rather "wet". The shells often have discolourations on the inside where the outside was touching the 'bator floor. I am thinking this is due to water that drips from the sides and gets the paper towel on the floor sopping wet. It gets mucky and stinks to high heavens. To counter this, I made a hardware cloth grate that raises the floor a bit. Water can fall through and get the underlying paper towel wet, but the eggshells can't touch it. It is not quite visible in the photo, but it has about 1 inch high sides. Since the photo was taken, I've taken it out and covered the sharp sides with duct tape for ease of removal.


Upgrade #2
Hardware cloth over the fan. This became necessary due to upgrade #1; I did not want chicks to get their beaks stuck in the fan. Keep this in mind when placing your fan in your initial build.

Upgrade #3
Tubing to add water in lockdown. This helps avoid constant temperature loss due to opening the lid to refresh water containers.


Upgrade #4
I enjoy candling. I don't enjoy temperature swings. This upgrade consists of a peephole I can open to place my hand in without causing massive temperature loss. This is particularly useful for lockdown. The hinge was simply duct tape, but something sturdier and potentially with a seal around the edge of the flap would likely work better.


After some period of operation, I began to have issues with temperature stability. If anyone else wants to try using a bin, I highly recommend screwing a piece of wood on the back to screw the thermostat on instead of putting it over the insulation. I believe the sides were too flexible, which made the microswitch slip and not turn the lights off/on well after roughly a year, or a year and a half. I was having 5*F temperature swings before I discontinued use of this incubator and rebuilt it as the BinBator Mark Two.
It is my hope that this article will aid and encourage others in building their own incubators. There is no need for expensive materials or hundreds of hours of design and construction-work—I have even seen 5-gallon buckets or electric frying pans modified and used successfully. There will be links included to a few on-line sources for suitable supplies, but I suggest trying to use largely what you already have or else the total cost for the build will escalate rapidly. With some re-purposing and basement digging involved, the total cost for this incubator was about $45.
Linked below are some articles and videos that may be helpful.
Rush Lane Poultry's Video Series
Part 1 / Part 2 / Part 3 / Part 4
This video series is almost solely what I used to come up with the plans for my first build. The wiring schematics and the element locations are based directly off of this video. I highly recommend watching it if you are building a tabletop incubator of a similar shape. On the off chance that the videos have been deleted in the future, I will still include diagrams for wiring in this article.
BinBator Mark Two
After several issues with this build that I will delineate later on, I decided to create a second iteration using mostly the same parts and a different body. This article covers the construction and operation of that build.
Cabinet BinBator
This is the build I made when I outgrew standard tabletop models. It has a capacity high enough that I cannot see a future in which I will need another incubator for the pre-lockdown period. This is a good choice for large backyard operations.
MiniBator
These large tabletop models can be excessive for hatching only a few eggs. I built this incubator with that in mind.
DIY Cabinet Incubator
This thread is what I based my cabinet incubator off of. It may seem overwhelming at first, but if you pay attention and break down the wiring and installation into discrete pieces it will seem more manageable. Building an incubator is not difficult!
Tools
- Jigsaw
- Utility knife
- Mitre saw
- Drill
- 1/4" and 3/16" bits
- Wire strippers
- Plastic tote
- A type of interior insulation (bubble wrap insulation)
- 8 x 11 sheet of plexiglass/plastic
- Duct tape
- Two light sockets
- Two light bulbs—25 to 60 watts
- One wafer thermostat assembly
- 60+ CFM computer/gaming fan
- 12v AC/DC adapter
- Assorted wire nuts
- Hot glue / liquid nails / gasket sealer
- Wire extension for the thermostat wires
- Extension cord
- Electrical tape
Adapter label.
The whole adapter. This part is needed because the plug on the fan is not compatible with a wall outlet. The ends of each respective piece will be cut off and spliced together.
Extension cord.
Gaming fan—64.4 CFM. Note the ends. The white casings will be cut off and the wire will be spliced with the adapter. There are 3 wires. The yellow is not the live or ground and so can be disregarded.
Here are the wires coming out from the fan.
Here is the first end. You can cut in this location if you wish, or at the next end if the yellow wire is to be avoided entirely.
Note how the yellow wire stops here, but the red and the black keep going.
The second end.
The light sockets. I am using this style because it is what I have on hand. Due to space concerns, they will need to be installed with the majority of the socket on the outside of the incubator.
This tote will make up the incubator body. The sides slant inwards which will make installation of some parts more difficult.
Here is the tote with the bubble wrap insulation duct-taped on.
After wrapping the incubator up I cut the hole in the lid for the viewing window. What good is an incubator if you can't watch the chicks? The dimensions of the hole are 7 x 10 inches.
After that, I duct-taped a square of insulation on the underneath and cut out the excess.
I ran a bead of hot glue between the insulation and the plastic to keep it secure. I didn't want it getting caught or torn.
Next comes the plexiglass. I used hot glue once again.
Next, I cut holes in the back of the tote. I used a utility knife and cut a hole for the head to stick through. I also removed some of the insulation around it so it wouldn't touch the lightbulb.
A picture of the socket being hot-glued in.
Back view of the tote, wiring completed (shown later.)
Make sure you lay everything out before gluing/screwing it in. Here is an image of approximatelyhow far away from the side I have the fan to ensure adequate airflow.
Here is the wafer thermostat being installed. I used two screws that were about an inch long. Later, you will drill a 1/4 inch hole next to the thermostat for the blue wires to come through to the other side.
Here's a sketch of how the wires are connected. This setup is created from the wiring method used in the Rush Lane Poultry video links used above. Note that I am not an electrician and cannot verify the safety of this, but I have personally have no issues with following this setup in the many years my incubators have been active. Both black wires are connected to one of the thermostat wires, and the other thermostat wire is connected to one side of the extension cord. Both white wires are spliced with the second side of the extension cord. The side of the extension cord with the wide plug is the ground or neutral side. The smaller one indicates the hot wire.
Purple = fan wire
Green = adapter wire
Blue = white wire
Yellow = thermostat wire/extension
Brown = black wire
Orange = extension cord
If you wish to see a more fluid compilation of wiring this incubator style, refer to the Rush Lane Poultry video links at the beginning of this article. They have a very nice step-by-step view of the entire process.
The lights turn on now. The fan is the only element left before this build is completed.
These are the fan and adapter wires. The actual copper wire part was too thin for the wire nuts I had to hold, so I covered the joint between both black wires and the joint between both red wires in electrical tape separately and then duct-taped it all to the side.
I mounted the fan on 2 pieces of scrap wood because I didn't have long enough screws to keep an air space between the insulation and the fan.
The thermostat turns the bulbs on and off, and the fan runs. Success!
Make sure you add several vent holes around the bottom and top to ensure adequate airflow. I was slightly excessive with mine, but it did not seem to have undue issues.
As far as turning, I mostly laid my eggs on their side and turned them manually. This build can fit a slightly modified Little Giant turner, or you can DIY turners from egg cartons cut into strips and tilted back and forth.
6/16/16 Update
2/3 eggs from the test run hatched out cleanly. I would say this incubator build is a success; I did not note any undue operation issues that may have stemmed from the design itself.
Upgrade #1
I've been thinking about past hatches in my spare time and how to improve hatch rates. I have noticed that despite air cells looking fine at lockdown, the resulting chicks are rather "wet". The shells often have discolourations on the inside where the outside was touching the 'bator floor. I am thinking this is due to water that drips from the sides and gets the paper towel on the floor sopping wet. It gets mucky and stinks to high heavens. To counter this, I made a hardware cloth grate that raises the floor a bit. Water can fall through and get the underlying paper towel wet, but the eggshells can't touch it. It is not quite visible in the photo, but it has about 1 inch high sides. Since the photo was taken, I've taken it out and covered the sharp sides with duct tape for ease of removal.
Upgrade #2
Hardware cloth over the fan. This became necessary due to upgrade #1; I did not want chicks to get their beaks stuck in the fan. Keep this in mind when placing your fan in your initial build.
Upgrade #3
Tubing to add water in lockdown. This helps avoid constant temperature loss due to opening the lid to refresh water containers.
Upgrade #4
I enjoy candling. I don't enjoy temperature swings. This upgrade consists of a peephole I can open to place my hand in without causing massive temperature loss. This is particularly useful for lockdown. The hinge was simply duct tape, but something sturdier and potentially with a seal around the edge of the flap would likely work better.
After some period of operation, I began to have issues with temperature stability. If anyone else wants to try using a bin, I highly recommend screwing a piece of wood on the back to screw the thermostat on instead of putting it over the insulation. I believe the sides were too flexible, which made the microswitch slip and not turn the lights off/on well after roughly a year, or a year and a half. I was having 5*F temperature swings before I discontinued use of this incubator and rebuilt it as the BinBator Mark Two.