Years ago, I helped my uncle put together a wooden swingset for my aunt. It was a place to sit together, relax and laugh. We enjoyed it for over a decade until time and the elements took their toll and the thinner boards on the seats began to rot and crack. My aunt and uncle aren't with us anymore and the idea of breaking apart the swingset saddened me more than I expected. I started looking at A-frame coop designs and decided to give the swingset new life.

As with previous coops, we planned as we built and because we had so many of the materials, our cost to transform it was minimal. To keep the coop as light as possible we substituted 2x2's for 2x4's as often as we could. Here's what you'd need to make a similar coop:
Wooden swingset frame
1x6 lumber, 4 boards
2x4 lumber, 3 boards
2x2 lumber, 5+ boards
1x2 lumber, scrap size
Quarter round molding, 2 pcs
Plywood, 1 sheet or scraps
Hardware cloth
Corrugated roofing, salvaged pcs
Hinges, 2
Gate latch, 1
Hex screws, 1 1/2"-3" lengths
Metal washers
Metal roofing screws with rubber washers
Small u-shaped staples
Finishing nails
Paint and brushes
Mitre saw
Jig saw
Cordless drill/screwdriver
Hammer
Wire cutters
Tin snips
Clamps
Measuring tape
Level
Ear plugs
Safety glasses
Working on a level surface, we stripped the swing to just the A-frame and left the existing cross braces until the base was secure. Using 2x4's we added an extra vertical leg on each side and then 1x6 baseboards.
Next we added horizontal cross pieces and framed a door with a threshold. Before attaching hardware cloth, I painted the frame with leftover paint from our cattle panel coop. There wasn't much paint left so I only applied one coat and focused on the areas that would be visible.
Working with the angles of an A-frame is challenging. Although the coop looks simple in design, hardly anything about it is square. Even the legs are round. So depending how comfortable you are cutting and matching angles, an A-frame coop might be considered a more difficult build. Perhaps more important than skill are patience and problem solving. We needed a lot of both.
Once the door was framed, we realized we needed reinforcement to keep everything in place. Diagonal supports at the bottom corners and along the sides gave the coop a sturdy, solid feel. To the diagonal supports we added a 2x2 roost bar 24" off the ground. Although we wanted to mount it cleanly between the diagonals, it was just too difficult cutting the angles correctly so we added extra 2x2's to make things easier.
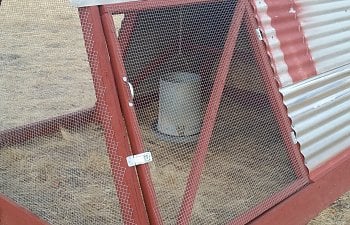
For the exterior, we covered the back wall of the coop with plywood scraps and used small u-shaped staples and screws with metal washers to attach the 1/2" hardware cloth to the front and side.

With these steps complete, we cut and attached the corrugated roofing. Working from the bottom up, we attached the pieces to the frame using metal roofing screws with rubber washers. We allowed a 4" overhang in the back and added extra length up front as well. Cutting the metal pieces was done with a jigsaw, although a sawzall could also be used. A sawzall makes smoother cuts than a jigsaw, but a jigsaw is easier to keep in a straight line. To give the saw a flat surface to travel over, we clamped plywood over the metal sheets. Ear protection in addition to safety glasses is important during this step. Gloves are also recommended.


At the end of our build we added finishing touches like quarter round molding at the base to secure the roofing at the edges. I prepainted these pieces and they were attached with finishing nails. We still weren't sure what to use as a roof cap to keep out rain at the top of the coop. After pricing actual roof cap at the hardware store we decided to use some of the roofing we already had. Using a narrow strip, we made a flat cap and screwed it to the top beam of the swingset. I smoothed the metal corners with tin snips.

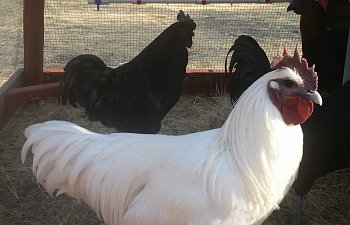
The feeder is from our family's 1950's turkey ranch and I made the PVC nipple waterer with a bucket reservoir that can be filled from outside the coop. A tutorial on how to make the waterer can be found HERE. Since the coop is currently being used for bachelors, no nest box is needed.


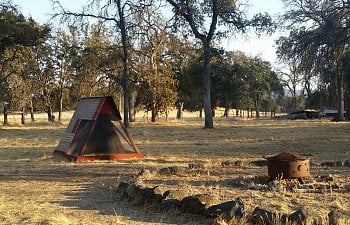
Moving the coop was comically difficult. From the beginning I wanted it on skids, but for one reason or another we didn't buy long enough lumber and it didn't actually happen. Our strategy of building it light was optimistic at best. In the end we ended up lifting and walking it from the inside like a cartoon. And it was not light. Skids would definitely have been a better idea. Other than that, I love this little coop and don't think I'd change a thing. We moved it back by the firepit where it used to be when it was a swing.

If the design looks familiar, it's basically a smaller A-frame version of our cattle panel coop (which is on skids!). We used a lot of the same materials and techniques in that coop if you'd like to check it out HERE. The three sided open air design works well in our climate, and tarps can be added for extra winter protection when needed.
Thank you for visiting this coop page. I hope you enjoyed our build. If you're willing to improvise and go with the flow, repurposing can save time and money while giving new life to something worn. It's hard to recognize the swing in our new little coop now, but it feels good knowing it still has a use and purpose.