Preface
If you need immediate instructions on how to assist a hatch, you may skip this section and go to the next one, where the instructions are.
To start with, I want to address the fact that some people think assisting during a hatch is wrong. I respect the decision to not help during a hatch. It's a personal choice and everyone does what they are comfortable with. Unfortunately, people do not always return the favor and respect the decisions of those who do choose to assist during the hatch. I would like to begin by outlining why I assist when hatching, and why some of the common arguments leveled against those who choose to assist a hatch are incorrect. I might not change anyone's mind, but I might be able to provide a response that those who are criticized for deciding to assist can provide to their critics.
I assist during hatching because I don't like to see healthy chicks die for no reason. One of the most common arguments that are brought up against assisting during a hatch is that if a chick couldn't hatch on its own, it is weak or has something wrong with it and so should be left to die without hatching. In my experience, I have not found this to be the case. Most of the time, when a chick needs help to hatch, it's because of things that went wrong in the incubating process. Either the humidity got too low and it shrinkwrapped, or because of the fact that it was artificially incubated it is malpositioned in the egg, or the temperature was too high so it grew too big to be able to turn and zip. Or, sometimes chicks are just so healthy and so large that they can't turn to zip. Letting any of these chicks die by not assisting is letting a perfectly healthy chick die for no reason because something went wrong in incubation and it couldn't hatch.
Can the chick be unable to hatch because something is wrong with it? Yes, that does happen. But, in all my years of hatching hundreds, probably thousands, of chicks, I have had this happen to me only three times. Twice were chicks that had slipped tendons, something that might possibly be fixable. The other time it was a shipped Call egg. The embryo was damaged during shipping and developed in a way that was incompatible with life. That one died before I could even finish the assist.
Those three are the only ones out of very many assisted hatches that I've done that had real issues keeping them from hatching. The rest did well, grew up healthy, and all have given me healthy chicks that don't need help to hatch.
I will pause here to say that when assisting hatches and when hatching in general, you must be prepared to humanely cull any chicks that hatch with issues so that they don't suffer. A gentle way to do this is detailed in this post here, along with why you don't want to use carbon dioxide as is commonly recommended.
Another argument commonly brought against those who assist is that assisting is not natural. What I say to that is, incubating itself is not natural. If we are talking natural, the natural thing is for a hen to sit on her clutch of eggs and hatch them underneath her. What is not natural is to stick eggs into what amounts to a heated box for 21 days, adding water to try to get the air cell right, sticking them in automatic turners, etc. None of that is natural, so of course, things can go wrong that will cause a chick to need help hatching. Shipping eggs through the mail is also not natural, and a big cause of chicks needing help to hatch.
All that said, assisting a hatch is very much natural anyway! Mothers help their eggs hatch. Here are some pictures that my friend @Ravynscroft let me borrow showing her two Call ducks helping their ducklings hatch.

The final argument I hear a lot is that assisting will lead to weak birds that always need help to hatch and will overall bring down the vigor of your birds. I addressed this a little bit earlier when I said that all the chicks aside from the three that I talked about above that I have assisted have grown up healthy and strong. And that's true! None of my assisted chicks have been any weaker than their hatch mates, because usually what causes them to need help is improper incubator conditions, being malpositioned, or being hatched out of shipped eggs, all of which don't impact their health. They have grown up healthy and strong and I don't have to assist all their chicks hatch. It's mostly shipped eggs that need my help to get out. Very rarely do I have to assist a chick from my own eggs.
Now, as I said, I respect the decision not to assist. If what was said above didn't change your mind and you want to remain hands-off, that is fine. Please just respect the decision of those of us that want to assist, as we will respect your decision not to.
Assisted Hatching Method for All Poultry
First I would like to state that, as always, it is important not to rush to assist a hatch. Assisting too soon can kill a chick. Hatching is a process that takes time. A baby chick/duckling/gosling/etc needs to absorb its yolk and the blood in the veins along the shell before it can hatch safely. Assisting too early could cause a baby to bleed out and die, or could mean that the yolk is not fully absorbed.
Luckily, the method I use has very little risk of causing a major bleeding event and killing a chick if followed correctly.
This guide will work for chicks, ducklings, geese, peachicks, keets, etc. I will just be saying chick for ease of writing and will specify if there are differences between species. If there are no notes about a specific species, then it is safe to assume that what is written is fine for all poultry not specifically mentioned.
What You Will Need
For assisted hatching, I have a little kit of items. I have a small sharp screw (a small drill bit works as well), a pair of tweezers, some cotton swabs, and some coconut oil. That's all you'll need! Instead of coconut oil, you may use bacitracin or Neosporin without pain relief if you would prefer or have it on hand.

It's also not a bad idea to have styptic powder or paper towels on hand in case you do cause some bleeding and need to apply pressure, or to use to prop eggs up if needed, etc.
Paper towels used in assisting should always be dry. It's not a good idea to wrap a wet paper towel around an egg or place one under an egg that you are assisting. While it seems like this would help keep things from drying out, it may actually chill the hatching chick, which is not good. To increase humidity if necessary, you may place a wet sponge or paper towel elsewhere in the incubator, away from and not touching the eggs.
A Safety Hole
A lot of my assists start with a safety hole. In fact, I tend to put them in on eggs that are more valuable to me even if I don't yet think they will need to be assisted. I do it a lot with goose eggs and peafowl eggs.
A safety hole is a small hole in the air cell, rather like the pip a chick would make. I like to put mine in towards the top of the air cell, because I know I won't hit anything accidentally to cause injury putting it there and because it's very unlikely to get blocked as the chick turns to zip. I've had too many goslings, ducks, and chicks block their pip as they turned to zip, thus cutting off their air supply and causing them to suffocate. However, if you want to make it closer to where a natural pip will occur, that's fine too.
A safety hole should be made if the chick has been internally pipped for 18 to 24 hours with no progress. If you don't know how long a chick has been internally pipped and are worried, the chick is making less noise than before, etc, go ahead and put the safety hole in. It won't hurt anything.
To start with, candle your egg to see if the chick has internally pipped. An internal pip will look like a triangular shadow in the air cell. Below is a picture of an internally pipped chick.
When it is time for the safety hole, candle the egg to determine the position of the air cell. Once you know where the air cell is and where it's safe to make the hole, take your screw or drill bit and gently twist it back and forth on the egg while applying slight pressure. Eventually, the screw will create a small hole in the shell. Eggs with tough shells like geese might take a while to break through, just keep going. Please note that this should be a small hole. There is no need to widen it further than the size that is made by the tip of the screw. Widening it may even lead to shrinkwrapping. After making the hole, you can put the egg back into the incubator and let it work on absorbing and getting ready to hatch. The chick may well take it from there on its own and zip and hatch with no further help. After a safety hole, if a chick is capable of externally pipping on its own and continuing to progress, it will do it. The safety hole in no way impedes external pipping or hatching of the chick.

Three chicken eggs with safety holes.

A safety hole in a peafowl egg.
Further Assisting
If your chick is malpositioned, please see the Malpositions section before proceeding. You may need to do some things differently than they are listed here.
If it's been 18 to 24 hours since the chick externally pipped or you made a safety hole and there has been no more progress, it's time to start to assist in earnest. Ducklings and goslings take a really long time sometimes from the time of external pip to the zip. You may want to allow them 24 to 36 hours before you start an assist.
Using the external pip or the safety hole you made as a starting point, start to chip away the shell over the air cell. ONLY chip away shell that's over the air cell. There will be no veins here so it's safe to take the shell off. Elsewhere will cause bleeding and possibly death if the chick has not finished absorbing the blood and yolk. If at any point you hit blood during this procedure, stop, apply gentle pressure with a dry paper towel to the bleeding area until it stops, and then take a break for an hour or two and come back later. If you stay over the air cell, though, you should not hit blood.
Once you have the air cell chipped away apply your coconut oil to the internal membrane surrounding the chick. This will both keep things moist and allow you to see whether the veins have receded and the blood has been absorbed. Below is a picture of a chick that has had coconut oil applied to its membrane that has active veins and is clearly not ready to come out of the egg yet.

That chick needs more time to finish absorbing things. If you see active veins like this, put the egg back in the incubator and let it be for several hours so it can continue to absorb. After a while, the veins will recede as the chick absorbs the blood and yolk. The egg below shows an internal membrane with no veins, meaning it is closer to being ready.

However, it might still be absorbing the yolk, so don't go yanking it out yet. If the chick is making yawning or eating motions, it's still absorbing the yolk. Leave it alone for now. Ducklings especially take a long time to absorb everything. If your duckling is yawning or chewing, let it be, it's not ready.
Getting the Chick Out of the Egg
So, the membrane is no longer showing active veins, your chick is not yawning or chewing, and it seems like it's time to get it out of the egg. Here's the good news: you might not have to do anything at all. Most chicks, as long as they are not shrinkwrapped, can push themselves right out of the hole you made in the top of the egg on their own. They probably don't need your help to get out.
But if the baby is stuck and can't get out, you'll know it's ready because it will be really pushing against the membrane, moving its beak like it's trying to strike the shell, and a lot of times they will cry and carry on. A baby doing that is ready. You can carefully peel the membrane away from it and widen the hole in the egg past where the air cell was if that's necessary. The chick will likely push itself right out at this point. If not, carefully free its head and use a flashlight to look down into the shell. If the yolk is gone, let it get itself the rest of the way out. If there's still yolk left and it was a little too early, see the next section.
What if you accidentally did this too soon and the chick wasn't done absorbing the yolk? What if the chick got too excited to hatch and pushed itself out without absorbing the yolk? Don't panic! See the next section for what to do.
Yolk Sac Not Fully Absorbed
Your chick hatched early, or you assisted a little too soon, and the yolk was not done absorbing. Don't panic, there's an easy fix. Firstly, you need to get that chick back into the lower half of its shell, if it has come out. Tuck it gently back in there. This will protect the yolk and keep it from getting ruptured. Next, you need to keep the chick in the shell and from being able to push itself out. We accomplish this by placing the chick, shell, and all, into a small cup, which will hold the shell and the chick upright, thus preventing it from getting out of the egg. I find that a disposable plastic cup works well for this. You may have to prop the egg upright by using a dry paper towel to hold it in the proper position.

If there is a lot of yolk, it may take some time for the chick to finish absorbing it. Just let it be. When it's done, it'll be really moving around and struggling to get out of the bottom of the shell.
Malpositions
There are several malpositions that a chick can end up in for one reason or another, such as feet over the head, head over the wing, beak away from air cell, head in the wrong end of the egg, etc. These require a little bit of a different approach when assisting. You can see illustrations of the most common malpositions in this PDF on page 4. Some of these malpositions, like head over the wing, usually don't cause issues hatching so we won't be talking about them.
Feet Over Head

Picture of a feet over head peachick, taken by @casportpony
Feet over the head is the most common malposition behind the head over the wing. In this position, the chick's feet have ended up over its head, and because of this, it cannot get the leverage it needs to pip the shell. This will be hard to catch unless they internally pip, which they can sometimes do. In this malposition, they will usually not be able to externally pip, or if they can, they will not be able to zip. What this means is that the hatch will be a full assist. You will need to follow all the steps above from Safety Hole to hatch, or for those that externally pip, all the steps from Further Assisting onward.
Facing Away From Air Cell
Picture by @casportpony - the outlined area is the air cell, the duckling has pipped away from it.
In this malposition, the chick ends up positioned away from the air cell, meaning that it cannot internally pip into the air cell like it normally would. That means that when it tries to internally pip, it will have to externally pip instead. Now, the chick may end up hitting a blood vessel and bleeding out when this happens. If that's the case, there's really not much to be done. However, a lot of the time they are able to externally pip. But because they didn't get to internally pip, they still have a lot of absorbing to do. Don't start to worry that they are not progressing until it's been 30 to 48 hours from the external pip. The good news is most of the time they can hatch themselves in this position, so you will likely not have to do a thing. If help is needed, you will still want to open the egg over the air cell, even though the chick is not in there, the reason being that it's a place that you can safely open to assess how far along the veins are, etc. Then from there, you will progress in the assist. But you will nearly never have to do this. Chicks in this position have nothing that is stopping them from hatching. Only shrinkwrapping could cause issues for a chick like this.
Head in the Wrong End of Egg
This malposition commonly results from an egg being set small end up in the turner instead of the large end up, so it is very important to make sure that you are setting the eggs correctly in the turner. In this malposition, the chick is facing the wrong way in the egg. They will end up externally pipping at the wrong end of the egg, where of course there is no air cell. Just like a Facing Away From Air Cell chick, you will need to allow more time before worrying that they are in need of help, and again, they usually can hatch all on their own. You can open the egg over the air cell to assess how far along absorbing is if it is seeming like the chick needs help. Make sure you're allowing plenty of time before doing this because most of the time, they get out on their own just fine with no interference needed.
With duck eggs, especially Call eggs, sometimes the duckling cannot externally pip the shell, but you will see evidence that it has tried. The shell will look like it has a bruise.
Picture by @casportpony
In this case, you will need to very carefully open the shell over the bruise. Start by making a small hole with your screw and then widen it until you can find the beak so that the duckling can breathe.
Picture by @casportpony
After you find the beak, apply coconut oil to any internal membrane you have exposed so that it does not dry out. Hopefully, the duckling can take it from here. If not, and this will be common with Calls because of their short necks and beaks, you will need to go for the full assist. Just as with other assists, open the shell over the air cell so you can monitor absorption. In this case, you will probably also be able to see the yolk and will be able to know when that has been absorbed too. Here is a picture of a backward chick that is still absorbing. You can see the veins, the yolk, and the leftover embryonic waste.
Once everything is absorbed, you will likely need to finish hatching the duckling out because with no bottom shell to push on it won't have the leverage to get itself out. Since you can see everything absorbing, wait until it's done, and then open the egg and take the duckling out.
Shrinkwrapping
Shrinkwrapping occurs when the humidity was too low throughout incubation, the incubator was too dry after external pipping, or if you made the safety hole too big or didn't moisten the membrane after you started opening the shell for assisting. True shrinkwrapping does not happen as often as people say. You will hear that chicks will shrinkwrap if you so much as open the incubator once during the lockdown. This is not true. I have had chicks hatch in my incubator that I didn't know the due date on and forgot to move them into the hatcher, and they hatched fine on their own. That means that they hatched with the turner going, in an incubator that never has the humidity above 30 or 40 percent. The small hole that they make at external pip, and the small hole you make as a safety hole, is usually not large enough to allow them to shrinkwrap. Now, if the humidity has been too low all throughout incubation, then a chick might become shrinkwrapped.
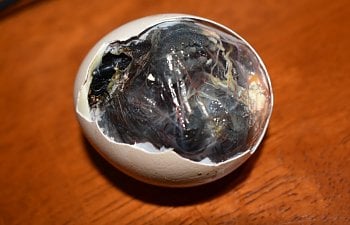
What happens in shrinkwrapping is that the internal membrane pulls away from the shell and shrinks down over a chick so tightly that it cannot move to turn or get out of the egg. Here is a picture of shrinkwrapping; the membrane has pulled away from the shell and is tight to the chick.

Picture by @Ravynscroft
In these cases, since the chick cannot move on its own, you will need to do a full assist, likely from Safety Hole onwards. Follow all the normal assisted hatching steps.
Chick Stopped During Zipping
If you ever have a chick that starts to zip its way out of the egg, and then stops, it is stuck and needs help. Once a chick starts zipping, it will generally finish within an hour. If you have a chick that is having a hard time zipping and is taking too long or starts to zip and then stops, go ahead and finish the zip for it.
Miscellaneous Notes
Here are some notes about various things that might be helpful in assisted hatching.
Call Ducks
Call ducklings almost always need to be assisted, thanks to their short beaks and necks which cause them a lot of trouble when trying to hatch. The procedure outlined above should work for them but I am a bit more aggressive as far as timelines go when I assist them. Now, I've only hatched shipped Calls so far, which likely plays a role here, but I have found that every time a Call has tried to zip on its own for me, it has blocked off its air supply and suffocated. So at this time, I don't like to let them do that. I will open up the air cell as detailed in Further Assisting before they get a chance to want to start to zip. I usually wait about 12 hours from when I do the safety hole to do this. Then I proceed as usual.
Goslings
Goslings, like ducklings, also take a very long time to hatch, so don't rush them! But I usually put safety holes in them whether I think they need it or not, because I don't like to take the chance of them blocking their air off when zipping, which I've had happen in higher instances with them than other poultry. That is a personal preference and is not something you need to do. I highly recommend checking out Pete's excellent guide to incubating geese and other waterfowl here, as it also details how he uses safety holes and a method of assisted hatching called capping. There are many excellent illustrations, too. It will also walk you through general incubation practices for geese, which are a little different than chickens and even ducks.
Need Further Help?
Is this your first assisted hatch? Are you a little nervous? Dealing with something not discussed here? Just have questions and want support? Please visit us in the Hands-on Hatching and Help thread. There is always someone around who can support you, answer questions, and walk you through a difficult assisted hatch.
Acknowledgment and Thanks
Finally, I would like to thank those who helped with this article. Thanks to @Ravynscroft, who provided several pictures and let me bounce this article off her as it was being written, and who helped me remember what I wanted to include and suggested some of the information that's contained here. Thanks to @casportpony for providing some of the great pictures here. And thanks to everyone on the Hands-on Hatching thread for being willing to help hatchers in need.

")