Before my husband, I had never considered becoming a homesteader. I had assumed my cushy office job and apartment in the city was my future. Somehow, I made my way back to the country and fell in love. And here we are today, with a brooder full of chicks, a makeshift brooder with ducklings, the incubator in full swing with eggs from our very own chickens, and I'm loving every minute!
What I didn't love was that my little baby ducklings were in a cramped makeshift brooder. Without spending another $100 on another brooder (seeing as we just bought a ton of materials for their coop/run/pond AND a goat fence/barn the cost for it was a pinch too much for us), I began pouring over ideas for a way to build one. Thus, I decided to transform a dresser.
This is where I started searching ads for free junk dressers. It was hit and miss. My hunny, after seeing my frustration, finally donated his dilapidated "work" dresser. Of course he didn't think it would turn out well at all. Challenge accepted!
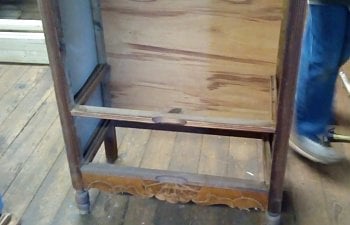
After emptying the little bit of tools and such (he really didn't have much in it, more of wasted space really), I took all the drawers out and looked at what I had to work with......
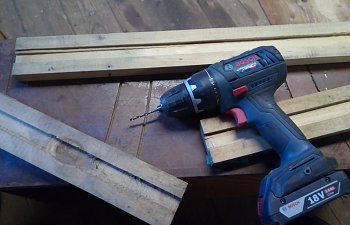
I decided to keep the bottom drawer as it actually was the only one in decent condition. I also kept the drawer track for the one above it for the track to the tray the chicks would set in. Then I removed the remaining tracks. The smallest drawers was a good size to use as a face for the chick tray so I deconstructed that drawer. Using some scrap wood that has a groove already in it, I reconstructed a new "drawer". For the bottom, I used a metal tray that had a lip to fit into the groove of the wood just perfectly (have tons of them for raising rabbits).


Next was figuring out a way to block the gap between the new "drawer" and the wall of the dresser, so I just reused parts of the tracks from the drawers I had taken out. The end result was a fairly tight (but easy) fit.
Up to this point things went fairly smooth. The kiddos were vying to build something of their own so I gave them the unusable scraps to fool around with.
I disassembled the top, cut it into two pieces (3-4inches off the back) and set them aside. The front face along the top was dropped to a level were I could easily reach the chicks and their water and food tray. The hard part was the part that usually comes super easy.... The fencing. I had been preselling my holes up to this point, so I really hadn't noticed how hard the wood actually was! When it was time to hammer some staples to the fencing, I found out quick.
If you haven't hammered staples to hang fencing, your missing out. It's the time for dropped staples, awkward finger poses, and blue thumbs! Especially in the case of this dresser! After attempting two staples I gave up!
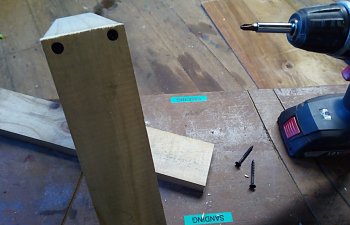
Haha, no, not going to give up that easy! Well...maybe on the staples. So I hunted down some washers and went back to predrilling and screws. Then I added a pretty piece of moulding scrap for along the bottom of the fencing where it meets the tray/drawer.
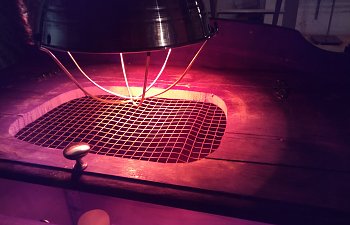
Next was the top. I finally had an excuse to use my hunnies jigsaw! (I LOVE tools btw). So I cut a hole, attached some fencing to the underside and voilà, there was the opening for the heat lamp. Next I took the short piece I had cut and the large piece and laid them back on top of the dresser. I attaché the small piece to the structure and got out some hinges. (This is the part I forgot to take pics of, so sorry). So the large piece was reattached to the short piece via hinges. This was so I could lift the top to actually reach in. A little bit of hardware and we have a finished brooder! The Chickie's are happy and warm and snug as a bug!
And my hunny no longer doubts my design skills!


What I didn't love was that my little baby ducklings were in a cramped makeshift brooder. Without spending another $100 on another brooder (seeing as we just bought a ton of materials for their coop/run/pond AND a goat fence/barn the cost for it was a pinch too much for us), I began pouring over ideas for a way to build one. Thus, I decided to transform a dresser.
This is where I started searching ads for free junk dressers. It was hit and miss. My hunny, after seeing my frustration, finally donated his dilapidated "work" dresser. Of course he didn't think it would turn out well at all. Challenge accepted!
After emptying the little bit of tools and such (he really didn't have much in it, more of wasted space really), I took all the drawers out and looked at what I had to work with......

I decided to keep the bottom drawer as it actually was the only one in decent condition. I also kept the drawer track for the one above it for the track to the tray the chicks would set in. Then I removed the remaining tracks. The smallest drawers was a good size to use as a face for the chick tray so I deconstructed that drawer. Using some scrap wood that has a groove already in it, I reconstructed a new "drawer". For the bottom, I used a metal tray that had a lip to fit into the groove of the wood just perfectly (have tons of them for raising rabbits).


Next was figuring out a way to block the gap between the new "drawer" and the wall of the dresser, so I just reused parts of the tracks from the drawers I had taken out. The end result was a fairly tight (but easy) fit.
Up to this point things went fairly smooth. The kiddos were vying to build something of their own so I gave them the unusable scraps to fool around with.
I disassembled the top, cut it into two pieces (3-4inches off the back) and set them aside. The front face along the top was dropped to a level were I could easily reach the chicks and their water and food tray. The hard part was the part that usually comes super easy.... The fencing. I had been preselling my holes up to this point, so I really hadn't noticed how hard the wood actually was! When it was time to hammer some staples to the fencing, I found out quick.
If you haven't hammered staples to hang fencing, your missing out. It's the time for dropped staples, awkward finger poses, and blue thumbs! Especially in the case of this dresser! After attempting two staples I gave up!
Haha, no, not going to give up that easy! Well...maybe on the staples. So I hunted down some washers and went back to predrilling and screws. Then I added a pretty piece of moulding scrap for along the bottom of the fencing where it meets the tray/drawer.
Next was the top. I finally had an excuse to use my hunnies jigsaw! (I LOVE tools btw). So I cut a hole, attached some fencing to the underside and voilà, there was the opening for the heat lamp. Next I took the short piece I had cut and the large piece and laid them back on top of the dresser. I attaché the small piece to the structure and got out some hinges. (This is the part I forgot to take pics of, so sorry). So the large piece was reattached to the short piece via hinges. This was so I could lift the top to actually reach in. A little bit of hardware and we have a finished brooder! The Chickie's are happy and warm and snug as a bug!
And my hunny no longer doubts my design skills!


