I'm still a bit nervous about incubating eggs, I still feel a bit like I don't know exactly what I'm doing
I'm not totally sure about controlling the humidity.
Ayam Cemanis have always been my favorite breed of chicken. A few years ago, I tried to hatch some, but I had a crappy incubator, which ended up shorting out and failing. I have decided that I am going to try again, but with a better incubator that hopefully won't fail. I ordered this incubator on Amazon, it appears to have pretty good reviews. Once it arrives, I'm going to order some Ayam Cemani hatching eggs from eBay, which I can hopefully get to hatch.
That was my first incubator. It works very well. Still use it for smaller batches and batches that are extra special. The one thing you HAVE to be careful with is the post that attaches to the lid. When the lid closes, it goes into the tray so the eggs turn. But if you aren't careful, you can puncture an egg. Been there, done that.....several times. Its especially heartbreaking when it happens after week two.
I put the eggs in the incubator today, it has two plastic trays in the bottom with one above the other, and I filled the water up to the bottom tray. Is that too much? I read something in the instructions about the water needing to be no more than 100ml, which is less than 1/2 cup.
I put the eggs in the incubator today, it has two plastic trays in the bottom with one above the other, and I filled the water up to the bottom tray. Is that too much? I read something in the instructions about the water needing to be no more than 100ml, which is less than 1/2 cup.
Do you have a hygrometer in there? Go by that, not by the incubator instructions. The incubator instructions are often way wrong, in terms of humidity.
So I actually wrote an article about incubating for beginners - this is a copy/paste of the humidity section
Humidity
The next very important component of incubation is humidity. The humidity in your incubator determines how much moisture an egg loses over incubation. This is a critical factor in whether an egg will hatch. If it loses too much moisture, the internal membrane can become tight around the chick, which is known as shrink wrapping. The chick is unable to move and thus it cannot hatch and will die. If an egg doesn't lose enough moisture, the chick can try to internally pip and drown due to the excess liquid in the egg. Incorrect humidity is one of the most common causes for death late in incubation.
So how do you make sure an egg is losing enough moisture? The most common way is to monitor the air cells. As the egg loses moisture, the air cell grows in size. Each week it should get a little bigger until it's time to put the egg into 'lockdown' for hatching. Below are some charts that shows how big the air should be each week and on the last day before lockdown.
Candle on the days listed on these charts and compare your eggs' air cells to the size of the ones on the charts. If they are the same size or very close, your humidity is correct. If your air cells are too large, it means your humidity has been too low, and you need to increase it. If they are too small, then your humidity has been too high, and you need to decrease it.
Weighing Your Eggs
Another, more accurate, way to track the moisture loss of an egg is to weigh it. This method is very exact and will tell you definitively if your eggs are losing the proper amount of moisture. I always weigh my more sensitive eggs like goose eggs and peafowl eggs to make sure they are losing the proper amount of moisture. It's also a good idea to weigh your eggs for your first time incubating because it will show you what you need your humidity to be with no guesswork involved. Once you know that, you could go by the air cells in the future if you prefer, but to start with weighing your eggs will allow you to calculate what is the best humidity for incubating for your location, climate, and incubator.
To weigh your eggs to track moisture loss, you will first need a base weight. Right before putting your eggs in the incubator, weigh them using a kitchen scale and write it down. I will actually write the weights right on the eggs with a sharpie pen; no way to lose the weights like you could if you misplace the piece of paper you wrote them down on, and it doesn't hurt the eggs to do this.
This weight is your base weight. An egg needs to lose 11 to 13 percent of its weight by the time it enters lockdown. Shooting for 12% is what I like to do since it's right in the middle. In that case, the formula for determining how much weight an egg should lose is the egg's weight multiplied by .12. So if a chicken egg for example weighed 100 grams, it should lose 12 grams by day 18, when it's time for lockdown. If you weigh the egg every six days to track moisture loss, that means that each time you weigh it, it should lose 4 grams. Or, if you want to weigh daily, that means it should lose roughly .67 grams each day for 18 days, which totals up to 12 grams on day 18. Weighing daily is not necessary, but you could do it if you wanted.
Bantam eggs with weights marked on them
If your eggs are not losing the correct amount of weight, you know you need to adjust humidity. If they lose too much weight, that means they are losing too much moisture and your humidity is too low and needs to be raised. If they are losing too little weight, it means they are losing too little moisture and your humidity needs to be lowered.
So What Should the Humidity Be?
You may notice that no numbers or percents were mentioned in the above explanations. That's because there are no set numbers for what humidity should be. Simply put, humidity is hugely variable and what percent you should have it at in your incubator depends upon where you are located, your local climate, and even your incubator. There's just no way to say for sure what you should keep your humidity at during the first stage of incubation (lockdown is a little different, and that will be discussed later). For the first stage of incubation, which would be the first 18 days for chicks and the first 25 days for ducklings, geese, turkeys, etc, you're just going to have to find out what will work best for you using the methods described above.
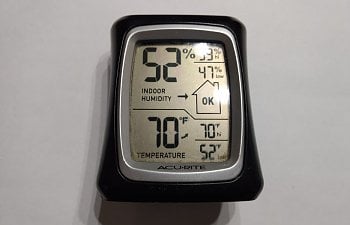
However, you will want to be monitoring what percent your humidity is at so you can know when it rises and when it lowers, and so that after getting the best humidity for yourself figured out you can just set it to that in your incubator going forward. To measure humidity, a hygrometer must be used. The best hygrometer I have found is a digital one by AcuRite, as pictured below.
Adjusting Humidity
It's very likely that as you're getting started with incubating, you're going to need to make adjustments to the humidity in your incubator, and you will definitely need to make adjustments for lockdown. Well, how do you do that? If it's too low, how do you get it to rise? If it's too high, how do you lower it?
The answer is simple: adjust the surface area of the water. Humidity is determined by how much surface area of water there is in an incubator, not the amount of water. For example, one incubator has a big jug of water in it that holds a quart of water. The opening of the jug is 3 inches square. A second incubator has a damp paper towel on the bottom that only holds one cup of water. The paper towel covers 10 square inches of the incubator. Even though the first incubator has more water in it, the second incubator will have a higher humidity.
Most incubators have water troughs built in that you can add water to for controlling humidity. If you add water to the troughs and you find it's not getting high enough, which can definitely be a concern during lockdown, you can add baby food jars or mason jars full of water with paper towels or sponges sticking out of them to wick water up and add even more surface area. Or just place a damp sponge or paper towel in the incubator (not touching the eggs).
If you add water to your troughs and the humidity is too high, then you can instead just add a folded up damp paper towel and fold it smaller until the surface area is small enough that the humidity is where you need it to be.
Or, if you are in a humid climate or your humidity just naturally stays high enough as is, you may not need to add any water at all for the first stage of incubation, which is referred to as dry hatching. However, dry hatching doesn't mean you never add water. You can see this thread for more details about that. If dry hatching is not appropriate for your area, then you will need to add water.
Calibrating Your Hygrometer
In order to make sure your hygrometer is reading correctly, you will want to calibrate it. This is easy to do via the "salt test". Take a teaspoon of salt and put it in a bottle cap or a small cup and add a few drops of water to dampen it. Take this and your hygrometer and put them inside a sealable see-through container. A Ziploc bag can work as long as it seals well. Let it sit for six hours and then check what the reading on your hygrometer is. The hygrometer should read 75%. If it doesn't, you'll know it's off, how much it's off, and you can calculate what the real humidity is by how off it is.
How'd the air cells look on your shipped eggs? Did they come through shipping pretty well? I always worry about detached air cells when I get shipped eggs. Luckily it hasn't happened to me too often.

")