Hügelkultur Raised Beds

Pics

gtaus

Crossing the Road
5 Years
Mar 29, 2019
7,252
35,778
977
Northern Minnesota
My Coop
My Coop
⚠️ New YouTube video on 3-year Review of Hügelkultur Raised Bed

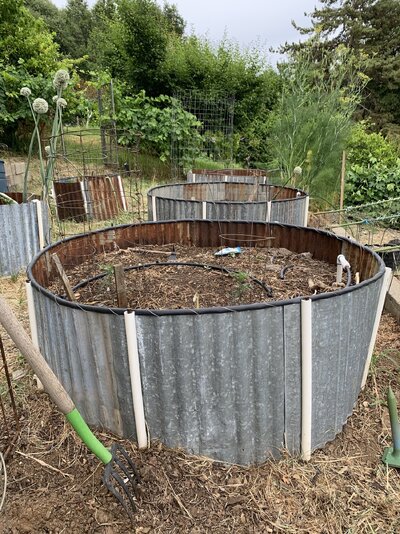
Over the years, I have become a big advocate for the hügelkultur method to use in raised beds. It just works for me. I understand the theory of the hügelkultur method, but does it deliver in actual use?

I want to share a link to the following video where they tear apart a 3-year-old hügelkultur raised bed and take a good look at how it is performing. If you are not convinced to give hügelkultur raised beds a try now, you probably will want to consider it after watching this 10-minute video...


A few points that I think are worth noting again:

He used freshly cut logs in his hügelkultur build. That works, and after 3 years in the raised bed, they could see the wood softening up and becoming more spongy, which holds water better. As the wood ages and breaks down, it feeds the soil and retains water better. Based on their 3 year look, they estimated that the wood logs in that bed might be good for about 20 years!

I use freshly cut wood if I have to clean up the yard. I had 2 big trees fall down last winter and used the wood to make some new raised beds this spring. Why not? However, if you want even better results earlier, then pick out some old rotting logs to start with.

The hügelkultur beds get better with age. As the wood decomposes, it feeds the soil from below. The rotting wood also retains more water as it continues to turn into a giant sponge. I have seen this in my hügelkultur beds as well. They just seem to perform better with each passing year.

He mentioned that his first attempt at making hügelkultur raised beds was not a complete success. Basically, he failed to adequately fill the voids between the logs and his raised bed soil level dropped almost 1 foot the first year! That is just crazy!

After he figured out that it was necessary to fill those voids between the logs, then the soil level dropped the normal 1-2 inches per year. That is what you want. Every year, you just top off that 1-2 inches with fresh compost. Perfect!

As to filling those voids, he used potting mix, which I find is pretty expensive. I can get free wood chips at our local county landfill, and that is what I use to fill the voids Still free for me to use as a filler, and being wood, it will also sponge up the water and break down over the years feeding the soil. What's not to love about that?

I'd love to hear any feedback on this video, and if you have any ideas on how to make hügelkultur raised beds even better. I have had great results with my hügelkultur raised beds, but I'm always looking to make improvements. Thanks.

Addendum: I originally posted this on the What did you do in the garden today? thread. But that thread moves too fast, topics are quickly forgotten, and I thought this topic might be better served if I started a separate thread.
 
Those are some nice pallet wood raised beds!

Hope you don't mind my contribution on the subject, but I've got some Hugel raised beds too! After I built my coop, I made some raised beds out of the leftover odd sized roof panels I was using. Had heard about and decided to try out Hugelkulture, but had never seen it in practice before, so I pretty much just went for it.

Only 2/3 beds got lots of wood chunks in the bottom before I ran out (fresh logs and well-aged logs). They all got a lot several wheelbarrows of decomposed cedar tree trunk wood and then a few wheelbarrows smaller sticks and leaves from around the property - filled them to maybe 3/4 full because I knew it would drop. On top of that I added homemade compost, commercial compost and raised bed mix from the local landscape supply, and some bagged soils on the very top where the plants would be - it was a lot of material to move to the top of our hill!

Sadly the two full-on Hugel beds didn't perform as well for the first couple years, but now they seem to be doing fine. It seemed as if the plants had nutrient deficiency, my guess is there wasn't enough soil as a buffer to the woody material and it pulled nitrogen as it decomposed. There were many pockets/holes from soil dropping into spaces down below, in the two beds that got logs. I've since added lots of compost and amendments every year, which probably has helped a lot for all of them.

Here’s my raised beds: They're 24" corrugated roof panels, screwed to PVC pipe with stainless hardware, then staked into the ground with rebar. Underneath is 1/2" hardware cloth to keep the voles/moles out and layers of cardboard on top for weed suppression since I have lots of bermuda and johnson grass that want to overtake the garden area - what a PITA that stuff is!
IMG_8710.jpeg


Topped with lots of woody sticks, trimmings and leaves, rakings, etc:
IMG_8729.jpeg


Then topped with compost/soil/bagged soil:
IMG_8752.jpeg


They have ended up doing pretty well over time though, so it seems to be working!
IMG_7375.jpeg

IMG_0436.jpeg


As much as I like my Hugel beds, my inlaws garden performs better than any I've ever seen before. They're not Hugel beds, they have a landscape designer who built and maintains their beds -- the base is a mix of commercial made soil for cannabis growers and mushroom compost. He amends them regularly with more mushroom compost, mycorrhizae granules, and A LOT of this organic chicken-poop based granular fertilizer (Nutri-Rich). They also have non-potable irrigation water and are very generous with it.
IMG_1565.jpeg
 

Attachments

  • IMG_7386.jpeg
    IMG_7386.jpeg
    1.1 MB · Views: 5
I did some hugelkultur beds a few years ago in my garden. I had an old woodpile I needed to get rid of as we no longer use the wood burner for heating. I didn't do anything so fancy or as pretty as their metal beds as the goal was to get rid of old logs and save money so not buying anything. I tacked the beds together with old pieces of lumber and stuff left from other projects. They might not last as long as the metal ones but I can always patch them with any scrap lumber I have around. They've held up really well, I haven't had to do any repairs so far. Some of the logs I used in the bottom were partially rotted already but it did really work great. I didn't have to water the beds except once or twice thru the whole summer as the logs absorbed and held plenty of moisture. I used existing soil, stuff from the compost pile and what I cleaned out from my deep litter in my run and coop to fill them. I added same as needed to counter any settling. I've been very pleased with the results, plants in them did much better than what I planted in the regular soil. Overall, I would highly recommend this method of gardening. Better growth, less water use, no tilling, raised beds are easier to harvest from.
 
Last edited:
Better growth, less water use, no tilling, raised beds are easier to harvest from.

I’m setting up some raised beds now, thanks for this!

Nice. Thanks for the thread. I haven't wanted to build hügel mounds in my small yard, but I'm going to add a 3rd raised bed this next year and this info will be very helpful.

If you want to save some money by building your raised beds, I posted my pallet wood raised bed v2.0 build on the thread Show Me Your Pallet Projects!. There are lots of other great pallet projects there as well.

To save time and effort, I'll just copy that specific post on how I built that pallet wood raised bed - which cost me less than $2.00 for the 16-inch high 4X4 foot bed.

************

⚠️ Pallet Wood 4X4 Foot, 16 Inch High, Raised Garden Bed - New Design

:yesss: Time to upload some pictures of my newly designed pallet wood raised garden bed. I was plenty happy with my old raised bed design, but I specifically wanted to redo this design to use the pallet wood notched 2X4 stretchers without cutting them. With that in mind, I took apart some pallets that had 4 foot long 2X4's, all of the same thickness, or very close to it. The beauty of this step is that you don't need to have the 2X4's nail free in this build. That means, you can use a reciprocating saw to cut off the pallet planks if you want and just leave the nail bottoms in the 2X4's. Or you can use a circular saw to cut off the edges of the planks and just use the shorter 16 inch long slats for the sidewalls. Both those methods make pallet breakdown fast.

First pic, you can see how I framed up the raised bed with the notched pallet wood 2X4's.

1684122194373.jpeg


Notice how I orientated the 2X4's so the notches on both the top and bottom have the notches in the middle. That becomes important later when I nail on the sidewall slats.

For those of you that know something about putting butt joints together, they are not considered a very strong connection. Here is what I mean...

1684122416911.jpeg


As you look at the above picture, you can see the screws go into the end grain of the other 2X4. Although this is a strong connection today, it will not stand up over time and those screws can (and most likely will) pull out of the end grain wood.

Knowing that this butt end connection is the weak point in this design, I made some corner posts out of 2X4's, attached to each other, and then attached them to the outside frame - screwing from the inside.

1684122647503.jpeg


1684122773378.jpeg


That should make the basic frame a lot stronger and not fall apart over the years to come.

Now I added all the 16 inch pallet planks I have cut from my pallet wood breakdowns. This process took very little time as the planks were already cut to 16 inches long. I simply started at one corner and started laying down wood planks working my way to the end of that side. I used my 18 gauge brad nailer to fasten the planks to the 2X4's. An 18 gauge brad nail is not that strong, but in this design, all it needs to do is to attched the plank so it does not fall down. When I fill up the garden bed with soil, the weight of the soil will be pushing outwards, so the weight of the soil will assist in holding the planks in place. Also, using the brad nailer takes no time at all to bump and shoot. Of course, a person could either nail or screw those planks in place if you don't have a nail gun.

⚠️ Now, here is a point that I want to stress... It's important to have the basic framing on the outside of the raised bed and the planks on the inside. When you add the soil, it will push the planks into the 2X4 outside frame and everything should hold together. Some people will reverse this process, making the 2X4 frame as the inside, and then tacking on the planks to the outside. Of course, that will work and will look just fine - for a short while - but in a few years the weight of the soil will push out on the planks on the outside of the frame and you will have multiple blowouts to repair. Remember, the wood is going to rot over time and the nails, screws, etc will no longer hold the planks if on the outside. No doubt, my pallet wood raised bed will also rot out over time, but it should last many years longer with the design of the planks on the inside of the frame. ⚠️

As you can see, I attempted to alternate between light and dark colored planks, because that is the look I wanted. Notice that one corner on each side has a gap board missing.

1684123074427.jpeg


When I laid out the planks, I made sure that the gap was an even distance from the 2X4 corner pieces. That meant I did not have to make any special taper cuts. So, I just had to rip final boards for 2 inches, 2-1/2 inches, 1-1/4 inches, etc... All straight rips that were very easy to measure and cut on the table saw.

Besides the aesthetics of having the notches in the 2X4's facing each other, it makes it very easy to nail the planks on the sidewalls just about an inch from the top/bottom where you know there is no notch to worry about. I did not want to shoot a nail into the notch void and then have to remove the nail.

Final boards added to each corner...

1684123587617.jpeg


OK, the build was done at this point and all in all, I would say that it was faster and easier than my previous designs.

Here is a picture of the new pallet wood garden bed design compared to the pallet wood garden bed design I built last year.

1684123795446.jpeg


Time to setup the garden bed, and I got most of it done today. I use the hügelkultur method in my raised beds. I recently cut up some pines trees that died and fell over this past winter. I used the tree trunk logs to line the bottom of the raised bed. The idea is that the wood will act like a giant sponge and soak up water, releasing it later to the plants when they need it. As the logs decay over the years, their effect as a giant sponge improves. Eventually, the wood breaks down and feeds the soil, which in turn feeds the plants growing above.

1684124031162.jpeg


After the heavy logs, I tossed in some smaller branches and dumped in a load of aged wood chips I needed to clear out. Here is where I ended today....

1684124121675.jpeg


What's left is the top ~8 inches which I will fill with a high-quality topsoil and chicken run compost mixed 1:1. I used to be able to get vermiculite for my raised bed mixes, but I can't get large 3 cubic foot bags of comercial vermiculite anymore. Small bags of garden vermiculite would be far too expensive - on my budget. So, I talked to the main guy at our local nursery, and he told me just to mix the chicken run compost and topsoil 1:1.

I had a little more time before it got dark, so I filled up my new 8 cubic foot "Gorilla-like" cart with some chicken run compost - you can see the chicken coop and run in the background of the first picture. Anyways, take a look at this black gold compost from my chicken run...

1684124523822.jpeg


I have to say that I get really excited about my chicken run compost because it's just so much better than what I used to buy at the big box stores. Mostly, it's a combination of leaves, grass clippings, maybe some wood chips or paper shreds from the coop litter, and of course, chicken poo mixed in. If you like the smell of rich, dark, earth, you would really like this compost.

I will be sifting this compost with my cement mixer compost sifter and then mixing it with the topsoil. Then, I'll top off the new garden bed(s) with about 8 inches of the compost/topsoil mix. I plan on building at least one more pallet wood garden bed this spring but would really like to make four new beds in total.

:caf If you made it this far, I would love to hear some feedback on this new pallet wood raised bed design. I put a number of hours of thinking into this project before I put it together but would love to hear any comments others may have. Thanks in advance for your thoughts. Later....
 
I wish I'd heard about hugelkultur before I made my raised beds 6-7 (?) years ago. The beds are just mounded soil, which I top off with compost and mulch. They do well.

I have thought about digging out the paths between them. I could dig deep trenches, hugel-ize them (my made up word), and then turn the mounded beds over onto the trenches. Three of the nine raised beds now have perennials planted in them, so I wouldn't be able to redo those.

I used the hugelkulter idea in a different part of my garden. I have a large flat area for the "sprawling stuff" like squash and sweet potatoes. I dug 9 trenches there and filled them in with wood and sticks.

I got a fantastic crop of sweet potatoes! I was beyond happy, I was thrilled. I planted regular potatoes in between the trenches, and they did well. I had a short row of beans that did very well.
 
Hope you don't mind my contribution on the subject, but I've got some Hugel raised beds too! After I built my coop, I made some raised beds out of the leftover odd sized roof panels I was using.

I am encouraging people to share their experiences with hügelkultur beds. I have learned a few things over the years, but I am always open to other ideas and suggestions. Every year, I feel like a first year gardener because there is always so much more to learn.

Sadly the two full-on Hugel beds didn't perform as well for the first couple years, but now they seem to be doing fine. It seemed as if the plants had nutrient deficiency, my guess is there wasn't enough soil as a buffer to the woody material and it pulled nitrogen as it decomposed. There were many pockets/holes from soil dropping into spaces down below, in the two beds that got logs. I've since added lots of compost and amendments every year, which probably has helped a lot for all of them.

In theory, the hügelkultur beds should get better each year. As the wood rots, it retains more moisture, and the decaying wood feeds the soil at the same time.

As mentioned in the YouTube video initially posted, he made a mistake in not filling in all those voids between the logs. From what I understand, if a root hits an air pocket, it stops growing in that direction. That probably makes for a weaker plant above. I fill the gaps between the logs with wood chips I get for free at our local county landfill. But anything that fills those gaps would be better than nothing. Eventually, the soil will collapse into the voids over time, but that will also lead to excessive soil level dropping above. My goal is to maintain a 1-2 inch drop in soil level each year which I backfill with my chicken run compost.

My raised beds are 16-inches high. I have the top 6-8 inches of the bed filled with a high-quality topsoil and chicken run compost mixed 1:1. That seems to work great for me as the plants I grow only need a good 6 inches of topsoil. I don't grow root plants in my hügelkultur beds.

As much as I like my Hugel beds, my inlaws garden performs better than any I've ever seen before. They're not Hugel beds, they have a landscape designer who built and maintains their beds -- the base is a mix of commercial made soil for cannabis growers and mushroom compost. He amends them regularly with more mushroom compost, mycorrhizae granules, and A LOT of this organic chicken-poop based granular fertilizer (Nutri-Rich). They also have non-potable irrigation water and are very generous with it.

:lau As much as I like my hügelkultur raised beds, I don't think I could pretend to compete with a professional who is constantly feeding and watering their plants, even if in-ground or a "normal" non-hügelkultur raised bed.

But I am just saying that my hügelkultur raised beds makes me a much better gardener for my skill level. Although I am not opposed to other people using fertilizers and such for their plants, I am trying to keep my gardening as natural and low maintenance as possible. I put fresh compost in the raised beds in the spring when I put in the plants or seeds, but don't feed the bed anymore the rest of the growing season.

I should probably add some more fresh compost mid-season, but I'm still learning. At any rate, my plants this year produced more fruit than we could keep up with.

Although I have been singing the praises of how well the hügelkultur wood retains water, I have been moving my gardening to my backyard the past 2 years (after we had a drought summer that killed almost everything in my main garden). Now, I have a garden hose from the house that I can use to water my raised beds as often as I want. The wood in the hügelkultur raised beds still performs its duty of retaining water and releasing it to the plants. The plants never get stressed out from lack of water, or overwatering.
 
That bed is just 2’ wide X 6’ long, and 17” high. And we can pick tomatoes from outside the fence as well. The fence is around the whole garden area to keep armadillos and rabbits out.

You have inspired me to consider making some narrower raised beds, and placing them along the chicken run fence. I could grow some vine beans, tomatoes, or something else that might be able to use the fence as a trellis. At the same time, it would provide some shade for the chickens on the inside of the run. I guess that would be a 3-for-1 setup!
 
I some did hugelkultur beds a few years ago in my garden. I had an old woodpile I needed to get rid of as we no longer use the wood burner for heating. I didn't do anything so fancy or as pretty as their metal beds as the goal was to get rid of old logs and save money so not buying anything. I tacked the beds together with old pieces of lumber and stuff left from other projects. They might not last as long as the metal ones but I can always patch them with any scrap lumber I have around. They've held up really well, I haven't had to do any repairs so far. Some of the logs I used in the bottom were partially rotted already but it did really work great. I didn't have to water the beds except once or twice thru the whole summer as the logs absorbed and held plenty of moisture. I used existing soil, stuff from the compost pile and what I cleaned out from my deep litter in my run and coop to fill them. I added same as needed to counter any settling. I've been very pleased with the results, plants in them did much better than what I planted in the regular soil. Overall, I would highly recommend this method of gardening. Better growth, less water use, no tilling, raised beds are easier to harvest from.

Sounds similar to my experience. Old rotten logs will actually work better in the raised bed because they retain more water. New logs work great, as shown in the YouTube video, but as the logs age and decompose, they just get better at retaining water and feeding the soil.

I really became an advocate for hügelkultur raised beds a few years ago when we had a terrible drought summer. I don't have running water out in the main garden. We did not have any rainfall from about mid-May to about sometime in September. All my in-ground plants dried up and died, as well as all my plants in my "normal" non-hügelkultur raised beds. The only plants that survived were in my hügelkultur raised beds. I estimate I got maybe 70% of a normal harvest that year from the hügelkultur raised beds, but compare that to 0% from the in-ground and "normal" non-hügelkultur raised beds.
 
The video showed me how to move one of the pre-existing beds, which we will use elsewhere, and in its place went a larger one today.
IMG_6324.jpeg
First put in rotten branches then the soil from the old bed, then all the compost we’ve made over the summer and there were a few bags of soil we bought on sale, leaving room for more compost in the spring, which is cooking now. This will be the tomato bed as it’s next to a fence for them to climb on.
IMG_6327.jpeg
We’ve been growing lettuces in a smaller bed, and after we eat it all, this bed will be moved and used for strawberries next spring. I’ve decided not to grow lettuce all winter this year, I’m taking the winter off. 🙃

IMG_6326.jpeg
 

New posts New threads Active threads

Back
Top Bottom