My whole finished coop can be found here...one day I will make a true BYC page!
https://www.backyardchickens.com/forum/viewtopic.php?id=496328&p=1
You will have to scroll down the bottom of this page to see the double decker system in its entirety!
But some people were asking about my double decker water PVC water system with chicken nipples so I though I would cut and paste. The directions are not perfect; I think PVC pipe and all it's adapters/couplers/ whatevers are amazing and anybody can rig up a crazy water or food system as long as they don't mind experimenting.
My chicken nipples came from another BYC member, Neil Grassbaugh.
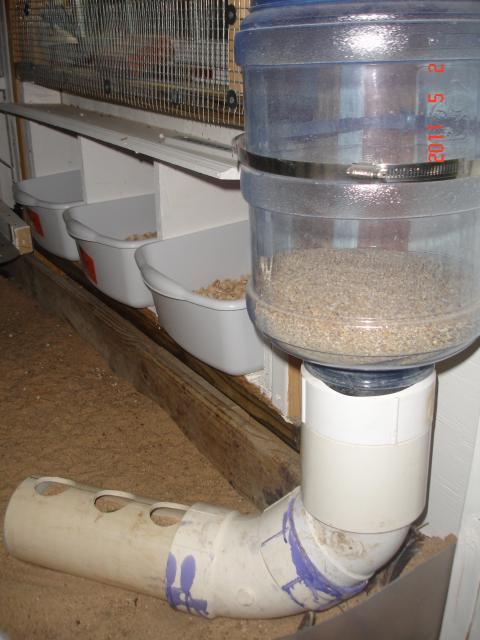
I'm not sure how to fully describe my water/food system. Keep in mind that the walls of my coop are 4 ft tall, but the roof adds another 1.5 ft or so. I have bantams, so I didn't have to raise the nipple system as high if they were standard size.
Starting with the easier system (food), it is merely the LE Bistro (size medium) food container from Petmate attached to a 4" PVC pipe. I bought the pet mate thing from a garage sale, and I liked it because there is an opening at the top with a lid, and an opening at the bottom....about 4", nearly perfect for the PVC pipe. You can buy this container separate on the pet mate website under their replacement parts. About $15 shipped. The LE Bistro is supposed to carry 10 lbs of food. Anyhow, I need to secure the pet mate more securely to the PVC pipe.
back to the system: If you try to squeeze the 4" PVC pipe into the LE bistro opening, neither one will slide over each other. So I bought some sort of adapter with a female end that could fit over the PVC pipe. The other end of the adapter was threaded, and allowed me to essentially screw the LE bistro on. I had to put electrical tape over the adapter threads for a snugger fit.
I used that plumbers strap thingy to help keep it upright against the wall. I'm not sure what the elbow is.... I want to say 60 degrees? I still have to jiggle it to get the food to go down. Or maybe I don't give it a chance, yet. 4" pipe seems like it carries a bunch of food, and the stuff looks like powder by the time the ladies get a pecking. But I like to see the crumbles on top, so I shake more down.
I bought most of the connectors, etc, at habitat for humanity....they were just labeled PVC miscellaneous. If you go to Lowes, head to the plumbing section, and I warn you, the PVC pipe and couplings, elbows and end caps are SO expensive in the 4" and above size.
I used a drill bit attachment with a 2" diameter for the food holes.

Ok, the watering system was a lot more difficult. All the kinks have not been worked out. I don't know what all the parts are called. The
top of it is obviously another LE bistro pet mate food canister. My intentions were good but my water sealing skills are not. My friend ended up giving me some gasket sealer stuff, clear, and food safe. I haven't tried regular caulk, but it's hard to create a watertight seal, but I haven't messed with it lately.
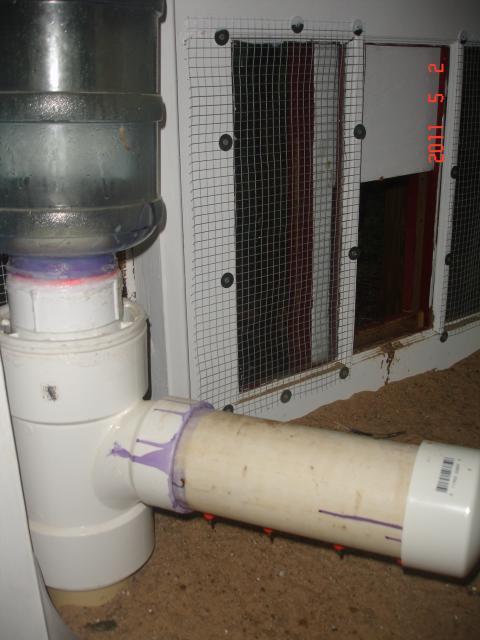
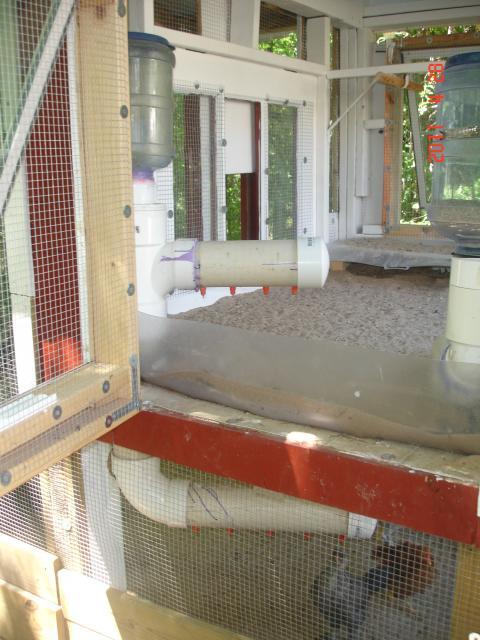
The big white PVC body part (we will call it Jumbo 3, since it's big and has 3 openings) has three openings that allows me to slap a LE Bistro on top, a 4" tube nipple system to the top portion of the coop, and the third opening winds down through the coop floor for the lower nipple system. I don't know what it's called. I bought it for 12.99 at habitat, but they sell it at lowes, for uh, waaaaaay more than that. The top and bottom openings are actually meant for 6" pipe.
Starting with the top:
Because the top of Jumbo 3 has a 6" opening, I had to buy a 6 to 4" reducer piece to reduce the opening for the 4" pipe. I don't know what it is called. But it had to hammered in. Make sure to seal it, too. After putting the reducer in, the 4" PVC pipe could fit in it. But the pipe was like 5" tall. Remember that the LE bistro doesn't just fit onto the top of the 4" PVC pipe? So another female-on-one-end, threaded-on-the-other piece had to be hammered down onto the 5" tall PVC pipe protruding from the top of Jumbo 3.
The "middle":
Jumbo 3 has a 4" opening coming out from the middle of it's body. I just added a 4" PVC pipe (I think it fit right in, no need for couplers or adapters). Make sure to seal this area.
The "bottom":
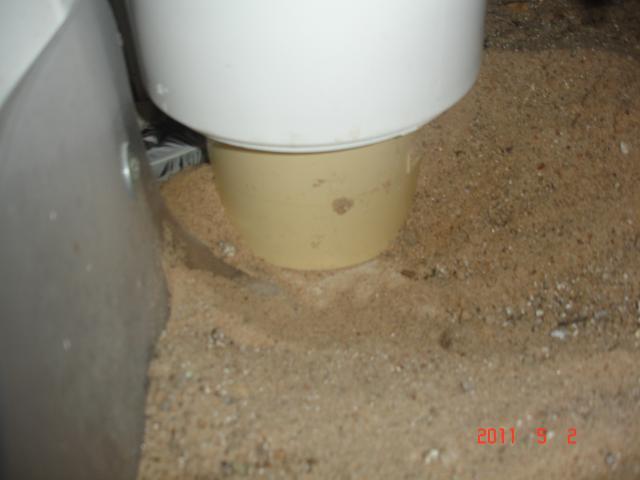
Jumbo 3 bottom opening is another 6" hole. Add the reducer piece to reduce the 6" to 4". Add another short piece of 4" PVC pipe into that reducer. Why a short piece instead of one that will reach through the coop floor?
I have bantams. They're smaller, obviously. But the "middle" portion of Jumbo 3 had to be lifted up enough so that the nipple system was tall enough for my girls to drink from. How to lift it up?
I cut the hole in the coop just big enough to SQUEEZE a 4" PVC pipe through. I added that short piece of PVC pipe onto Jumbo 3. I then added another coupler piece with two female ends to connect two pipes of the same size. This coupler piece is slightly larger outside-diameter wise than the corresponding PVC pipe, so the coupler rests on top of the hole in the coop, boosting JUmbo 3 and all above parts high enough to allow my birds to be able to drink.
See how it rests on the coop floor? Then I was able to insert the longer 4" PVC pipe into the other female end, through the hole in the coop. If you cut the hole too big, that coupler piece will just slide through the hole, and Jumbo 3 will be too low. Get it? Not sure if this will work for standard chickens...you'll have to add more height.
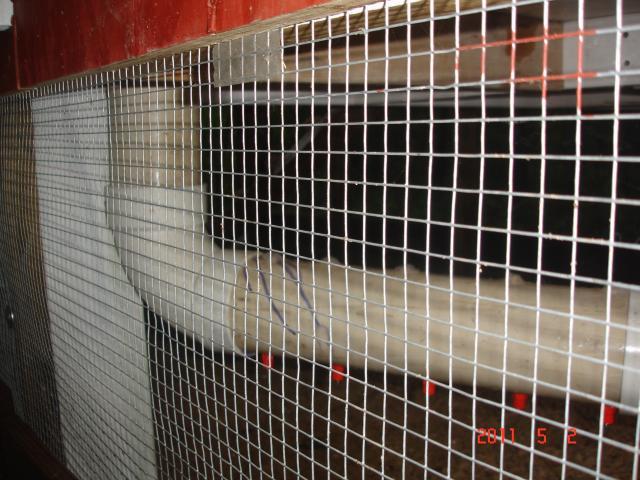
Coming through the hole, the PVC pipe and accompanying elbow just makes up the lower waterer.
Like I said, any piece joining another PVC piece, you need to seal and waterproof. Because, by golly, water can squeeze through and leak! Go figure!
I'm sorry that you're gonna have to puzzle it out, since I didn't take photos of what piece goes into what opening. I wasn't even sure it'd work. But there is a lot of water in there. I'm trying to figure a way to collect rainwater and allow it to fill up my waterer, but it'd be too much water and I'd be cutting more holes everywhere to accommodate all the outflow. But I drag the hose out there and just top it off when I see that it needs water. Haven't seen how it performs in either the summer or how bad it freezes in the winter.
If you get the LE Bistro, make sure to keep that top capped on. When my bantams were first figuring out their coop, I saw them jump and roost on top of the LE bistro. If the lid wasn't on, and they jumped in, well, drowning for sure.
Hope this helps out, even a little. Once you get to a plumbing section, you just start popping things on at random. But really, try your local habitat for humanity first for anything PVC!
Same pic as before to show the top and bottom water system!
https://www.backyardchickens.com/forum/viewtopic.php?id=496328&p=1
You will have to scroll down the bottom of this page to see the double decker system in its entirety!
But some people were asking about my double decker water PVC water system with chicken nipples so I though I would cut and paste. The directions are not perfect; I think PVC pipe and all it's adapters/couplers/ whatevers are amazing and anybody can rig up a crazy water or food system as long as they don't mind experimenting.
My chicken nipples came from another BYC member, Neil Grassbaugh.
I'm not sure how to fully describe my water/food system. Keep in mind that the walls of my coop are 4 ft tall, but the roof adds another 1.5 ft or so. I have bantams, so I didn't have to raise the nipple system as high if they were standard size.
Starting with the easier system (food), it is merely the LE Bistro (size medium) food container from Petmate attached to a 4" PVC pipe. I bought the pet mate thing from a garage sale, and I liked it because there is an opening at the top with a lid, and an opening at the bottom....about 4", nearly perfect for the PVC pipe. You can buy this container separate on the pet mate website under their replacement parts. About $15 shipped. The LE Bistro is supposed to carry 10 lbs of food. Anyhow, I need to secure the pet mate more securely to the PVC pipe.
back to the system: If you try to squeeze the 4" PVC pipe into the LE bistro opening, neither one will slide over each other. So I bought some sort of adapter with a female end that could fit over the PVC pipe. The other end of the adapter was threaded, and allowed me to essentially screw the LE bistro on. I had to put electrical tape over the adapter threads for a snugger fit.
I used that plumbers strap thingy to help keep it upright against the wall. I'm not sure what the elbow is.... I want to say 60 degrees? I still have to jiggle it to get the food to go down. Or maybe I don't give it a chance, yet. 4" pipe seems like it carries a bunch of food, and the stuff looks like powder by the time the ladies get a pecking. But I like to see the crumbles on top, so I shake more down.
I bought most of the connectors, etc, at habitat for humanity....they were just labeled PVC miscellaneous. If you go to Lowes, head to the plumbing section, and I warn you, the PVC pipe and couplings, elbows and end caps are SO expensive in the 4" and above size.
I used a drill bit attachment with a 2" diameter for the food holes.
Ok, the watering system was a lot more difficult. All the kinks have not been worked out. I don't know what all the parts are called. The
top of it is obviously another LE bistro pet mate food canister. My intentions were good but my water sealing skills are not. My friend ended up giving me some gasket sealer stuff, clear, and food safe. I haven't tried regular caulk, but it's hard to create a watertight seal, but I haven't messed with it lately.
The big white PVC body part (we will call it Jumbo 3, since it's big and has 3 openings) has three openings that allows me to slap a LE Bistro on top, a 4" tube nipple system to the top portion of the coop, and the third opening winds down through the coop floor for the lower nipple system. I don't know what it's called. I bought it for 12.99 at habitat, but they sell it at lowes, for uh, waaaaaay more than that. The top and bottom openings are actually meant for 6" pipe.
Starting with the top:
Because the top of Jumbo 3 has a 6" opening, I had to buy a 6 to 4" reducer piece to reduce the opening for the 4" pipe. I don't know what it is called. But it had to hammered in. Make sure to seal it, too. After putting the reducer in, the 4" PVC pipe could fit in it. But the pipe was like 5" tall. Remember that the LE bistro doesn't just fit onto the top of the 4" PVC pipe? So another female-on-one-end, threaded-on-the-other piece had to be hammered down onto the 5" tall PVC pipe protruding from the top of Jumbo 3.
The "middle":
Jumbo 3 has a 4" opening coming out from the middle of it's body. I just added a 4" PVC pipe (I think it fit right in, no need for couplers or adapters). Make sure to seal this area.
The "bottom":
Jumbo 3 bottom opening is another 6" hole. Add the reducer piece to reduce the 6" to 4". Add another short piece of 4" PVC pipe into that reducer. Why a short piece instead of one that will reach through the coop floor?
I have bantams. They're smaller, obviously. But the "middle" portion of Jumbo 3 had to be lifted up enough so that the nipple system was tall enough for my girls to drink from. How to lift it up?
I cut the hole in the coop just big enough to SQUEEZE a 4" PVC pipe through. I added that short piece of PVC pipe onto Jumbo 3. I then added another coupler piece with two female ends to connect two pipes of the same size. This coupler piece is slightly larger outside-diameter wise than the corresponding PVC pipe, so the coupler rests on top of the hole in the coop, boosting JUmbo 3 and all above parts high enough to allow my birds to be able to drink.
See how it rests on the coop floor? Then I was able to insert the longer 4" PVC pipe into the other female end, through the hole in the coop. If you cut the hole too big, that coupler piece will just slide through the hole, and Jumbo 3 will be too low. Get it? Not sure if this will work for standard chickens...you'll have to add more height.
Coming through the hole, the PVC pipe and accompanying elbow just makes up the lower waterer.
Like I said, any piece joining another PVC piece, you need to seal and waterproof. Because, by golly, water can squeeze through and leak! Go figure!
I'm sorry that you're gonna have to puzzle it out, since I didn't take photos of what piece goes into what opening. I wasn't even sure it'd work. But there is a lot of water in there. I'm trying to figure a way to collect rainwater and allow it to fill up my waterer, but it'd be too much water and I'd be cutting more holes everywhere to accommodate all the outflow. But I drag the hose out there and just top it off when I see that it needs water. Haven't seen how it performs in either the summer or how bad it freezes in the winter.
If you get the LE Bistro, make sure to keep that top capped on. When my bantams were first figuring out their coop, I saw them jump and roost on top of the LE bistro. If the lid wasn't on, and they jumped in, well, drowning for sure.
Hope this helps out, even a little. Once you get to a plumbing section, you just start popping things on at random. But really, try your local habitat for humanity first for anything PVC!
Same pic as before to show the top and bottom water system!
Last edited:
")
