- Sep 7, 2012
- 156
- 58
- 119
Dear BYC peeps,
Almost every summer one of my hens gets bumblefoot at some point. You can tell as soon as they start doing that one legged stand while browsing in the yard. This summer it was Pepper, she is a fairly light weight easter egger hen, but is an intrepid explorer and as a result gets a few cuts and scrapes while out adventuring.

Pepper, now 5 years old and still laying and grub hunting like a pro
What is Bumblefoot?
Bumblefoot is an infection in a cut or puncture wound usually in the pad of a chicken's foot. The infection is usually E. coli or Staph which are common in soil and even on your skin. Usually it is not a problem unless it gets under the skin. Bumblefoot is not a foreign object lodged in the chicken's foot and a "kernel" does not need to be dug out for this to heal. Humans can get this same infection ,cellulitis, which is also treated with antibiotics.
Treatment_______________________
This is how I have treated bumblefoot in all my hens for the last several years. It is relatively easy but requires frequent maintenance. Be sure to wash your hands well before and after performing each treatment for your own health and that of the rest of your flock.
Step 1: Assemble your treatment kit
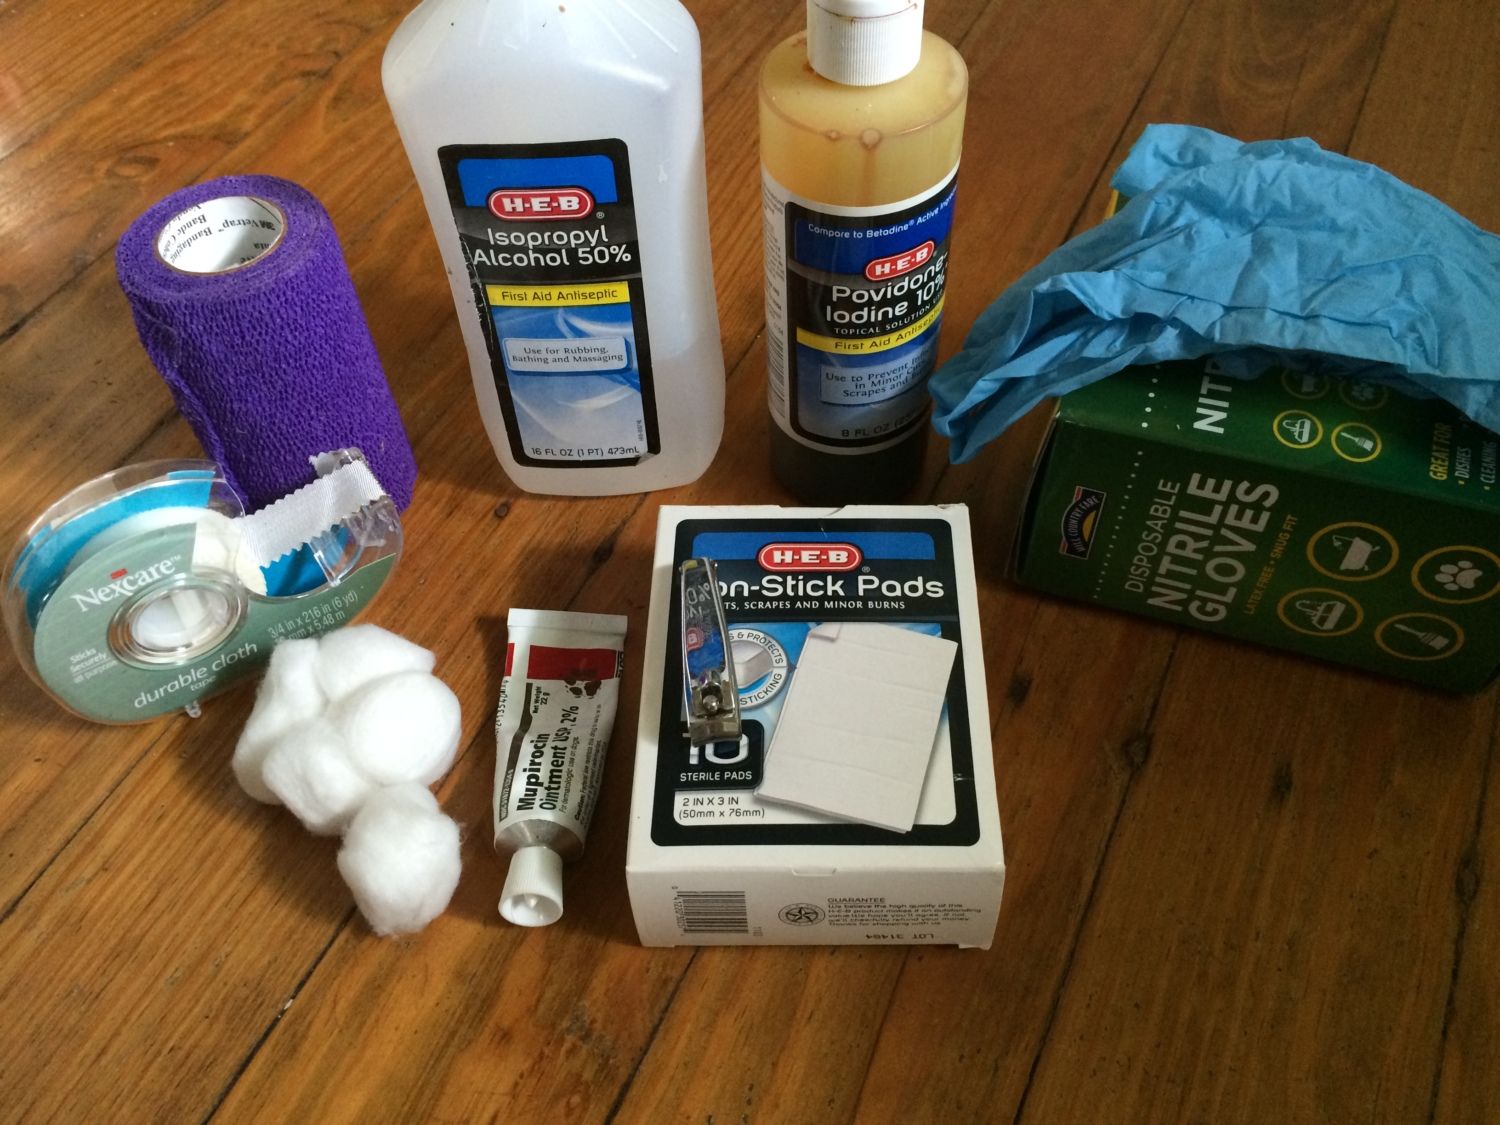
Prepare all your items in advance so you don't have to search for equipment mid treatment. I use the following:
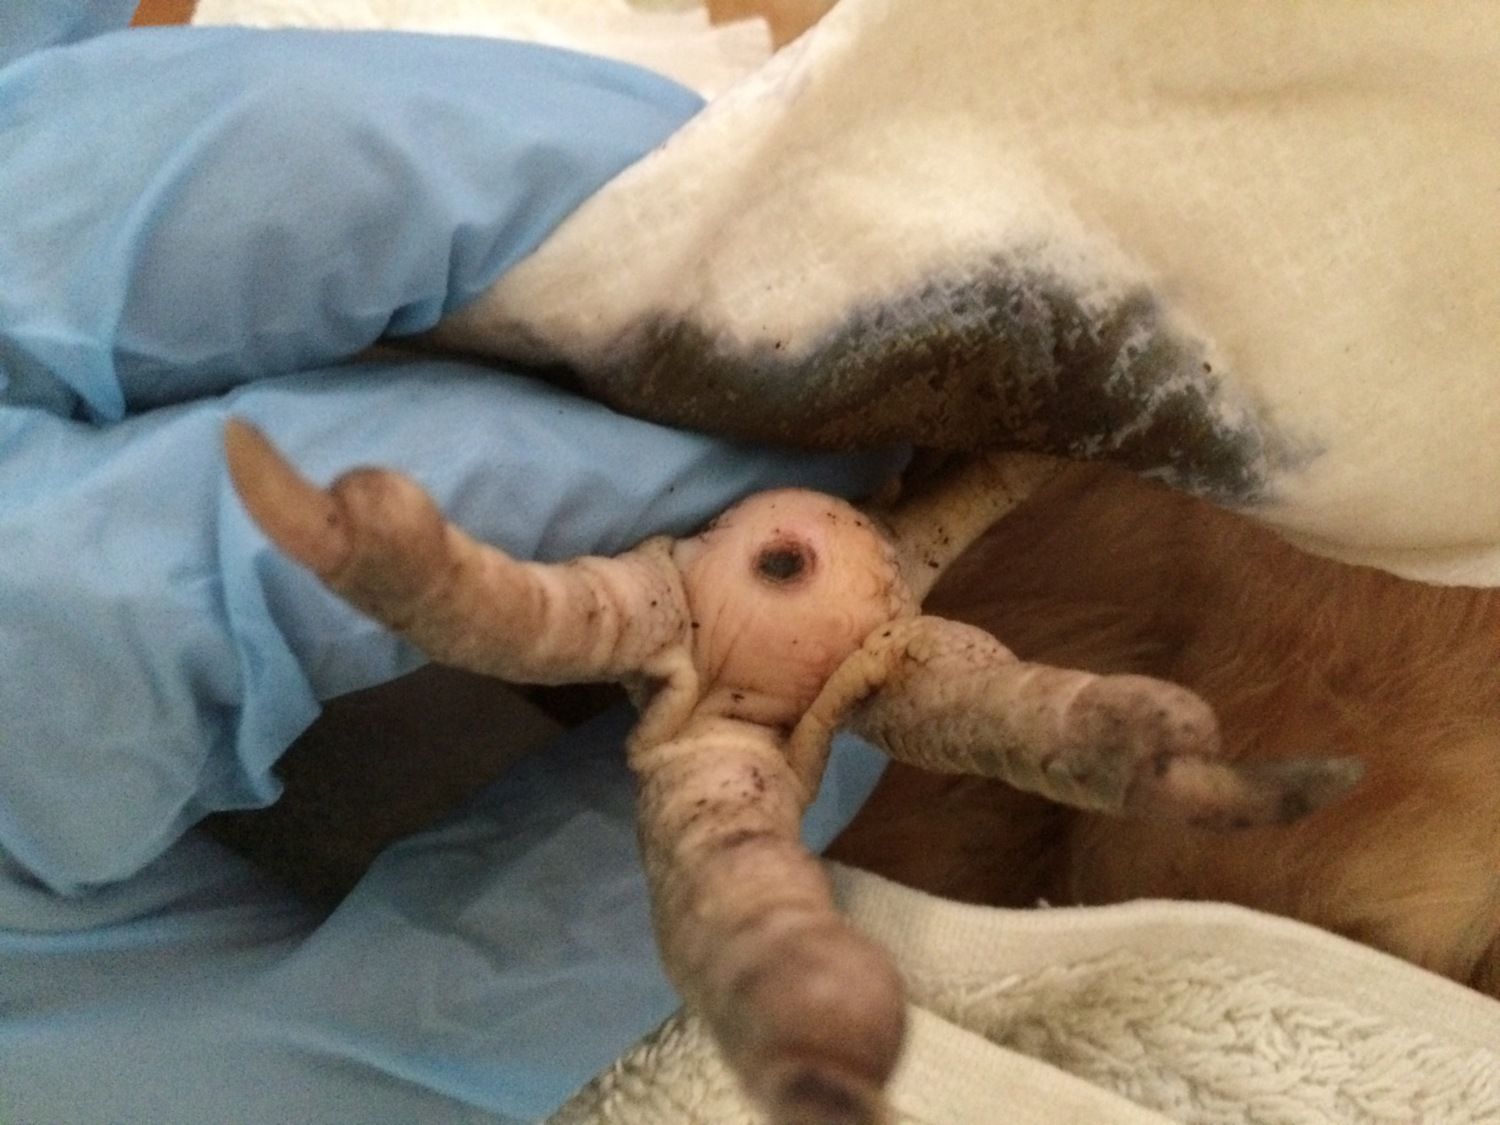
Step 2: Clean the wound
I wrap my chicken snuggly in a bath towel and lay her on her back in my lap with her bottom and feet free and facing away from me. She may resist a bit at first, but after about 30 seconds most hens will become very calm and sometimes fall asleep (this is similar to tonic immobility in other animals).

Here you can see the tell-tale black scab and swelling common in bumblefoot
Add a bit of providone iodine solution to the moist paper towel and clean any dirt and debris off the pad of the foot before you start treatment.
Clean and pink except for the scab (the discoloration on the towel is providone iodine solution)
Step 3: Remove scab and irrigate wound
Use a blunt, pointed object (I use the nail cleaner extension on a pair of nail clippers) to remove the black scab by gently prying around the edges until it comes off. There is usually a hole beneath the scab if there is pus gently squeeze what you can out and if needed irrigate the wound with dilute providone-iodine solution to wash out as much bacteria as possible.
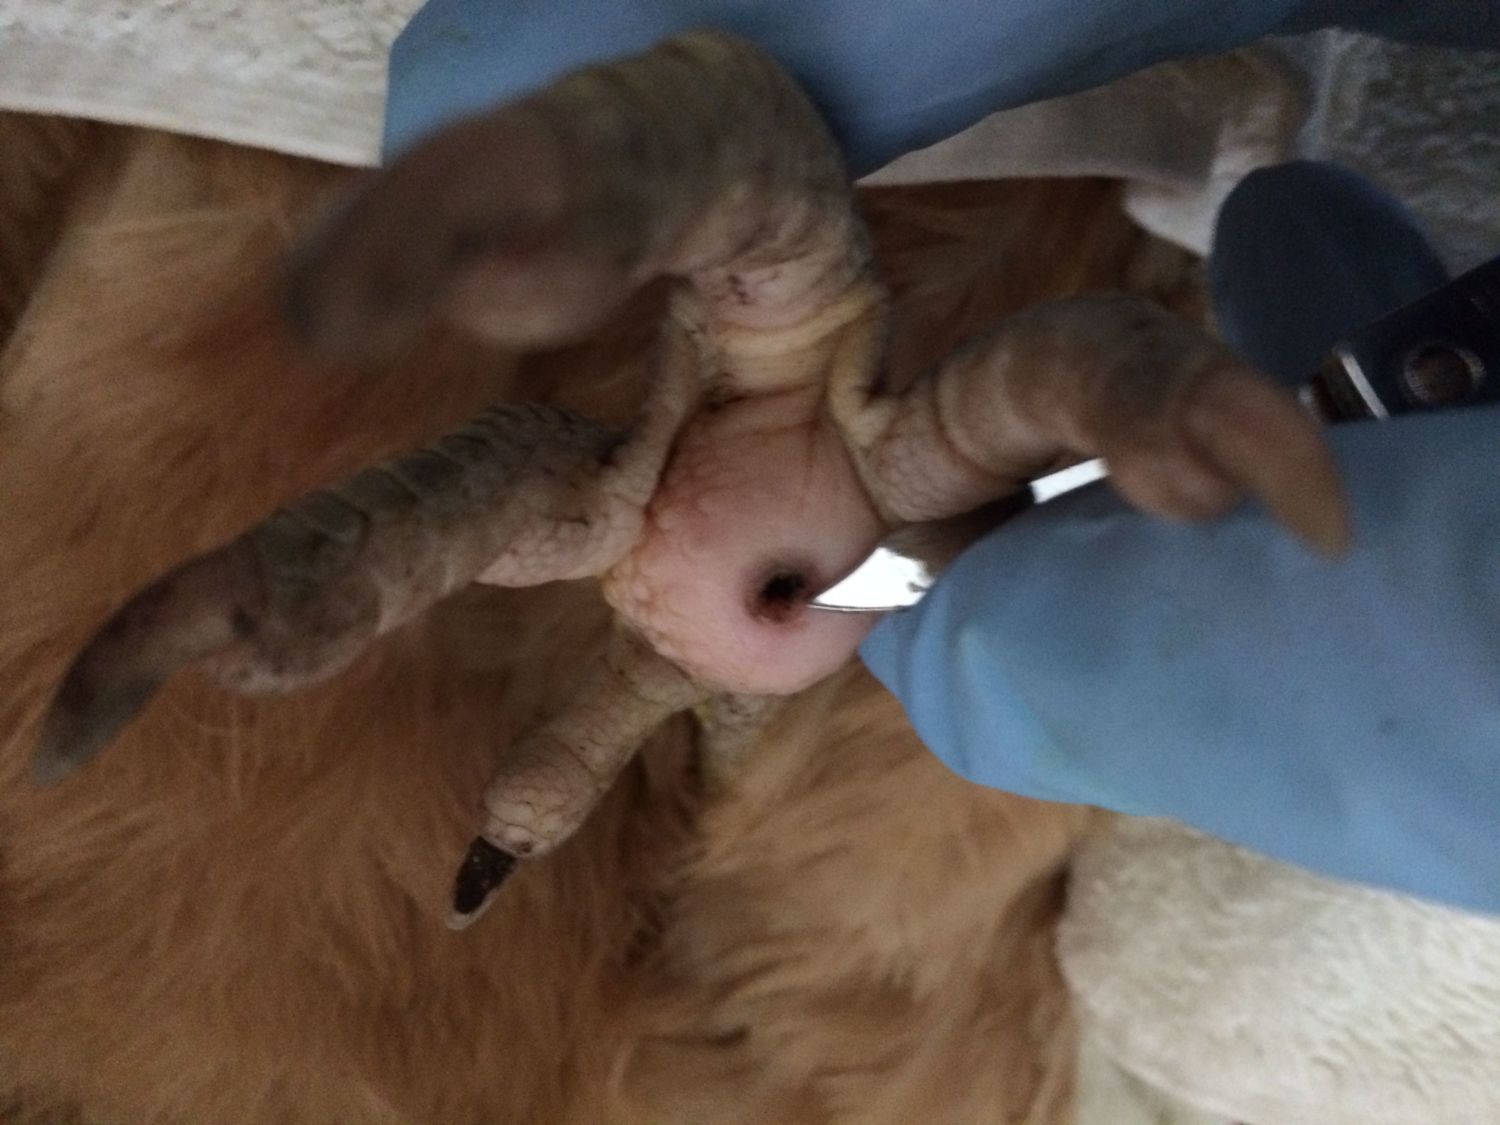
It had just rained this morning so this scab was already a bit soft and easier to remove
Step 4: Apply antibiotic ointment
Squeeze a pea-sized amount of antibiotic ointment onto a non-stick gauze pad and apply to the wound. Try and get the ointment down into the puncture as much as possible. Then place a small square of non-stick padding over the pad of the foot to help keep it clean.

A big oozy glob of ointment to help Pepper fight this infection
Step 5: Pad and Wrap the foot
Cut a cotton ball in half and place it over the non-stick padding on the base of the foot. This will help cushion the sensitive spot while your hen walks around later. Holding the cotton ball in place wrap the foot in vetwrap. I start one end of the strip on the cotton ball on the botton of the foot then loop through the toes around the base of the leg and repeat. Try and end the strip around the back of the leg (if you cut it too short just use another to reinforce it, it only needs to last for a couple days anyway). The goal is to keep the bandage in place and the wound clean while your hen is outside. You do not need to wrap it super tight or you risk cutting off circulation (think ace bandage on your knee). Test to make sure you have not impeded toe movement as you go along.

All wrapped up in a pretty shade of purple (I recommend dark colors to reduce pecking)
Step 6: Second Wrap and tabbing
Strictly speaking this step is not required but it will improve the longevity of your wrap. I use a slightly sticky sports wrap to cover a portion of the vetwrap on the leg. As I wrap, I squeeze the tape together to create a small tab on the front of the foot. Your hen will have something to peck at without actually damaging the wrap below (a bit of a chicken mind game).

This little tab will save you a lot of rewrapping hassle
Finally, check the other foot just to be sure there is not the beginning of bumblefoot there too. Small bits of dirt can look like bumblefoot scabs so while your hen is in medical procedure mode get the most out of it by doing a quick check. You might want to do a general health check too; make sure the vent it clean and there are no mites or other pests in her feathers.

Pink, fatty and bumblefoot free
Step 7: Clean up and release
All cleaned and wrapped your hen is ready to go back and face the world in her funny foot wrap. She will probably walk a bit wonky at first but she will adapt quickly. I gave Pepper a bit of left over breakfast waffle for her good behavior and let her go back outside.

Pepper: "How do I get this darned thing off?!"
Clean up your tools with a little rubbing alcohol and put it somewhere accessible for the next round. A handy trick for cleaning up dirty bandages and cloth is to wad then all up in your hand then pull the glove off so the dirty pieces are all trapped inside then toss in the trash.

Quick easy clean up with all the nasty germs safely contained
~Fin~
__________________________________________________
I hope that this guide helps you treat bumblefoot in your own flock. If you have other tips or tricks feel free to share them here. I am also happy to explain anything that did not make sense in this post if you have questions. I will update as I continue to treat Pepper's foot over the next couple of weeks.
**Note** Severe cases of bumblefoot may not respond to topical antibiotics in which case you will need to get an oral prescription or over the counter medicine from a feed store. I do not toss eggs when I use topical medicine but recommend not eating eggs from hens on oral antibiotics.
Almost every summer one of my hens gets bumblefoot at some point. You can tell as soon as they start doing that one legged stand while browsing in the yard. This summer it was Pepper, she is a fairly light weight easter egger hen, but is an intrepid explorer and as a result gets a few cuts and scrapes while out adventuring.
Pepper, now 5 years old and still laying and grub hunting like a pro
What is Bumblefoot?
Bumblefoot is an infection in a cut or puncture wound usually in the pad of a chicken's foot. The infection is usually E. coli or Staph which are common in soil and even on your skin. Usually it is not a problem unless it gets under the skin. Bumblefoot is not a foreign object lodged in the chicken's foot and a "kernel" does not need to be dug out for this to heal. Humans can get this same infection ,cellulitis, which is also treated with antibiotics.
Treatment_______________________
This is how I have treated bumblefoot in all my hens for the last several years. It is relatively easy but requires frequent maintenance. Be sure to wash your hands well before and after performing each treatment for your own health and that of the rest of your flock.
Step 1: Assemble your treatment kit
Prepare all your items in advance so you don't have to search for equipment mid treatment. I use the following:
- Rubbing alcohol (for cleaning supplies before and after treatment)
- nitrile gloves
- providone iodine (antiseptic wash for cleaning the wound)
- moistened paper towel or cleaning cotton pad
- nail clippers with a nail cleaning attachment
- cotton balls (foot padding)
- non-stick sterile pads
- antibiotic ointment (my vet prescribed mupirocin 5%)
- vetwrap (cut into long thin strips for wrapping the foot)
- sport wrap
- scissors
- towel (as a chicken restraint during treatment)
- optional: plastic syringe (without a needle) and small bowl of dilute providone-iodine solution
Step 2: Clean the wound
I wrap my chicken snuggly in a bath towel and lay her on her back in my lap with her bottom and feet free and facing away from me. She may resist a bit at first, but after about 30 seconds most hens will become very calm and sometimes fall asleep (this is similar to tonic immobility in other animals).
Here you can see the tell-tale black scab and swelling common in bumblefoot
Add a bit of providone iodine solution to the moist paper towel and clean any dirt and debris off the pad of the foot before you start treatment.
Clean and pink except for the scab (the discoloration on the towel is providone iodine solution)
Step 3: Remove scab and irrigate wound
Use a blunt, pointed object (I use the nail cleaner extension on a pair of nail clippers) to remove the black scab by gently prying around the edges until it comes off. There is usually a hole beneath the scab if there is pus gently squeeze what you can out and if needed irrigate the wound with dilute providone-iodine solution to wash out as much bacteria as possible.
It had just rained this morning so this scab was already a bit soft and easier to remove
Step 4: Apply antibiotic ointment
Squeeze a pea-sized amount of antibiotic ointment onto a non-stick gauze pad and apply to the wound. Try and get the ointment down into the puncture as much as possible. Then place a small square of non-stick padding over the pad of the foot to help keep it clean.
A big oozy glob of ointment to help Pepper fight this infection
Step 5: Pad and Wrap the foot
Cut a cotton ball in half and place it over the non-stick padding on the base of the foot. This will help cushion the sensitive spot while your hen walks around later. Holding the cotton ball in place wrap the foot in vetwrap. I start one end of the strip on the cotton ball on the botton of the foot then loop through the toes around the base of the leg and repeat. Try and end the strip around the back of the leg (if you cut it too short just use another to reinforce it, it only needs to last for a couple days anyway). The goal is to keep the bandage in place and the wound clean while your hen is outside. You do not need to wrap it super tight or you risk cutting off circulation (think ace bandage on your knee). Test to make sure you have not impeded toe movement as you go along.
All wrapped up in a pretty shade of purple (I recommend dark colors to reduce pecking)
Step 6: Second Wrap and tabbing
Strictly speaking this step is not required but it will improve the longevity of your wrap. I use a slightly sticky sports wrap to cover a portion of the vetwrap on the leg. As I wrap, I squeeze the tape together to create a small tab on the front of the foot. Your hen will have something to peck at without actually damaging the wrap below (a bit of a chicken mind game).
This little tab will save you a lot of rewrapping hassle
Finally, check the other foot just to be sure there is not the beginning of bumblefoot there too. Small bits of dirt can look like bumblefoot scabs so while your hen is in medical procedure mode get the most out of it by doing a quick check. You might want to do a general health check too; make sure the vent it clean and there are no mites or other pests in her feathers.
Pink, fatty and bumblefoot free
Step 7: Clean up and release
All cleaned and wrapped your hen is ready to go back and face the world in her funny foot wrap. She will probably walk a bit wonky at first but she will adapt quickly. I gave Pepper a bit of left over breakfast waffle for her good behavior and let her go back outside.
Pepper: "How do I get this darned thing off?!"
Clean up your tools with a little rubbing alcohol and put it somewhere accessible for the next round. A handy trick for cleaning up dirty bandages and cloth is to wad then all up in your hand then pull the glove off so the dirty pieces are all trapped inside then toss in the trash.
Quick easy clean up with all the nasty germs safely contained
~Fin~
__________________________________________________
I hope that this guide helps you treat bumblefoot in your own flock. If you have other tips or tricks feel free to share them here. I am also happy to explain anything that did not make sense in this post if you have questions. I will update as I continue to treat Pepper's foot over the next couple of weeks.
**Note** Severe cases of bumblefoot may not respond to topical antibiotics in which case you will need to get an oral prescription or over the counter medicine from a feed store. I do not toss eggs when I use topical medicine but recommend not eating eggs from hens on oral antibiotics.
Last edited:


