novice roof question, please advise?

dftkarin

Songster
11 Years
Jun 27, 2008
332
1
141
I want to build a roof for this coop:
12480_img_1178.jpg


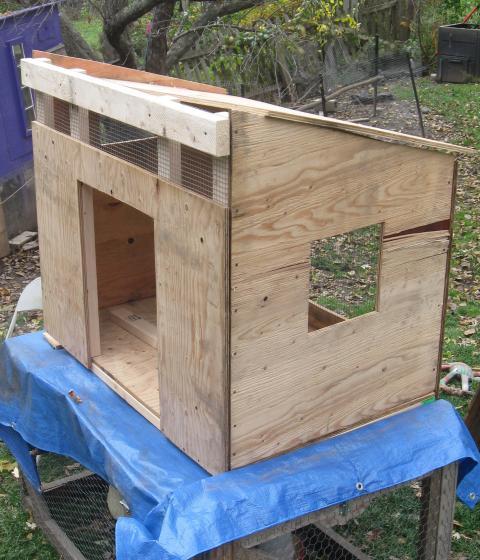
Could I buy 2x3s and cut them to (2) 54" and (4) 40" and make a rectangle with two supports in the middle (is that enough info to understand what I mean? Then paint the frame. Put metal brackets in the corners to make it strong. Then buy 2'x8' wavy plastic roof panels (and those wavy foam things and special screws) and screw the panels to the frame and then hoist the paneled frame up on the coop and screw it in place? I'm a total and complete beginner at building, but I have a power drill.
 
You could do that but it would probably be better to put your rafter material up first then purlin followed by decking and finally roofing material. That way you can firmly connect each section before moving on to the next. The other way you would risk having a very solid roof that is not well attached to the main structure.
 
What she said. Build it in place (not separately and then putting it on)... it will be much more secure that way (also easier <g>). You don't need decking with that kind of roof btw (unless you just *want* it, for various particular reasons)... just purlins, spaced no more than 2' apart and running perpendicular to the roof panel corrugations, is completely fine.

Good luck, have fun,

Pat
 
Okay, you think this will be siimple? I'm not sure I understand what purlins are - can you explain? If I screw boards to the wood that runs at the top of the front wall and top of the back wall (2x3s) - its 48: wide and 32"deep - so one on each side and two evenly placed in the middle (18" apart? is my math right?) - so I need to cut angles? Can I simply lay it down and screw it into the board running along the tops of the plywood walls? I have looked at the manufacturers webpages about installation but somehow I just don't get it - I can't understand what they mean or how to do it.
 
Oh yes, very simple once you get it clear in your mind
smile.png


First, I would suggest screwing a piece of 2x2 (at least) along the tops of the two slanty side walls. One piece along the top inside edge of each wall. Right up even with the top of the plywood. That will give you something to screw the roof purlins (or decking if you prefer, see below) *into* -- screwing into the end 'grain' of plywood doesn't really work very well.

If you want to use your plywood roof, screw it on, into those pieces you just added. Then screw the roofing onto the plywood. The thing is, this will result in screw points protruding thru the bottom of the plywood, for chickens to skewer their combs on. Also at some point *you* will get cut from 'em.

A better plan would be to use purlins (=nailers, =strapping). As long as your roofing is opaque and you are not in a cold climate where winter condensation is an issue, I don't really see any particular reason to use the plywood roof decking, although of course you certianly *can*. If you're going to, screw it on, screwing into the wood you added along the tops of the side walls, as described in previous paragraph. If not, don't
smile.png


Then, irrespective of whether you used the plywood, cut three pieces of wood the width that your roof will be. I would suggest reasonable overhangs on the sides, but you may as well make it some multiple of 2', which is the width of a plastic roofing panel. If I am understanding correctly that this coop is 54" wide (??) then you would probably want three roof panels (=72", giving a 9" overhang on each side). Thus you would cut three pieces of 2x3 or 2x4 into 70-72" lengths. Screw one along the top, over the high wall of the coop; one over the low wall of the coop; and one halfway between. You'll be screwing into those 2x2s you added atop the slanty walls, right?

Then you just screw your roofing panels onto those three purlins. Make sure to predrill the holes as per manufacturer's specs, and also do not leave more unsupported overhang on the top and bottom of the roof than the mfr recommends. If you want significant overhang at top or bottom, you will have to either build out a little frame to support it, or use plywood to run it out.

Oh, and follow mfr's directions for screwing panels on - screw on *peaks* not valleys, and use their wavy foam filler strips, they are not optional.

Good luck, have fun,

Pat
 
Last edited:
I think I get it and if I am understanding you correctly - it seems even more simple than I had originally thought! The coop is 48" wide and 32"deep - let me ask you this: If I ran those original purlins (2x3 or 2x4) in the opposite direction - across the depth of the coop instead of the width - and used 4 instead of 3, could I cut a single piece of panel in half and use the single panel with the waves running side to side instead of up/down? I wouldn't allow for any overhang on the short sides but I could run the boards/purlins out longer than the depth of the coop (maybe 40 inches) and have a nice overhang in the front and back (and the back is where the biggest window is). Also, I do live in a cold climate - new england - and I plan to staple a piece of bubblewrap insulation inside the coop wherever I end up putting the roost for the coldest months. Do you think its not safe to use those panels without plywood underneath?? I have a lot of ventilation (and I'm thinking about the snowload factor!)
 
Quote:
Well, sorta. You *could*, but it will tend to leak somewhat. Reason being, the screw holes will no longer be "high and dry", they will get water running over (and thus also through) them. Yes, I know you use gasketed screws but the gaskets are not a 100% proposition, especially as time passes.

Also, I do live in a cold climate - new england - and I plan to staple a piece of bubblewrap insulation inside the coop wherever I end up putting the roost for the coldest months. Do you think its not safe to use those panels without plywood underneath?? I have a lot of ventilation (and I'm thinking about the snowload factor!)

Snow load is not a problem as long as you have sufficient size and close-enough spacing of the purlins that support the roofing. If you were to go through with your suggestion above, of running the roofing sideways (although I really wouldn't, myself) then I would suggest beefing it up extra with more, closer-spaced purlins, because you will lose most of the value of the roof pitch - snow will NOT slide off well, as it would off correctly oriented roofing, and thus will pile up higher and get wetter.

Yes, in New England I'd suggest putting some form of insulation under your roofing if there's no plywood under it (and you really do not need plywood from a structural standpoint! it would only be aesthetics or a minor amount of insulation)). You want it over the whole underside of the roof, not just over the roost. Bubblewrap might be sufficient, worth a try anyhow, just watch for birds pecking at it (or its staples) if they can reach it anywhere
smile.png


Good luck, have fun,

Pat​
 
Last edited:
Thanks Pat,
I've been mulling it over and I think I should do it the way you originally suggested - but listen to this plan and tell me if you think it will work?
I'll screw 2x3s to the side walls but they will be 36" instead of simple 32" - with 2" hanging over the front and back. Then I'll screw three 60" 2x3s to those 36" side ones. Then I'll paint it blue to match the coop. Then I'll buy 2 panals of the good roofing and ask them very sweetly if they'll cut it into 40" lengths for me and I'll come home and screw the panels (I'll predrill the holes) to those three 60" purlins with a 2" overhang of panal over the front and back purlin. Does that make sense? So the roof will be 40"deep x 60" wide, attached to pulins that are spaced 36" front to back and 60" long, over a coop who's walls are 32"x48".

It is hard for me to picture it exactly but I think it could word, do you agree? Also, I have all sorts of hardware cloth covered ventilation in this coop but this way of attaching the roof seems to not be airtight at all - is there a way to deal with that? Or will it be tighter than I'm thinking? My coop is not tight at the edges so I will need to caulk or use that foam sealer stuff anyway - maybe I'll need that around the roof too?

My chickens are pretty hardy and I don't insulate (other than that bubble wrap stuff attached with just a few staples in the coldest months). Right now the two chickens for whom I'm building this coop are sleeping at night in my apple tree even though its leaves are all gone and its often beflow freezing at night, they stay up in the branches (separate branches, they don't even huddle together for warmth) even through thunder storms and fierce winds. It does get below 0 F at night frequently in our winters - but I still think they'll be okay even if the coop isn't completely draught-free.
 
Quote:
Sounds good! You don't have to have them cut the panels for you, btw (and they may well not do it anyhow)-- if you are using plastic roofing it cuts quite easily with plain ol' scissors. Be a little careful as sometimes it is a little brittle, but it is very easy to do.

Also, I have all sorts of hardware cloth covered ventilation in this coop but this way of attaching the roof seems to not be airtight at all - is there a way to deal with that? Or will it be tighter than I'm thinking? My coop is not tight at the edges so I will need to caulk or use that foam sealer stuff anyway - maybe I'll need that around the roof too?

You can either close the gaps up with lumber the same thickness as the purlins, or staplegun feedbags over the gaps, or pretty much anything else like that
smile.png
Be careful with the spray foam thing, chickens will peck at it anywhere they can reach, which is probalby not great for the chickens and DEFINITELY not great for the longevity of the spray foam
smile.png


Good luck, have fun,

Pat​
 

New posts New threads Active threads

Back
Top Bottom