When to assist a muscovy duckling to hatch?

scooter1989

In the Brooder
7 Years
Jan 10, 2013
51
0
39
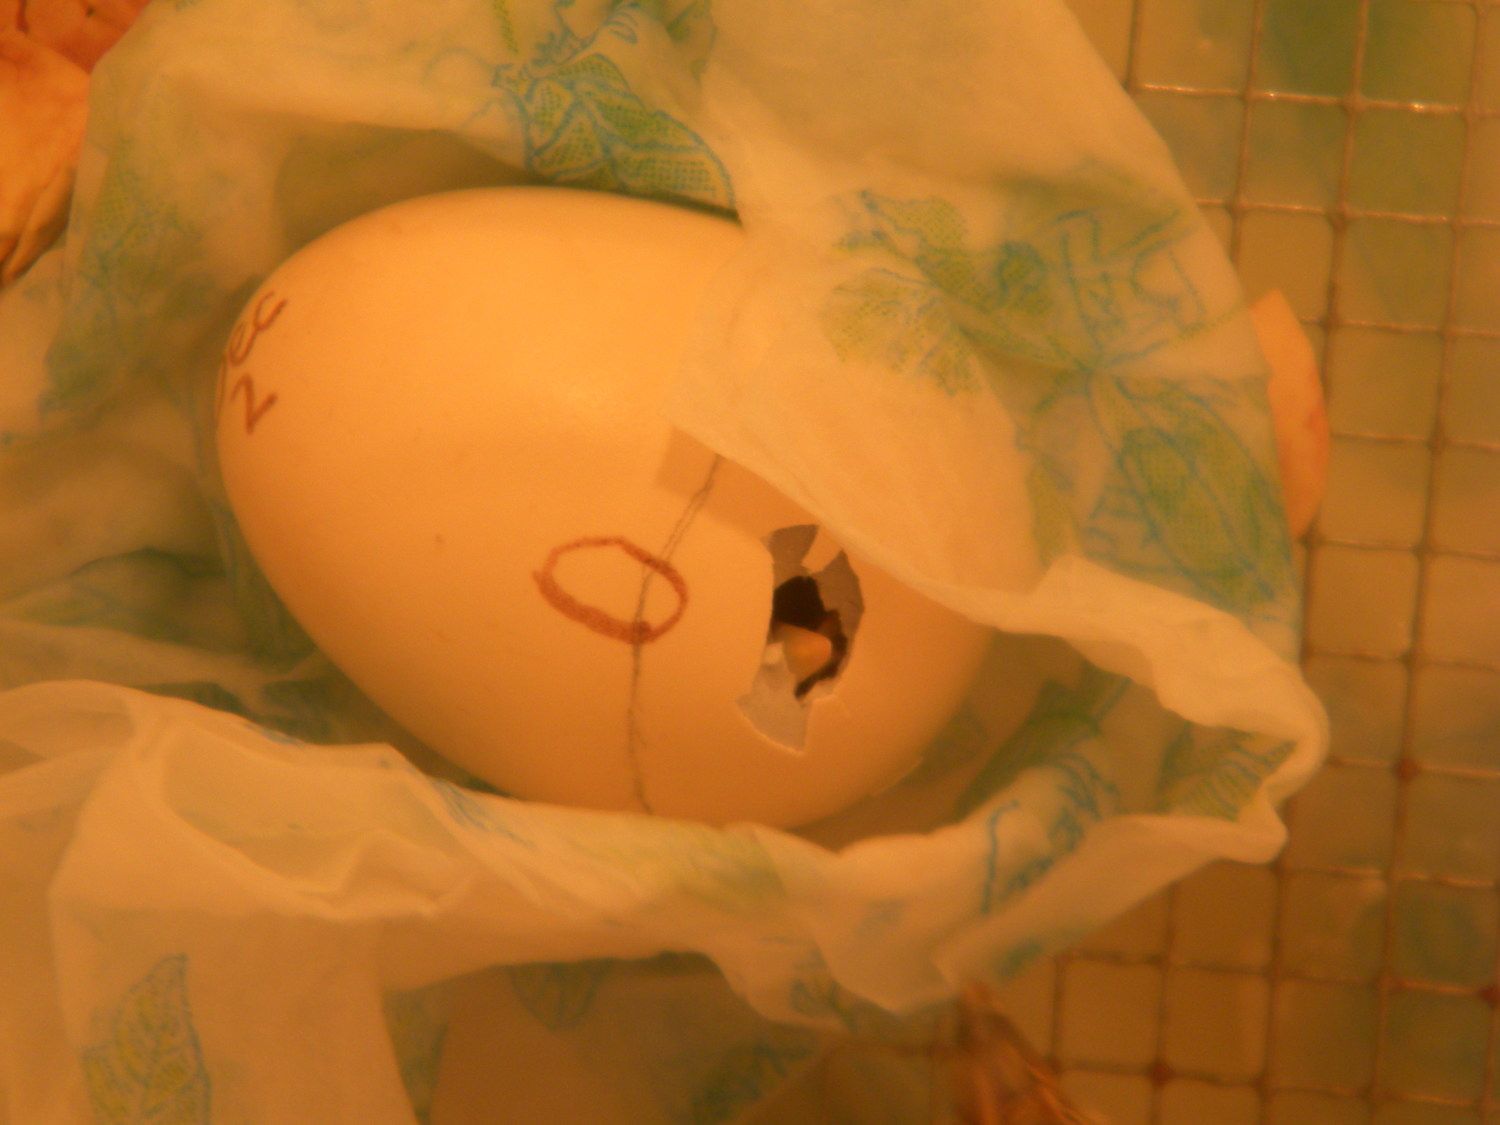
Hi everyone, I need help and very worry about my last batch of eggs in the incubator. I'm using a fan Hova Bator. My last two hatch didn't go well due to too high of humidity and all my ducklings died from the amber fluid.

The eggs that I have now seems to be a lot more healthier then the last two batches I had before, they came from my Muscovy hens. They are now piped and tapping on the eggs. They started to pip yesterday around 3pm and today there is no sigh of zipping. It is now 7pm today and all I feel is them tapping on the eggs. I opened the incubator because, I thought maybe they died already like the last two batches I had. The humidity is at 35% "not wet bulb" right now and all been hand turned half way threw incubation, the beginning they where on a auto turner then I read somewhere that they hatch better when turn on their side, so I started hand turning.

When should I assist to help? I'm so worried.
 
Have you seen this yet?

Source: https://www.backyardchickens.com/a/step-by-step-guide-to-assisted-hatching

Step by Step Guide to ASSISTED Hatching

By: Sally Sunshine
Posted 12/29/12 •Last updated an hour ago •58,037 views •25 comments


Step by Step Guide to ASSISTED Hatching
by, Sally Sunshine Poultry

GRAPHIC PICTURES FIRST
Why?
Because MOST New Hatcher's ASSIST too SOON & too FAST!


Below is the result of a BEAUTIFUL Chick that will die.
This chick clearly was NOT ready to hatch as her yolk sac has not yet been drawn inside the
abdominal cavity, nor have blood vessels receded.

I can not express how necessary it is to understand the hatching process!


To SAVE A CHICK and better your Hatch rates please study incubation!
Incubation Notes, Images, Videos & Links Including SHIPPED EGGS INCUBATION Techniques.

CLICK: HATCHING 101


Anxiety at this stage is tremendous for the first timer and they can quickly misinterpret the well being of their chicks and prematurely intervene with disastrous consequences.


Understanding The Hatching Process

Between the 15th and 16th days, the chick orients itself so that its head is near the air cell at the large end of the egg. Not long before the chick is ready to attempt to make its way out of the shell its neck acquires a double bend so that its beak is under its right wing and pointed toward the air cell. The chicks PIP first then REST then Zipping begins up to 24 +/- after initial pip depending on breed!

21 DAYS is just a baseline for hatching eggs.
Many chicks can take 23 - 25 days!
Some pip internally and fully hatch in hours while others will be 24 hours or more.


Egg movement! Eggs can “Rock n Roll” days before they are due to hatch!

Development of motor patterns in avian embryos:
Control of hatching behavior http://www.int-ornith-union.org/files/proceedings/durban/Symposium/S46/S46.1.htm


In regards to opening and closing the bator to remove already hatch chicks; It is important to remember that chicks can go 3 days without food/water. It is better to wait for the remaining chicks to hatch to insure reducing the impact to unhatched pipping eggs.

But my new chick is running around in the bator knocking eggs around!
LET THEM GO! DO NOT OPEN THE INCUBATOR! They are fine!


When to assist?
Assisting a chick should be your LAST RESORT
A chick’s failure
to progress normally at hatching stage can be caused by genetic problems resulting in malpositioning, deformities or weakness, in which case assistance may promote the survival of birds with deleterious genes. However, hatching difficulties may also result from imperfect incubation procedures with a chick which is genetically viable, or an abnormally thick shell. A lot of the deaths due to the above situations occur immediately before hatching during the transition between embryos to breathing chick. The chick can have difficulty positioning for pipping, absorbing the yolk sac, or changing to breathing air. A chick’s chorioallantoic circulation remains functional until shortly before hatching and remains even when yolk absorption is complete and the embryo/chicks are vocalizing? Therefore the correct time to assist an egg is hard to judge. It is essential that the chick is given as much time as possible to fully absorb the yolk, for the vascular system to shut down, and for the chick to complete the normal physiological processes of hatching.
Do not rush the hatch!

DO NOT RUSH THE HATCH!

DO NOT RUSH THE HATCH!


If a chick HAS pipped a hole in the shell
DO NOT INTERVENE for AT LEAST 12 hrs!


Why?

It’s at this point that it’s difficult to judge when intervention is both necessary and safe.
A chick rests during this QUIET phase as it is preparing for hatching. This is a VERY quiet stage that is easily misinterpreted. Inside the egg the chick is resting and learning to breath. They will sleep while occasionally opening and closing their mouth. The chick will move it's head in a jerky pipping motion as well as chirp lightly. The lungs are maturing and with this change in chest pressure it causes contractions which helps the yolk sac to be drawn inside the abdomen. Blood vessels at this stage also start to recede. If assisted prematurely it can cause hemorrhaging from the blood vessels and the yolk sac will be unable to absorb.

WHEN should I help?

You can tell the chick is having trouble if it gets stuck for several hours in the MIDDLE of the unzipping stage, either pointlessly banging its beak against the hole without making further openings in the shell or mostly unzipped but unable to kick free.

A chick is troubled if it's pipped but hasn't started unzipping AFTER 18-24 hours, or if the bit of exposed membrane around the pipping hole is starting to turn tan and dry.

If the pipping marks look erratic or irregular, the chick may also be in trouble.
Anything past 40 hours there is a very real possibility that the chick will never get out of the egg without assistance.


A chick that has pipped the wrong end of the egg is also in trouble, and sometimes may be assisted as well.

AGAIN I CANNOT STRESS ENOUGH….
It takes HOURS and HOURS for the complete absorption of the yolk sack!


Below..... a Good Looking Membrane!


FOR MALPOSITIONS (pipped wrong end)

SEE MALPOSITION SECTION Below


TIMELINE of a silky HATCHING!
MONDAY 5 PM noticed external pip


TUESDAY DAY 20 9AM STILL RESTING,
hole slightly larger but chick is NOT zipping!


2 PM TUES. CHICK IS ALREADY OUT!
missed the last quick zipping!
Silky on the left, two CCL hatched at the same time!

ITS IMORTANT TO NOTE:
THIS CHICK TOOK WELL OVER 24 hours to hatch! and absolutely normal!


EXAMPLE of why I tell everyone if they have a malposition (pipped wrong end)
its chirping and getting air LET THEM ALONE just note the time and keep an eye on them!
These are usually the first pips you can see, because they are both the internal and external pips.
I got lucky to catch a video of one today....
EXCUSE the WHITE OUTS thats the bator lights kicking on and off sorry!


Step by Step Guide
To assist an INTERNALLY AND/OR EXTERNALLY
Pipped Chick in distress


BREATHE!
That’s right, take a deep breath, calm your nerves and RELAX!
There is no rush to get a chick out of the shell!


"The developing embryo has lived in this shell for well over 3 weeks.
It has survived off of the contents of the egg for that entire time. The only thing it has absorbed from the outside is Oxygen. As long as the chick is getting Oxygen, there is nothing urgent. Too many people feel the need to rush in and pull a chick out of a place that has served it well for 3-4 weeks. There should be no rush to get a chick out of the shell if it can breathe. As long as it has access to air through the pip, it can sit there all day, even after the blood vessels recede. It's not going to starve. It has plenty of yolk. It's not going to dehydrate, unless you get impatient and begin removing shell before it's time to do so causing bleeding or too much exposure to outside air."
http://www.avianresources.com/Nursery_Mgt.htm


If the majority of your chicks have hatched or
its past day 21 (for Chicken eggs), it's time to....
CANDLE & Tap!
Candle and look for an internal pip. Pencil mark the air cell.


Below is what an internal pip it looks like.
The beak is thrust through the inner membrane into the air cell.


Tap with your fingernail GENTLY on the air cell and hold to your ear, Can you hear a peep?


**IF** YOU DO NOT HAVE AN INTERNAL PIP AND YOU CAN’T HEAR CHIRPING and but you do SEE MOVEMENT, place that egg BACK in the incubator and WAIT, this EGG DOES NOT need assisting at this point!

**IF** however YOU DO NOT HAVE AN INTERNAL PIP AND YOU CAN’T HEAR CHIRPING and YOU DO NOT see MOVEMENT please proceed to The Float Test ~ Checking Egg Viability. Give Eggs A Full 24 Hrs Overdue Before Float Testing ONLY AFTER CANDLING and NO Internal pips and NO internal MOVEMENT or CHIRPING! This procedure takes very little equipment Or time to do and Is Easy To Perform. If your egg is still viable, place back in the bator and wait! https://www.backyardchickens.com/t/383525/float-testing-checking-egg-viability-for-late-or-overdue-hatching

Now its time to assist if…
Your Beyond THE WAITING PERIOD and you’ve followed ALL steps above!

Assist if YOU HAVE AN INTERNAL PIP AND you hear CHIRPING, OR YOU HEAR CHIRPING and No PIP......
AND you clearly understand the hatching process,
AND you are CERTAIN its time to intervene,
AND you have READ THROUGH this ENTIRE ARTICLE,
AND you understand THE STEPS to ASSIST,
AND you HAVE PATIENCE,
If NOT, DO NOT TOUCH THAT EGG!


Creating an Artificial Pip or "View Hole"!
Disinfect & WASH your hands!
Begin this step by making small hole at the pip area
(or closest to where you hear him chirp)

ONLY IN THE AIR CELL AREA!!!
TYPICALLY his beak is towards the LOWER DIP IN THE AIR CELL as shown below


Make "Only" a small hole ENOUGH so you can see that the little beak is free of the inner membrane. Use a flat tipped tweezers or a knife. DO NOT POKE just chip and then use tweezers to pull that white outer membrane away a tad until u can see his beak. Remember, THERE is an OUTER white membrane and an inner membrane. It is very important at this stage not to damage the inner membrane that holds all the chick's blood cells.


If you need to create a pip its best to keep scoring a tiny X until you can chip the hole. You can also use a tiny sharp drill bit, NOT in the drill, I just use it to score the X, but DO NOT harm the chick! DO NOT CRUSH THE EGG with force! It is very hard to start a pip if you dont have one, so be prepared with multiple tools if one isnt working for you....


If you open that pip and can see her beak like below, then leave the egg like this.... set her on a dampened paper towel, and put her back in the incubator and raise the humidity. Then WAIT.... WAIT WAIT!


900x900px-LL-996aa13f_DSCN6943.jpeg


If you have made a pip AND CANNOT SEE THE BEAK, open a larger hole in the shell little by little, in the AIR CELL Area ONLY, DO NOT GO BELOW THAT LINE. As you can see in the photo below this little bugger was a hard one to find! Again, only clear the beak then dampen the membrane with a finger dipped in sterile/clean water (DO NOT GET NEAR HIS NOSTRILS and DO NOT PULL any MEMBRANE with blood in it!)
Set the egg on a damp paper towel and return to the incubator.


NEVER UNDER ANY CIRCUMSTANCES SHOULD YOU REMOVE THIS INNER MEMBRANE AT THIS POINT!
AS long as you LEAVE THAT MEMBRANE intact THEY WONT KICK OUT PREMATURELY...
THIS I CANNOT STRESS ENOUGH!!!


TIME TO LEAVE HER ALONE and keep that humidity up!! 75-80s even!!
What did you read that is most important right now???

LEAVE HER ALONE! Do not pick at her shell do not remove any more membrane at this point! Wait, every 2 hours dampen her membrane and place her back in the bator! There is A LOT of stuff for them to absorb!!
Not just that blood, that yolk is HUGE! look!


Now that you created a pip she still CAN finish up the job!

This is a girl I helped and as you can see went to town all on her own!


What if she DOESN’T Finish Pipping?

The first thing to remember when helping is to watch for blood. If bleeding, STOP right then and there. Put the egg back and wait a few hours before trying to help again. Once you start helping a chick at this point, it won't be able to finish by itself.


If after 6-8 hours and there is still NO PROGRESS in her pipping you will need to remove the “CAP” Air cell end of the egg. ONLY ABOVE the Pencil Line! I start by taking tiny pieces of shell off just like a pipping line and follow just above the pencil line. IF YOU DRAW BLOOD you went a bit too low, so move a bit higher…
GO SLOW! And stay ABOVE THAT INNER AIR CELL!


In the picture below you will see an inner pip with the beak in it… Dampen first for better viewing of membranes. Clear a tiny bit of membrane from the nostrils, but DO NOT to hit any veins. If you dampen that white membrane you can see it’s fairly clear when wet but still filled with full vessels. If you do hit a little blood in a vein gently press a dry paper towel on the spot to stop the bleed. Below are pics of THE SAME chick dry membrane and the other dampened.
This chick CLEARLY is NOT READY to COME OUT OF THAT SHELL or have its membrane removed!
Put BACK in the bator on damp towel!


I will also add that I have recently switched from using sterile water in an assist to using Q-tips or "Ear Buds", and adding antibacterial CLEAR OINTMENT called bacitracin (NOT NEOSPORIN) to inner membranes, because you do NOT have to keep wetting them and you can see in the pic below that the ointment makes that membrane clear, and it is ANTIBIOTIC it wont have bacteria in it that water can! refer to https://www.backyardchickens.com/t/704328/diary-notes-air-cell-detatched-shipped-eggs/7850 for understanding ointments and creams. DO NOT USE OINTMENT WITH PAIN KILLER! USE BACITRACIN


NEVER remove this membrane until THOSE VEINS RECEDE and blood is absorbed!


Every 2 hours you will check and if necessary dampen that membrane or add more ointment if your using it. Continue looking for the recession of veining. This will probably take at least 8-12 hours if not more!

If the blood is not absorbed THE YOLK SURE ISNT!
WETTING THE MEMBRANE MAKES IT TRANSPARENT SO YOU CAN VIEW THOSE VEINS!


Nope still needs a little time!


How do I tell if the chick is READY?

Below is how the membrane looked in a healthy hatch! Once the blood has been drawn into the body the veins will look thin, webby and the membrane will look transparent.
Very thin tiny veins like hair strands! Enlarge photo.


WHEN THE chick is READY they will again chirp LOUD!
BUT ONLY GO BY THAT MEMBRANE and its veining!!


She is READY!
WHEN she has absorbed all that blood check the position of the beak and ease the membrane away by stretching rather than tearing if possible. If no bleeding occurs continue to gradually ease the membrane from the beak towards the sides of the shell and I sorta of stick them OVER the shell and they stick to it, as if putting a trash bag in a trash can. Continue until the chick is exposed by dampening the membrane, I use a tweezers with a flat tip (not pointed). If the membrane is sticking to the chick just keep dampening and use a clean damp paper towel and wipe gently with the feathers and it will come off.


Now that you have the membrane pulled off the top of the chick wet along the outer shell membrane 1 more time & PUT THE CHICK BACK IN THE BATOR!​
DO NOT ATTEMPT TO PULL OR TILT the chick out of its shell!!

LET the chick do that part when it’s ready!!!


LL


Oh NO!
It PIPPED the WRONG END!

MALPOSITIONS
It is common to lose about 1-2% of the chicks due to deformities and malpositions. Deformities occur during embryo development, while malpositions occur the last week of incubation. Malpositioned embryos are unable to pip the eggshell and escape due to improper positioning within the egg. The chicks can have difficulty positioning for pipping, absorbing the yolk sac, or changing from embryo to chick breathing air. The majority of malpositioned embryos that have died in the shell probably resulted from exhaustion and/or lack of oxygen. One GOOD thing to remember is that SOME malpositions are Lethal and some are not! Occasionally, malpositioned chicks will hatch unassisted but the hatch does need to be monitored closely to ensure that the chick is not becoming stressed, or stuck. Often as a result of the position in the shell they have been unable to absorb all of the yolk. Please refer to Navel SECTION BELOW.
LL


Common reasons of Malpositions are:
Eggs are set with small end up.
Advancing breeder hen age and shell quality problems.
Egg turning frequency and angle are not adequate.
Inadequate % humidity loss of eggs in the setter.
Inadequate air cell development, improper temperature and humidity regulation, and insufficient ventilation in the incubator or hatcher.
Imbalanced feeds, elevated levels of mycotoxins, and vitamin and mineral deficiencies.
Lower than recommended temperatures in the last stage of incubation.


Normal hatching position and the six recognised malpositions Images:
http://www.thepoultrysite.com/articles/1608/investigating-hatchery-practice-examining-the-hatch-debris


ASSISTING MALPOSITIONED CHICKS
The external pip of a malpositioned chick is actually both an internal and external pip, these are also the hardest to deal with because they are made directly into a fully active membrane and not into the safety of the air cell. Be extremely careful not to puncture the membranes directly under the shell as this is likely to cause a bleed.
PLEASE READ THIS ARTICLE IN ITS ENTIRETY
BEFORE YOU ATTEMPT THIS ASSIST!


The decision to intervene and how fast to progress with assistance is not simple and there are NO RULES except… SLOW SLOW SLOW HOURS HOURS HOURS and MORE HOURS!
A chicks chances are slim with these kinds of malpositions so recognize that your trying to give it a chance to live! I have lost a few malpositions and saved a few! EXPERIENCE WITH ASSISTING is VERY HELPFUL! Assistance should take place in stages. Stopping after each stage of assistance gives the chick a chance to complete the hatching by itself.


Assisting Chicks that have ALREADY pipped the wrong end
or have pipped in an air pocket within the egg (seen while candling, or hearing their chirps). If the chick has made a successful external pip at the wrong end or somewhere in between, you can monitor them and see if they can hatch out themselves, if no progress in say 10-12 hrs begin a slow assist, keep reading. If the pip is not successful you will need to create one, chip a tiny bit of shell away from the center of the crack. Make sure there is a slice through the outer membrane so air can get in. TINY means less than 1/4”. If the pip has fluid running out of it create a viewing hole to check if its still viable.


ASSISTING~ If the chick does not progress, membrane looks brown or seems exhausted after (give or take 8 hrs), begin assist by slowly chipping outer shell as to create a viewing hole to see whats going on in there. CAUTION ~ SLOW as the view hole in the case of a malpositioned chick is actually the external and internal pip in ALL cases. They are difficult! More so than the standard view hole, as they are made into a fully active membrane area and NOT into the safety of the air cell. The membranes directly under the shell should not be punctured accidentally as this is likely to cause a major bleed.


Assisting CHICkS that you SUSPECT Malposition
THIS is by FAR THE WORST SENARIO and SO HARD to Distinguish between Not ready to hatch and malpositioned! If you suspect you have a malpositioned chick (the egg is overdue for hatching) and HAS GONE PAST day 21 and the hatch of everyone else…. you can open air sac, (DO NOT OPEN BELOW AIR CELL LINE!) follow the instructions above on opening the air cell CREATING an EXTERNAL PIP. BUT FIRST Study the common malpositions as pictured in this article so you are familiar with its anatomy!….

Normal hatching position and the six recognised malpositions:
http://www.thepoultrysite.com/articles/1608/investigating-hatchery-practice-examining-the-hatch-debris

After carefully removing air cell end, wet a finger and feel and look for the beak through the membrane. IF there is A LOT of fluid under the membrane you may have a wet/mushy chick or one that simply isn’t ready yet, place them back in the incubator and wait! DO NOT OPEN THE INNER MEMBRANE! If a lot of fluid is NOT present, look for its big round eye, or beak, or even wing to help you find its head. JUST LOOK AND FEEL THROUGH THE MEMBRANE AT THIS POINT DO NOT OPEN IT!

If you find its beak/eye/wing take your tweezers and create a small hole in the inner membrane AVOIDING ANY BLOOD VESSELS! Depending on position you may need a larger hole, just AVOID vessels as much as possible. You may need to gently lift/pull the head from under the wing and by gently extending it may be sufficient to allow the chick to complete hatching. (If you do hit a vessel quickly using a dry clean paper towel or gauze hold for a few seconds and bleeding will stop.) After this stage the chick will look as though he is gasping, place in incubator & let it rest at this point. Let the chick rest until the blood vessels recede, follow instructions for assisted hatch above from this point on. WAIT WAIT WAIT! Oh and WAIT SOME MORE! AGAIN. this is the HARDEST position to get a chick to live, but at least your giving it a chance at life!

IF YOU DON’T FIND its beak/eye/wing from the air cell end or see a yellow/orange sack DO NOT break the membrane! I HATE HAVING TO DO THIS STEP AND depending on egg cost I WONT EVEN TRY AN ASSIST! It is Hard understand and find how a chick is positioned! IF YOU CANT FIND ITS BEAK, you can make a guess as to where you think it is after refering to that link and its pictures on malpositions, and carefully chip ONLY OUTER EGG Shell away at the guess area. (Example: If you see the butt or yolk sack when you took the air cell end off, you have the bottom of the chick, you will refer to the link with malposition pictures and take a guess at how the chick is situated at the other end or SIDE of the egg) The membrane will often be brown where the beak is trying to break through. If your lucky and find its beak, create an air hole there so the chick can breathe and if you didn’t find it DO NOT open the membrane, refer back to the position ANATOMY pics and try another spot and keep trying! As LONG as your only taking the Shell off and not causing blood loss and NOT disrupting and inner membrane your ok! ITS HARD to figure out a position and I am finding alot of times their head is tucked in the middle of the egg between butt and feet! After you found its beak establish clear beak for breathing, let the chick rest until the blood vessels recede, follow instructions for assisted hatch above from this point on. WAIT WAIT WAIT! Oh and WAIT SOME MORE!


SHIPPED EGGS & Malpositions!
SADDLE SHAPED AIR CELLS are very COMMON with shipped eggs!


Saddle shaped is when one or both sides have a large "dip" in the air cell. For the best way to incubate shipped eggs please refer to the Shipped Egg Section in https://www.backyardchickens.com/a/hatching-eggs-101


A lot of times with saddle shaped cells the chick doesn’t position correct for hatching and their feet can easily get stuck behind their head and “smoosh” the chick so they can’t move, it can also force the yolk sack and everything more north in the shell.... First lets Look at this position.....


Note the top of the egg (air cell end) and how far down one side of the egg this air cell goes. Some times the chicks CAN do the internal pip but cannot hit that outer membrane/shell. This is why you should pencil mark the air cells and keep a close watch on them at hatch, especially if they seem "later" that the rest by about 6-12 hrs. I will begin an assist by candle and tapping to make sure I have that internal pip, HOWEVER in this case you cant see the internal pip too well because of the angle, so I always tap to see if I hear them. IF you DO hear a chirp or see an internal pip then follow the Assist steps first in this article. If not I check again in another 6 hours and repeat...


She HATCHED! But what's with her butt?


If there is slight bleeding at the navel use corn starch or a dab of cold water to stop the bleeding. You can also swab the umbilicus area with a 1% solution of Betadine and place the chick back in the bator to dry. If you do see this and the chick is already out of the shell dangling with this, use a clean sterile scissors to cut through them, DO NOT PULL as you can harm the chick’s navel!
But only the cords!
DO NOT CUT IF THERE IS UNABSORBED YOLK SACK!!

Please see below for info on unabsorbed yolk.


Please see HOW TO TREAT & PREVENT yolk sack infections!!
click on in the link below​

https://www.backyardchickens.com/a/mushy-chick-disease-yolk-sack-infection-omphalitis

Below is a photo of a "Duck in a Cup" waiting for its yolk sack to finish up!


The chick BELOW had a large navel at hatch.
With some antibiotic ointment she had quickly absorbed the rest of that navel area and is now a fine young pullet!


3 Essential Chick Care Tips (pasting up and Cord info)
http://ezinearticles.com/?Do-You-Know-These-3-Essential-Chick-Care-Tips?&id=4449831


YES this CHICK MADE IT through with proper Care!
https://www.backyardchickens.com/t/744592/day-21-ohmy


And this one MADE IT! Say Hello to "Yolk"
Yolk, a WONDERFUL Story of a Chick that stopped pipping midway and ended up having a yolk sack rupture and a bunch of other issues! It is well worth a read and "Rock" has all the footage to boot!
https://www.backyardchickens.com/t/704328/diary-notes-air-cell-detatched-shipped-eggs/3100


My Links for additional information

Eggtopsy: What happened to my egg?
https://www.backyardchickens.com/t/363717/eggtopsy-what-happened-to-my-egg-graphic-pictures

"Shrink wrap" vs. "Sticky chick"?
https://www.backyardchickens.com/t/491421/shrink-wrap-vs-sticky-chick#post_6242987

Hatchability Problem analysis.pdf1,708k .pdf file

Trouble Shooting Failures with Egg Incubation
http://msucares.com/poultry/reproductions/trouble.html


http://www.poultry.msstate.edu/extension/pdf/troubleshooting_incubation.pdf
http://anrcatalog.ucdavis.edu/pdf/8127.pdf

This is also a great pdf with pics: paste link in browser search:
http://www.google.com/url?sa=t&rct=...joHICw&usg=AFQjCNGgYxCBYwBex31MS5w2McdnpH1zbw

ALSO this PDF at the last pages have a chart that shows what could have happened.... http://gallus.tamu.edu/library/extpublications/b6092.pdf


New Chick Care Links and Info

DIP THE BEAK OF THE CHICK IN THE WATER BEFORE YOU TURN IT LOOSE in the brooder. A taste of water right away helps them to find more water soon. If your chicks are at all stressed, add about 3 tablespoons of brown or table sugar to each quart of water for extra energy. Most baby bird loss is caused because the bird doesn't start to eat or drink. Never let your bird run out of water. http://odysseyranch.com/Chick Care Tips.html

Dont forget to have Sav-A-Chick™ Electrolyte and Vitamin Supplement on hand! AND ITS CHEAP at TSC its Balanced electrolytes supplement for newly hatched and adult chickens, ducks, turkeys, and other domestic poultry. Fortified with vitamins A, D3, E, C, K, B1, B2, B3, B5, B6, B9 and B12. Convenient, single-use packets each mix into one gallon of drinking water. Use during hot weather or other stress to support optimal hydration and bird health. JUST IN CASE you have a weak bird! OR You can add sugar to the water in the first couple of days.


Homemade Electrolyte Recipe for weak/ill chicks
2 C. Water
2 TBL. Brown Sugar, honey or molasses
1/2 tsp Salt
1/2 tsp. Baking Soda
Mix until all dry ingredients dissolve & Keep refrigerated
You could also use electrolyte drinks Gatorade or Pedialyte, or
3 drops of POLYVISOL (liquid childrens A-B-D vitamins)
Slowly drip along inner edge of lower beak.


http://www.mypetchicken.com/backyard-chickens/chicken-care/chapter-4-caring-for-baby-chicks.aspx


Some causes of EARLY CHICK MORTALITY ~


CHICKEN ORTHOPEDICS ~​

Splayed Leg & Curly Toes
On occasions “stuck” chicks are affected with splayed or rotated legs. This may be a result of an unusual position in the egg, a fall resulting in injury to the leg, or slipping on a smooth surface in the hatcher & brooder. Splayed legs are preventable by the use of non-slip brooder matting and can be corrected with hobbles, if identified early enough.
https://sites.google.com/a/larsencreek.com/chicken-orthopedics/leg-braces
https://www.backyardchickens.com/t/72885/boot-for-curled-toes-on-3-month-old-chicken-update-w-pics
http://www.the-chicken-chick.com/2012/02/spraddle-leg-in-baby-chicks-what-is-it.html

Culling ~

Small Animal Euthanasia at Home http://www.alysion.org/euthanasia/index.php
How to cull chicks http://www.waldeneffect.org/how_to_cull_chicks/
How to Dispatch a Chicken.http://poultrykeeper.com/general-chickens/how-to-kill-a-chicken


SEXING CHICKS ~ With in TWO DAYS you must do this or wait till they crow or lay!! refer to : http://www.ca.uky.edu/smallflocks/sex_linked_crosses.html & http://www.ca.uky.edu/smallflocks/Feather_sexing_practice.html


FINISHED ~
SANITIZE EQUIPMENT & PAT YOURSELF ON THE BACK or throw the bator out the window!

A few Cool Videos!


Disclaimer: Please note this information is offered as friendly advice only and, whilst I have made every effort to ensure it is accurate, I can not be held responsible if it proves not to be useful in your case!


If they were mine and internally pipped I would have the humidity (RH, not wet bulb) at 65-70%, but I'm no expert, lol.

-Kathy
 
This person hatches tons of Muscovies

Source: https://www.backyardchickens.com/a/incubating-and-hatching-muscovy-eggs

Incubating And Hatching Muscovy Eggs

By: yinepu
Posted 5/10/12 •Last updated 4/27/14 •13,937 views •16 comments

Please note: I don't always get notified when there is a comment to the articles that I have posted.. so if you have a question and I don't get back to you here... just drop me a PM
* ~ Ƹ̵̡Ӝ̵̨̄Ʒ ~ *

This is my basic guide for the Incubation and Hatching of Muscovy Eggs

All ducklings pictured were hatched out in incubators... none of these eggs spent any time under broody ducks or hens


A few freshly hatched and drying Muscovy ducklings (ignore the temp on the thermometer.. I had it under a desk lamp just before putting it in the brooder and taking this picture)


16 french white muscovy from 18 shipped eggs (2 of the eggs were broken when they arrived)


More pics to come!...
* ~ Ƹ̵̡Ӝ̵̨̄Ʒ ~ *

Shipped eggs will need to be handled differently than eggs from your own ducks.. so all info specific to shipped eggs and not eggs from your own birds will be in "BLUE".. some of the other info will also pertain to shipped eggs so please read everything

* ~ Ƹ̵̡Ӝ̵̨̄Ʒ ~ *

Most people will tell you that Muscovys are hard if not impossible to hatch. I've found that's simply not true. My family used to hatch out Muscovys for years with no issues and also very high hatch rates. However over the years I had forgotten the exact procedure. After doing a bit of research I've come across the method we used plus I have tweaked it a bit to increase the hatch rates even more. I have one more experiment to do (which I will explain later on). So far I have been able to get a consistent hatch rate of 90% on shipped Muscovy eggs using this method... naturally any infertile eggs or ones that come broken, smashed or scrambled won't benefit from my method.

* ~ Ƹ̵̡Ӝ̵̨̄Ʒ ~ *

First of all.. the basics:

Muscovy incubation can take an average of 33-37 days incubation.. so don't give up on them until after day 37
if your incubator has been running low temps give a few additional days.. however ducklings which hatch out a bit early will be stronger than those who hatch out days late

The incubation temperature would be 99.5 ºF for forced air incubators.. 101.5 ºF for still air

LEAVE VENTS OPEN DURING INCUBATION AND ESPECIALLY HATCH.. growing embryos need oxygen.. the closer to hatch the larger the embryo becomes hence it needs more oxygen. Carbon Dioxide poisoning is a major cause of late day embryo death in all types of birds so vents should always be open regardless of what you may think...
a chick can get over a bit low humidity (it may need a little help hatching).. but it can't get over being dead from Carbon Dioxide poisoning!


* ~ Ƹ̵̡Ӝ̵̨̄Ʒ ~ *

HUMIDITY
Forget everything you have read about using high humidity for incubating Muscovy eggs...
MOST of the guides you'll find cite 80+% humidity for incubation for Muscovys.. if you follow that you will have dead in shell ducklings at hatch.. Originally it was supposed to be around 80 - 84 º WET BULB.. but when people started passing around the info they forgot that it was a wet bulb measure and said it was % instead.. (which is one reason why so many Muscovy hatches fail).. so forget everything you have ready about Muscovys and humidity since 99% of it is wrong.. even using 84º WET BULB reading that will give about a 52.4% humidity which is still too high for successful hatching in most cases.

Humidity needs will vary between geographic location, time of year, water features in your home (fountains and aquariums and so on) plus usage of the air conditioner, heater, dehumidifiers and so on. So your neighbor may have different humidity requirements than in your home.. and your home may vary if it's a different season or even a different room of the house where the incubator is located.
That's why it's crucial to give the proper humidity for the eggs in YOUR bator and not assume all Muscovys (or chickens.. turkeys, geese, emus and so on) need the same humidity the world over. By monitoring the eggs you will be able to provide them with the proper humidity for your specific location which will allow for a successful hatch.

* ~ Ƹ̵̡Ӝ̵̨̄Ʒ ~ *

WEIGHT LOSS
do you have a good gram scale?.. if not you;ll need one .. Muscovys need to lose around 2.8% of their weight per week.. you can also monitor air cells.. but I find weighing is a bit more accurate.. (though some people find that looking at an air cell and not doing the math may be easier for them)..
for shipped eggs you will need to monitor the air cells by holding a bright light to the tops of the eggs during the first two weeks since you won't be able to remove them for weighing... adjust the humidity as needed based on the info you get from the eggs
If the eggs loose less weight than 2.8% every week, it means that the humidity is too high. If the eggs loose more than 2.8% every week, it means that the humidity is too low. Neither one is a good scenario since humidity which is too high or too low will result in ducklings that will be too weak or swollen at hatch.. in most cases they won't even be able to pip.. and if they do manage to pip they usually die in the shell since they can't finish hatching
Keep track of the weights!
I number each of the eggs and also write the weight on the egg as well... makes things easier for when you do weigh them again

* ~ Ƹ̵̡Ӝ̵̨̄Ʒ ~ *

AIR CELLS
when you first get the eggs you have to candle them.. take note of any damaged air cells and mark the eggs accordingly.. also look for any hairline cracks and if you choose to incubate them patch the cracks with plain candle wax.. You can actually use a pencil and trace the air cell size if it will make it easier for you to monitor the air cell size
For best results assume that all shipped muscovy eggs are damaged.. by marking the ones with loose air cells or detached ones you will know which will need to be handled carefully as they progress through incubation.. also mark them with the usual X and O even though they will be autoturned.. I'll explain why in a bit


I don't think I can stress this enough.... don't add any water to the bator at first.. go dry until you check the growth of the air cells and monitor the weights

Again.. try to go with LOW humidity during incubation (only increasing it if the air cells start to grow too large too quickly or if the weight loss is too rapid).. MOST Muscovy egg death comes at the end of incubation just before hatch. the main cause is because of too high incubation humidity which leaves the ducklings too large to properly turn to pip and zip.. if you choose to ignore my humidity recommendations then don't blame me if you have late day embryo deaths... LISTEN TO YOUR EGGS.. by monitoring air cell size and weight loss the eggs will tell you what they need as to humidity!

This is an approximation of what the air cell growth should look like during incubation. Shipped eggs will develop "saddle shaped air cells". This is normal for shipped eggs and should not be a cause for concern. I believe that the saddle shaped air cells are from the changes in air pressure that the eggs experience during transit.
(numbers = days of incubation)

* ~ Ƹ̵̡Ӝ̵̨̄Ʒ ~ *

INCUBATION
all shipped eggs should be incubated for the first 36 to 48 hours standing upright (pointy end down) and NOT TURNED for those first 36 to 48 hours
after the first 48 hours has passed you can turn on the autoturner... they still need to be upright and autoturned for best results...
after day 15 you will still leave them in the autoturner.. but you can lay them GENTLY on their sides or tilt them at a 45º angle... remember that the tissue inside will still be delicate.. and if handled wrong you can still kill the embryo.. once on their sides or tilted to the side they should be turned once a day by hand.. so if the X is on the side facing up.. turn them once a day so that the opposite side is facing up and so on. When removing them for weighing (after day 15) be careful that the eggs are not handled too roughly


For home grown eggs .. (assuming their air cells look to be perfect) place them in the incubator laying on their sides. If room in the bator is an issue you can incubate them upright however it's more of a natural position for them to be on their sides for incubation and that makes for better hatch rates. You will still need to place them in an autoturner (for best results) and hand turn them completely once a day (using the X & O method). Turn the autoturner on after the first 24 hours of incubation.
Monitor the air cells and weight at least once a week and adjust the humidity as needed.. be careful when removing the eggs from the incubator that you do not bump or jar them.

* ~ Ƹ̵̡Ӝ̵̨̄Ʒ ~ *

MISTING AND COOLING
You can mist and cool the eggs once a day after day 10 (cooling for 10 to 15 minutes a day) if the air cells are in good shape.. however misting them will also cause more evaporation from the eggs (though it is minimal).. so if the air cells (or weight) is too great hold off on the misting.. the misting is more important during the last two weeks.. (I'm experimenting with an additive to be added to the water .. it should increase hatch rates even more for most people and also increase the health and hardiness of the ducklings after hatch) (I will update this with the info once I have completed the experiment)

here's the cooling & misting schedule I go by:
COOLING WATERFOWL (the basics)
I start cooling incubating eggs on day 7.of incubation for 5 to 10 minutes (for muscovy eggs I move that to day 10)
on day 14: I raise the time to 15 minutes and also start misting the eggs at the beginning of the cooling period
on day 21 and til external pipping: it goes to 20 minutes of cooling with the misting at the beginning of the cooling period per day

* ~ Ƹ̵̡Ӝ̵̨̄Ʒ ~ *

HATCHING
for temps.. 99.5 ºF (101.5 for still air bators) until the first internal pip ("lockdown" as some call it.. I prefer the term HATCH).. then I drop the temp down to 98 to 98.5 ºF (dropping temp to 100.5 for the still air bators) and increase humidity to 60% or better*** (see note below).. also after the eggs are internally pipped if they are not already laying on their sides.. they should be.. if you have a separate hatcher without a fan then that's even better. If you decide to turn the fan off for your incubator (for those who have that option) keep a very close eye on the temps since the incubator may begin to get too hot and need a temperature adjustment..

Internal pipping for Muscovy eggs should begin around day 32 (give or take a few days).. candle the eggs and check for internal pips (when you can see the duckling's bill in the air cell). You may also be able to hear the duckling peeping. When you can see the bill in the air cell or hear the eggs peeping then begin to lower the temp and raise the humidity... IF you don't see any internal pips or hear any peeping then they may need an additional day or two.

At HATCH.. a still air machine would be preferred (the 98 - 98.5 ºF temp is for forced air machines) since the location of a fans in most commercial forced air incubators are designed to blow directly onto the eggs. If the bird in question is a slow baby (especially if it makes a large pip then rests for too long) the fan blowing directly on it can dry it out too much causing it to get stuck to the inner membrane. or causing the membrane to become too tough to break through.. Assistance would be required otherwise the baby would eventually weaken from all the struggling and die. If you only have a forced air bator which has a bad fan location.. you can cover the eggs with a paper towel or soft cloth to help block the fan from blowing directly on them... there are a few forced air models where this isn't a problem.. so you would have to check your incubator and see exactly how the air is circulated.
* ~ Ƹ̵̡Ӝ̵̨̄Ʒ ~ *

OTHER EGGS
for shipped chicken and turkey eggs you can still use some of the methods I have listed..However the humidity at hatch for turkey eggs needs to be higher (80% or better).. plus chickens and turkeys do not need to be misted (unless the air cells are too small and need the assistance of evaporative cooling to make them larger).. so the above instructions would need to be modified a bit to fit the species in question

Other types of waterfowl can be incubated the same way as Muscovys (incubation lengths will vary according to type of bird).. for very small (we are talking about abnormally small) eggs.. skip the cooling if possible since it's very easy to chill the eggs too much

Percentages of weight loss will vary from species to species.. emu eggs for example need to lose 12 to 15% of their weight (+/- 1.2%) during their entire incubation.. peafowl need to lose 15% (from date laid)... and so on

* ~ Ƹ̵̡Ӝ̵̨̄Ʒ ~ *

*****AS A NOTE:
this year I have noticed our weather was much wetter than last year... at hatch the first muscovys were a bit "gooey".. a clear amber fluid sticking to them.. this is caused by humidity being a bit too high during the final week of incubation and during hatch (which you may not be able to control very well if your relative humidity is on the high side)... MORE turning during the last full week of turning will help absorb it since turning the egg causes the duckling to absorb more of the albumen (which is what the gooey amber fluid is)... however if you see the goo at hatch it's a bit too late to go back and turn more.. you can still drop down the humidity at hatch a bit.. but the old saying of "the damage is done" comes to mind..

IF you experience the dreaded yellow goo you may have to intervene .. if you don't the air can cause the goo to dry onto the duckling causing it to become encased in a hard amber fluid much like a bug in amber.. the duckling WILL die at that point since it won't be able to breathe (even if the nostrils are clear).. and it also won't be able to move.. rib cage extension from breathing will also stop since the amber fluid will harden.. so it's best to have some warm water on hand and lots of cotton swabs to try to remove as much as the goo from the ducklings as possible. Once you have the goo off cover the duckling and egg with wet paper towels .. that will help restrict any air flow around the egg and help keep the remaining goo from drying .. check on him often and assist with goo removal as needed.. BE CAREFUL OF VEINS!..
Once he has hatched swab the navel with iodine and rinse the duckling off as well as you can under flowing warm water.. then swab the navel with iodine once more.. place him back into the incubator to dry and fluff.

I have found that if I hatch DRY the ducklings have had a much easier hatch this year.. now I am not saying everyone should hatch dry... but if you experience the yellow goo and are planning a second hatch.. try dry hatching (do not raise humidity at hatch) and see how the first duckling does.. IF he has a hard time breaking through the membrane then you will have to raise the humidity to help soften it.. however if he hatches fine you may want to continue dry hatching the rest of the eggs.


The main thing is to watch the first duckling and see how he does.. he will tell you if there is an issue with humidity or not.
 
Thanks casportpony, for your help in responses. But I already have read those before and I still don't know when I should Assist lol.
It had been 30 hours since they had piped into the air cell and no zipping yet :/
 
Thanks casportpony, for your help in responses. But I already have read those before and I still don't know when I should Assist lol.
It had been 30 hours since they had piped into the air cell and no zipping yet :/
What day are they on?

What I do now is give them ~24 hours to pip externally, then I make a very small hole to see if they look shrink wrapped. After I make the really small hole I give them another 24 hourse to see if they start to zip and if they don't, I make the hole a little bigger, moisten the membrane with distilled water and wait some more.

I've had them die in the shell when I don't help and I've had them die when I do help. Just remember that they are yours and we aren't there, so go by what your gut says.

Can you candle them and take a picture of them? That might help. Maybe send Yinepu a message, they have tons of experience hatching Muscovy eggs. If Yinepu can't help, try Charlindabob. Lacrystol has lots of experience with quackers and chickens, so I'm sure she can help, too.

-Kathy

Disclaimer: I'm not suggesting that you do anything, just telling you what sort of works for me.
 
I did find one duckling dead from piping in the middle, I can see a puddle of blood in the air sac. The other 2 that are tapping out of 12 eggs are moving rapidly and breathing. One of the two made the top part of the air cell really dark and i can only see about a quarter throw the air cell from on end of the egg.
 

New posts New threads Active threads

Back
Top Bottom