Please note: I don't always get notified when there is a comment to the articles that I have posted.. so if you have a question and I don't get back to you here... just drop me a PM
This is my basic guide for the Incubation and Hatching of Muscovy Eggs
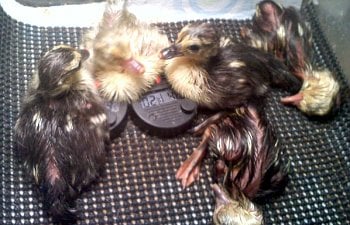
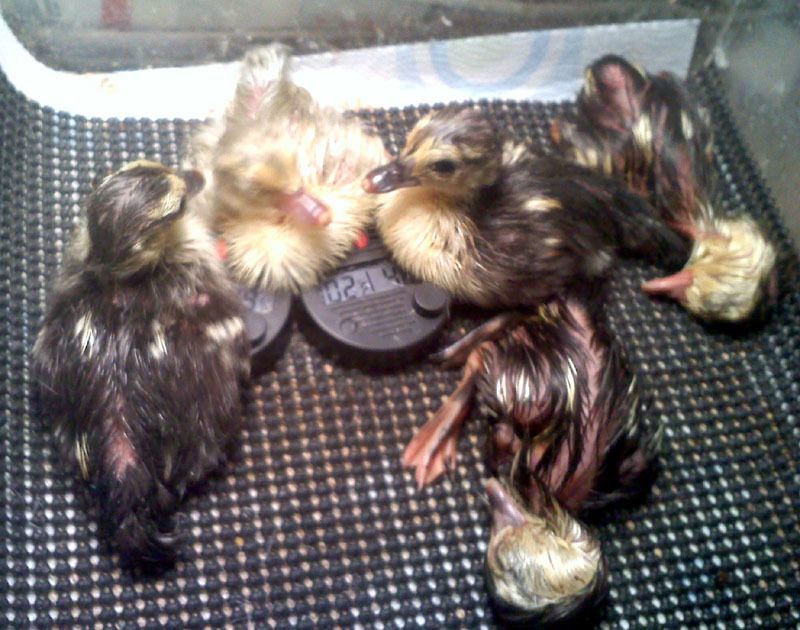
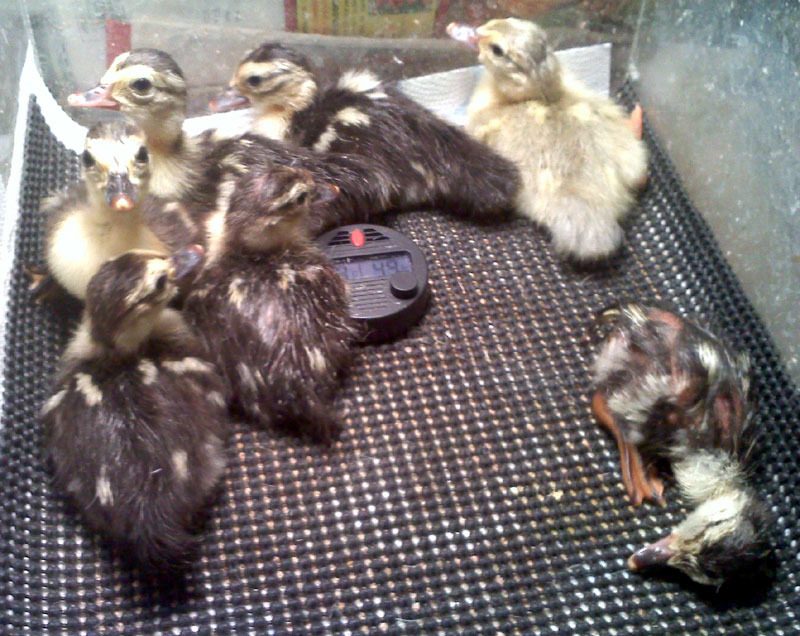
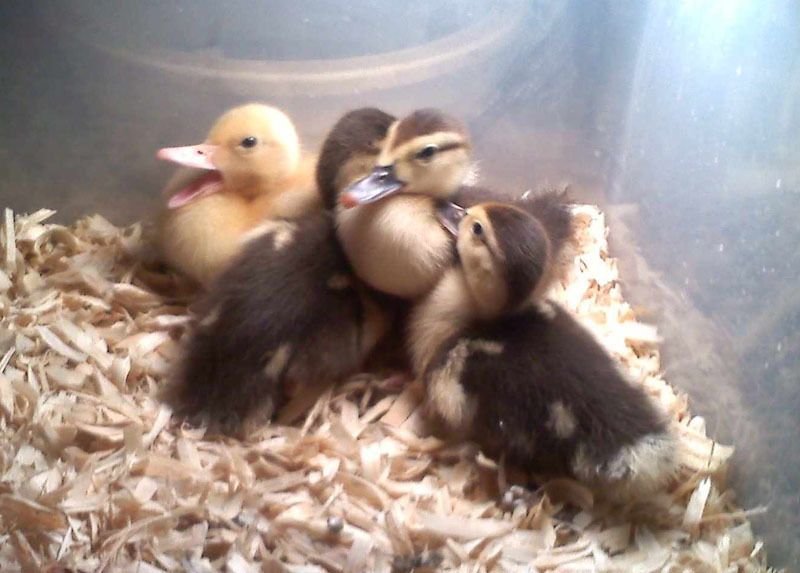
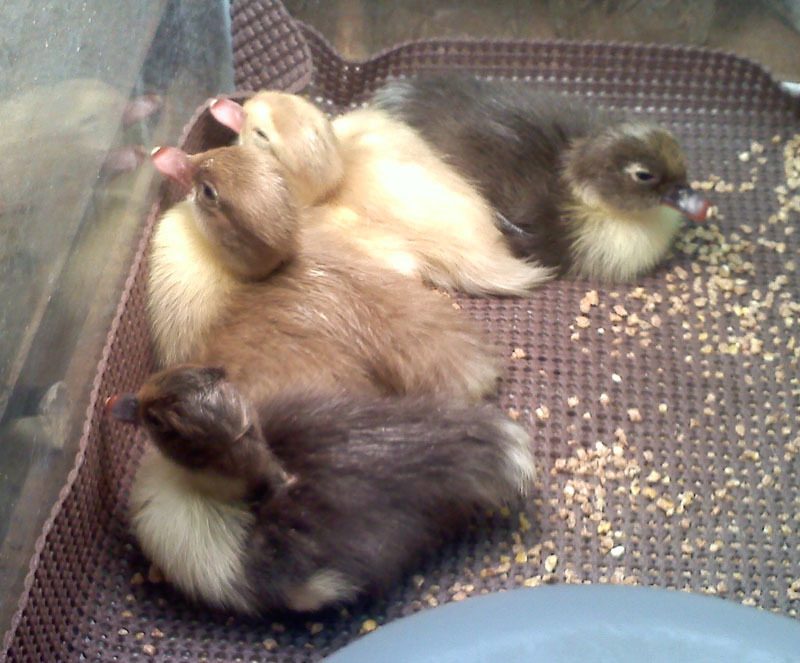
All ducklings pictured were hatched out in incubators... none of these eggs spent any time under broody ducks or hens

A few freshly hatched and drying Muscovy ducklings (ignore the temp on the thermometer.. I had it under a desk lamp just before putting it in the brooder and taking this picture)
16 french white muscovy from 18 shipped eggs (2 of the eggs were broken when they arrived)
More pics to come!...
Shipped eggs will need to be handled differently than eggs from your own ducks.. so all info specific to shipped eggs and not eggs from your own birds will be in "BLUE".. some of the other info will also pertain to shipped eggs so please read everything
Most people will tell you that Muscovys are hard if not impossible to hatch. I've found that's simply not true. My family used to hatch out Muscovys for years with no issues and also very high hatch rates. However over the years I had forgotten the exact procedure. After doing a bit of research I've come across the method we used plus I have tweaked it a bit to increase the hatch rates even more. I have one more experiment to do (which I will explain later on). So far I have been able to get a consistent hatch rate of 90% on shipped Muscovy eggs using this method... naturally any infertile eggs or ones that come broken, smashed or scrambled won't benefit from my method.
First of all.. the basics:
Muscovy incubation can take an average of 33-37 days incubation.. so don't give up on them until after day 37
if your incubator has been running low temps give a few additional days.. however ducklings which hatch out a bit early will be stronger than those who hatch out days late
The incubation temperature would be 99.5 ºF for forced air incubators.. 101.5 ºF for still air
LEAVE VENTS OPEN DURING INCUBATION AND ESPECIALLY HATCH.. growing embryos need oxygen.. the closer to hatch the larger the embryo becomes hence it needs more oxygen. Carbon Dioxide poisoning is a major cause of late day embryo death in all types of birds so vents should always be open regardless of what you may think...
a chick can get over a bit low humidity (it may need a little help hatching).. but it can't get over being dead from Carbon Dioxide poisoning!
HUMIDITY
Forget everything you have read about using high humidity for incubating Muscovy eggs...
MOST of the guides you'll find cite 80+% humidity for incubation for Muscovys.. if you follow that you will have dead in shell ducklings at hatch.. Originally it was supposed to be around 80 - 84 º WET BULB.. but when people started passing around the info they forgot that it was a wet bulb measure and said it was % instead.. (which is one reason why so many Muscovy hatches fail).. so forget everything you have ready about Muscovys and humidity since 99% of it is wrong.. even using 84º WET BULB reading that will give about a 52.4% humidity which is still too high for successful hatching in most cases.
Humidity needs will vary between geographic location, time of year, water features in your home (fountains and aquariums and so on) plus usage of the air conditioner, heater, dehumidifiers and so on. So your neighbor may have different humidity requirements than in your home.. and your home may vary if it's a different season or even a different room of the house where the incubator is located.
That's why it's crucial to give the proper humidity for the eggs in YOUR bator and not assume all Muscovys (or chickens.. turkeys, geese, emus and so on) need the same humidity the world over. By monitoring the eggs you will be able to provide them with the proper humidity for your specific location which will allow for a successful hatch.
WEIGHT LOSS
do you have a good gram scale?.. if not you;ll need one .. Muscovys need to lose around 2.8% of their weight per week.. you can also monitor air cells.. but I find weighing is a bit more accurate.. (though some people find that looking at an air cell and not doing the math may be easier for them)..
for shipped eggs you will need to monitor the air cells by holding a bright light to the tops of the eggs during the first two weeks since you won't be able to remove them for weighing... adjust the humidity as needed based on the info you get from the eggs
If the eggs loose less weight than 2.8% every week, it means that the humidity is too high. If the eggs loose more than 2.8% every week, it means that the humidity is too low. Neither one is a good scenario since humidity which is too high or too low will result in ducklings that will be too weak or swollen at hatch.. in most cases they won't even be able to pip.. and if they do manage to pip they usually die in the shell since they can't finish hatching
Keep track of the weights!
I number each of the eggs and also write the weight on the egg as well... makes things easier for when you do weigh them again
AIR CELLS
when you first get the eggs you have to candle them.. take note of any damaged air cells and mark the eggs accordingly.. also look for any hairline cracks and if you choose to incubate them patch the cracks with plain candle wax.. You can actually use a pencil and trace the air cell size if it will make it easier for you to monitor the air cell size
For best results assume that all shipped muscovy eggs are damaged.. by marking the ones with loose air cells or detached ones you will know which will need to be handled carefully as they progress through incubation.. also mark them with the usual X and O even though they will be autoturned.. I'll explain why in a bit
I don't think I can stress this enough.... don't add any water to the bator at first.. go dry until you check the growth of the air cells and monitor the weights
Again.. try to go with LOW humidity during incubation (only increasing it if the air cells start to grow too large too quickly or if the weight loss is too rapid).. MOST Muscovy egg death comes at the end of incubation just before hatch. the main cause is because of too high incubation humidity which leaves the ducklings too large to properly turn to pip and zip.. if you choose to ignore my humidity recommendations then don't blame me if you have late day embryo deaths... LISTEN TO YOUR EGGS.. by monitoring air cell size and weight loss the eggs will tell you what they need as to humidity!
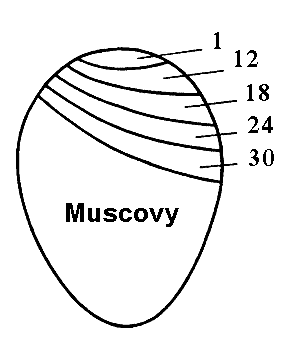
This is an approximation of what the air cell growth should look like during incubation. Shipped eggs will develop "saddle shaped air cells". This is normal for shipped eggs and should not be a cause for concern. I believe that the saddle shaped air cells are from the changes in air pressure that the eggs experience during transit.
(numbers = days of incubation)
INCUBATION
all shipped eggs should be incubated for the first 36 to 48 hours standing upright (pointy end down) and NOT TURNED for those first 36 to 48 hours
after the first 48 hours has passed you can turn on the autoturner... they still need to be upright and autoturned for best results...
after day 15 you will still leave them in the autoturner.. but you can lay them GENTLY on their sides or tilt them at a 45º angle... remember that the tissue inside will still be delicate.. and if handled wrong you can still kill the embryo.. once on their sides or tilted to the side they should be turned once a day by hand.. so if the X is on the side facing up.. turn them once a day so that the opposite side is facing up and so on. When removing them for weighing (after day 15) be careful that the eggs are not handled too roughly
For home grown eggs .. (assuming their air cells look to be perfect) place them in the incubator laying on their sides. If room in the bator is an issue you can incubate them upright however it's more of a natural position for them to be on their sides for incubation and that makes for better hatch rates. You will still need to place them in an autoturner (for best results) and hand turn them completely once a day (using the X & O method). Turn the autoturner on after the first 24 hours of incubation.
Monitor the air cells and weight at least once a week and adjust the humidity as needed.. be careful when removing the eggs from the incubator that you do not bump or jar them.
MISTING AND COOLING
You can mist and cool the eggs once a day after day 10 (cooling for 10 to 15 minutes a day) if the air cells are in good shape.. however misting them will also cause more evaporation from the eggs (though it is minimal).. so if the air cells (or weight) is too great hold off on the misting.. the misting is more important during the last two weeks.. (I'm experimenting with an additive to be added to the water .. it should increase hatch rates even more for most people and also increase the health and hardiness of the ducklings after hatch) (I will update this with the info once I have completed the experiment)
here's the cooling & misting schedule I go by:
COOLING WATERFOWL (the basics)
I start cooling incubating eggs on day 7.of incubation for 5 to 10 minutes (for muscovy eggs I move that to day 10)
on day 14: I raise the time to 15 minutes and also start misting the eggs at the beginning of the cooling period
on day 21 and til external pipping: it goes to 20 minutes of cooling with the misting at the beginning of the cooling period per day
HATCHING
for temps.. 99.5 ºF (101.5 for still air bators) until the first internal pip ("lockdown" as some call it.. I prefer the term HATCH).. then I drop the temp down to 98 to 98.5 ºF (dropping temp to 100.5 for the still air bators) and increase humidity to 60% or better*** (see note below).. also after the eggs are internally pipped if they are not already laying on their sides.. they should be.. if you have a separate hatcher without a fan then that's even better. If you decide to turn the fan off for your incubator (for those who have that option) keep a very close eye on the temps since the incubator may begin to get too hot and need a temperature adjustment..
Internal pipping for Muscovy eggs should begin around day 32 (give or take a few days).. candle the eggs and check for internal pips (when you can see the duckling's bill in the air cell). You may also be able to hear the duckling peeping. When you can see the bill in the air cell or hear the eggs peeping then begin to lower the temp and raise the humidity... IF you don't see any internal pips or hear any peeping then they may need an additional day or two.
At HATCH.. a still air machine would be preferred (the 98 - 98.5 ºF temp is for forced air machines) since the location of a fans in most commercial forced air incubators are designed to blow directly onto the eggs. If the bird in question is a slow baby (especially if it makes a large pip then rests for too long) the fan blowing directly on it can dry it out too much causing it to get stuck to the inner membrane. or causing the membrane to become too tough to break through.. Assistance would be required otherwise the baby would eventually weaken from all the struggling and die. If you only have a forced air bator which has a bad fan location.. you can cover the eggs with a paper towel or soft cloth to help block the fan from blowing directly on them... there are a few forced air models where this isn't a problem.. so you would have to check your incubator and see exactly how the air is circulated.
OTHER EGGS
for shipped chicken and turkey eggs you can still use some of the methods I have listed..However the humidity at hatch for turkey eggs needs to be higher (80% or better).. plus chickens and turkeys do not need to be misted (unless the air cells are too small and need the assistance of evaporative cooling to make them larger).. so the above instructions would need to be modified a bit to fit the species in question
Other types of waterfowl can be incubated the same way as Muscovys (incubation lengths will vary according to type of bird).. for very small (we are talking about abnormally small) eggs.. skip the cooling if possible since it's very easy to chill the eggs too much
Percentages of weight loss will vary from species to species.. emu eggs for example need to lose 12 to 15% of their weight (+/- 1.2%) during their entire incubation.. peafowl need to lose 15% (from date laid)... and so on
this year I have noticed our weather was much wetter than last year... at hatch the first muscovys were a bit "gooey".. a clear amber fluid sticking to them.. this is caused by humidity being a bit too high during the final week of incubation and during hatch (which you may not be able to control very well if your relative humidity is on the high side)... MORE turning during the last full week of turning will help absorb it since turning the egg causes the duckling to absorb more of the albumen (which is what the gooey amber fluid is)... however if you see the goo at hatch it's a bit too late to go back and turn more.. you can still drop down the humidity at hatch a bit.. but the old saying of "the damage is done" comes to mind..
IF you experience the dreaded yellow goo you may have to intervene .. if you don't the air can cause the goo to dry onto the duckling causing it to become encased in a hard amber fluid much like a bug in amber.. the duckling WILL die at that point since it won't be able to breathe (even if the nostrils are clear).. and it also won't be able to move.. rib cage extension from breathing will also stop since the amber fluid will harden.. so it's best to have some warm water on hand and lots of cotton swabs to try to remove as much as the goo from the ducklings as possible. Once you have the goo off cover the duckling and egg with wet paper towels .. that will help restrict any air flow around the egg and help keep the remaining goo from drying .. check on him often and assist with goo removal as needed.. ..BE CAREFUL OF VEINS!
Once he has hatched swab the navel with iodine and rinse the duckling off as well as you can under flowing warm water.. then swab the navel with iodine once more.. place him back into the incubator to dry and fluff.
I have found that if I hatch DRY the ducklings have had a much easier hatch this year.. now I am not saying everyone should hatch dry... but if you experience the yellow goo and are planning a second hatch.. try dry hatching (do not raise humidity at hatch) and see how the first duckling does.. IF he has a hard time breaking through the membrane then you will have to raise the humidity to help soften it.. however if he hatches fine you may want to continue dry hatching the rest of the eggs.
The main thing is to watch the first duckling and see how he does.. he will tell you if there is an issue with humidity or not.
* ~ Ƹ̵̡Ӝ̵̨̄Ʒ ~ *
This is my basic guide for the Incubation and Hatching of Muscovy Eggs
All ducklings pictured were hatched out in incubators... none of these eggs spent any time under broody ducks or hens
A few freshly hatched and drying Muscovy ducklings (ignore the temp on the thermometer.. I had it under a desk lamp just before putting it in the brooder and taking this picture)

16 french white muscovy from 18 shipped eggs (2 of the eggs were broken when they arrived)
More pics to come!...
* ~ Ƹ̵̡Ӝ̵̨̄Ʒ ~ *
Shipped eggs will need to be handled differently than eggs from your own ducks.. so all info specific to shipped eggs and not eggs from your own birds will be in "BLUE".. some of the other info will also pertain to shipped eggs so please read everything
* ~ Ƹ̵̡Ӝ̵̨̄Ʒ ~ *
Most people will tell you that Muscovys are hard if not impossible to hatch. I've found that's simply not true. My family used to hatch out Muscovys for years with no issues and also very high hatch rates. However over the years I had forgotten the exact procedure. After doing a bit of research I've come across the method we used plus I have tweaked it a bit to increase the hatch rates even more. I have one more experiment to do (which I will explain later on). So far I have been able to get a consistent hatch rate of 90% on shipped Muscovy eggs using this method... naturally any infertile eggs or ones that come broken, smashed or scrambled won't benefit from my method.
* ~ Ƹ̵̡Ӝ̵̨̄Ʒ ~ *
First of all.. the basics:
Muscovy incubation can take an average of 33-37 days incubation.. so don't give up on them until after day 37
if your incubator has been running low temps give a few additional days.. however ducklings which hatch out a bit early will be stronger than those who hatch out days late
The incubation temperature would be 99.5 ºF for forced air incubators.. 101.5 ºF for still air
LEAVE VENTS OPEN DURING INCUBATION AND ESPECIALLY HATCH.. growing embryos need oxygen.. the closer to hatch the larger the embryo becomes hence it needs more oxygen. Carbon Dioxide poisoning is a major cause of late day embryo death in all types of birds so vents should always be open regardless of what you may think...
a chick can get over a bit low humidity (it may need a little help hatching).. but it can't get over being dead from Carbon Dioxide poisoning!
* ~ Ƹ̵̡Ӝ̵̨̄Ʒ ~ *
HUMIDITY
Forget everything you have read about using high humidity for incubating Muscovy eggs...
MOST of the guides you'll find cite 80+% humidity for incubation for Muscovys.. if you follow that you will have dead in shell ducklings at hatch.. Originally it was supposed to be around 80 - 84 º WET BULB.. but when people started passing around the info they forgot that it was a wet bulb measure and said it was % instead.. (which is one reason why so many Muscovy hatches fail).. so forget everything you have ready about Muscovys and humidity since 99% of it is wrong.. even using 84º WET BULB reading that will give about a 52.4% humidity which is still too high for successful hatching in most cases.
Humidity needs will vary between geographic location, time of year, water features in your home (fountains and aquariums and so on) plus usage of the air conditioner, heater, dehumidifiers and so on. So your neighbor may have different humidity requirements than in your home.. and your home may vary if it's a different season or even a different room of the house where the incubator is located.
That's why it's crucial to give the proper humidity for the eggs in YOUR bator and not assume all Muscovys (or chickens.. turkeys, geese, emus and so on) need the same humidity the world over. By monitoring the eggs you will be able to provide them with the proper humidity for your specific location which will allow for a successful hatch.
* ~ Ƹ̵̡Ӝ̵̨̄Ʒ ~ *
WEIGHT LOSS
do you have a good gram scale?.. if not you;ll need one .. Muscovys need to lose around 2.8% of their weight per week.. you can also monitor air cells.. but I find weighing is a bit more accurate.. (though some people find that looking at an air cell and not doing the math may be easier for them)..
for shipped eggs you will need to monitor the air cells by holding a bright light to the tops of the eggs during the first two weeks since you won't be able to remove them for weighing... adjust the humidity as needed based on the info you get from the eggs
If the eggs loose less weight than 2.8% every week, it means that the humidity is too high. If the eggs loose more than 2.8% every week, it means that the humidity is too low. Neither one is a good scenario since humidity which is too high or too low will result in ducklings that will be too weak or swollen at hatch.. in most cases they won't even be able to pip.. and if they do manage to pip they usually die in the shell since they can't finish hatching
Keep track of the weights!
I number each of the eggs and also write the weight on the egg as well... makes things easier for when you do weigh them again
* ~ Ƹ̵̡Ӝ̵̨̄Ʒ ~ *
AIR CELLS
when you first get the eggs you have to candle them.. take note of any damaged air cells and mark the eggs accordingly.. also look for any hairline cracks and if you choose to incubate them patch the cracks with plain candle wax.. You can actually use a pencil and trace the air cell size if it will make it easier for you to monitor the air cell size
For best results assume that all shipped muscovy eggs are damaged.. by marking the ones with loose air cells or detached ones you will know which will need to be handled carefully as they progress through incubation.. also mark them with the usual X and O even though they will be autoturned.. I'll explain why in a bit
I don't think I can stress this enough.... don't add any water to the bator at first.. go dry until you check the growth of the air cells and monitor the weights
Again.. try to go with LOW humidity during incubation (only increasing it if the air cells start to grow too large too quickly or if the weight loss is too rapid).. MOST Muscovy egg death comes at the end of incubation just before hatch. the main cause is because of too high incubation humidity which leaves the ducklings too large to properly turn to pip and zip.. if you choose to ignore my humidity recommendations then don't blame me if you have late day embryo deaths... LISTEN TO YOUR EGGS.. by monitoring air cell size and weight loss the eggs will tell you what they need as to humidity!
This is an approximation of what the air cell growth should look like during incubation. Shipped eggs will develop "saddle shaped air cells". This is normal for shipped eggs and should not be a cause for concern. I believe that the saddle shaped air cells are from the changes in air pressure that the eggs experience during transit.
(numbers = days of incubation)
* ~ Ƹ̵̡Ӝ̵̨̄Ʒ ~ *
INCUBATION
all shipped eggs should be incubated for the first 36 to 48 hours standing upright (pointy end down) and NOT TURNED for those first 36 to 48 hours
after the first 48 hours has passed you can turn on the autoturner... they still need to be upright and autoturned for best results...
after day 15 you will still leave them in the autoturner.. but you can lay them GENTLY on their sides or tilt them at a 45º angle... remember that the tissue inside will still be delicate.. and if handled wrong you can still kill the embryo.. once on their sides or tilted to the side they should be turned once a day by hand.. so if the X is on the side facing up.. turn them once a day so that the opposite side is facing up and so on. When removing them for weighing (after day 15) be careful that the eggs are not handled too roughly
For home grown eggs .. (assuming their air cells look to be perfect) place them in the incubator laying on their sides. If room in the bator is an issue you can incubate them upright however it's more of a natural position for them to be on their sides for incubation and that makes for better hatch rates. You will still need to place them in an autoturner (for best results) and hand turn them completely once a day (using the X & O method). Turn the autoturner on after the first 24 hours of incubation.
Monitor the air cells and weight at least once a week and adjust the humidity as needed.. be careful when removing the eggs from the incubator that you do not bump or jar them.
* ~ Ƹ̵̡Ӝ̵̨̄Ʒ ~ *
MISTING AND COOLING
You can mist and cool the eggs once a day after day 10 (cooling for 10 to 15 minutes a day) if the air cells are in good shape.. however misting them will also cause more evaporation from the eggs (though it is minimal).. so if the air cells (or weight) is too great hold off on the misting.. the misting is more important during the last two weeks.. (I'm experimenting with an additive to be added to the water .. it should increase hatch rates even more for most people and also increase the health and hardiness of the ducklings after hatch) (I will update this with the info once I have completed the experiment)
here's the cooling & misting schedule I go by:
COOLING WATERFOWL (the basics)
I start cooling incubating eggs on day 7.of incubation for 5 to 10 minutes (for muscovy eggs I move that to day 10)
on day 14: I raise the time to 15 minutes and also start misting the eggs at the beginning of the cooling period
on day 21 and til external pipping: it goes to 20 minutes of cooling with the misting at the beginning of the cooling period per day
* ~ Ƹ̵̡Ӝ̵̨̄Ʒ ~ *
HATCHING
for temps.. 99.5 ºF (101.5 for still air bators) until the first internal pip ("lockdown" as some call it.. I prefer the term HATCH).. then I drop the temp down to 98 to 98.5 ºF (dropping temp to 100.5 for the still air bators) and increase humidity to 60% or better*** (see note below).. also after the eggs are internally pipped if they are not already laying on their sides.. they should be.. if you have a separate hatcher without a fan then that's even better. If you decide to turn the fan off for your incubator (for those who have that option) keep a very close eye on the temps since the incubator may begin to get too hot and need a temperature adjustment..
Internal pipping for Muscovy eggs should begin around day 32 (give or take a few days).. candle the eggs and check for internal pips (when you can see the duckling's bill in the air cell). You may also be able to hear the duckling peeping. When you can see the bill in the air cell or hear the eggs peeping then begin to lower the temp and raise the humidity... IF you don't see any internal pips or hear any peeping then they may need an additional day or two.
At HATCH.. a still air machine would be preferred (the 98 - 98.5 ºF temp is for forced air machines) since the location of a fans in most commercial forced air incubators are designed to blow directly onto the eggs. If the bird in question is a slow baby (especially if it makes a large pip then rests for too long) the fan blowing directly on it can dry it out too much causing it to get stuck to the inner membrane. or causing the membrane to become too tough to break through.. Assistance would be required otherwise the baby would eventually weaken from all the struggling and die. If you only have a forced air bator which has a bad fan location.. you can cover the eggs with a paper towel or soft cloth to help block the fan from blowing directly on them... there are a few forced air models where this isn't a problem.. so you would have to check your incubator and see exactly how the air is circulated.
* ~ Ƹ̵̡Ӝ̵̨̄Ʒ ~ *
OTHER EGGS
for shipped chicken and turkey eggs you can still use some of the methods I have listed..However the humidity at hatch for turkey eggs needs to be higher (80% or better).. plus chickens and turkeys do not need to be misted (unless the air cells are too small and need the assistance of evaporative cooling to make them larger).. so the above instructions would need to be modified a bit to fit the species in question
Other types of waterfowl can be incubated the same way as Muscovys (incubation lengths will vary according to type of bird).. for very small (we are talking about abnormally small) eggs.. skip the cooling if possible since it's very easy to chill the eggs too much
Percentages of weight loss will vary from species to species.. emu eggs for example need to lose 12 to 15% of their weight (+/- 1.2%) during their entire incubation.. peafowl need to lose 15% (from date laid)... and so on
* ~ Ƹ̵̡Ӝ̵̨̄Ʒ ~ *
*****AS A NOTE:
this year I have noticed our weather was much wetter than last year... at hatch the first muscovys were a bit "gooey".. a clear amber fluid sticking to them.. this is caused by humidity being a bit too high during the final week of incubation and during hatch (which you may not be able to control very well if your relative humidity is on the high side)... MORE turning during the last full week of turning will help absorb it since turning the egg causes the duckling to absorb more of the albumen (which is what the gooey amber fluid is)... however if you see the goo at hatch it's a bit too late to go back and turn more.. you can still drop down the humidity at hatch a bit.. but the old saying of "the damage is done" comes to mind..
IF you experience the dreaded yellow goo you may have to intervene .. if you don't the air can cause the goo to dry onto the duckling causing it to become encased in a hard amber fluid much like a bug in amber.. the duckling WILL die at that point since it won't be able to breathe (even if the nostrils are clear).. and it also won't be able to move.. rib cage extension from breathing will also stop since the amber fluid will harden.. so it's best to have some warm water on hand and lots of cotton swabs to try to remove as much as the goo from the ducklings as possible. Once you have the goo off cover the duckling and egg with wet paper towels .. that will help restrict any air flow around the egg and help keep the remaining goo from drying .. check on him often and assist with goo removal as needed.. ..BE CAREFUL OF VEINS!
Once he has hatched swab the navel with iodine and rinse the duckling off as well as you can under flowing warm water.. then swab the navel with iodine once more.. place him back into the incubator to dry and fluff.
I have found that if I hatch DRY the ducklings have had a much easier hatch this year.. now I am not saying everyone should hatch dry... but if you experience the yellow goo and are planning a second hatch.. try dry hatching (do not raise humidity at hatch) and see how the first duckling does.. IF he has a hard time breaking through the membrane then you will have to raise the humidity to help soften it.. however if he hatches fine you may want to continue dry hatching the rest of the eggs.
The main thing is to watch the first duckling and see how he does.. he will tell you if there is an issue with humidity or not.