My Gambrel-roofed Chicken Tractor
So, we needed a tractor for 5 hens (hopefully all 5 chicks make it to pullet-hood, and none decide to start 'cock-a-doodle-doo-ing!). While we won't be moving the coop a lot, I wanted the option of being able to move it around a bit during nice weather, and bring it close to the house during the winter. Having had to shovel paths through the several feet of snow we had on the ground at one time this past winter, I knew I didn't want to shovel paths all the way to the back of the yard if it's there when the snow is flying!!

The frame for the 'range' portion of the tractor. It's 2' high, 4' wide, and 7' long; those seemed to be the best dimensions to take advantage of the sizes lumber is sold in. Making it 7' long means the plywood roofing will have sufficient overhang to provide some additional weather protection. The two handles on the front are 12' lumber and will be for my husband and I to lift and move the tractor once it's assembled and there are wheels on the back. Each of the ends is a door that opens up for access to the run. If we did it over, I think we'd do doors in the center of each long section instead-that would be easier when it's time to round the chickens up and get them upstairs for the night, and also would allow easier placement of the food/water where it's not underneath the poop screens on the ends.
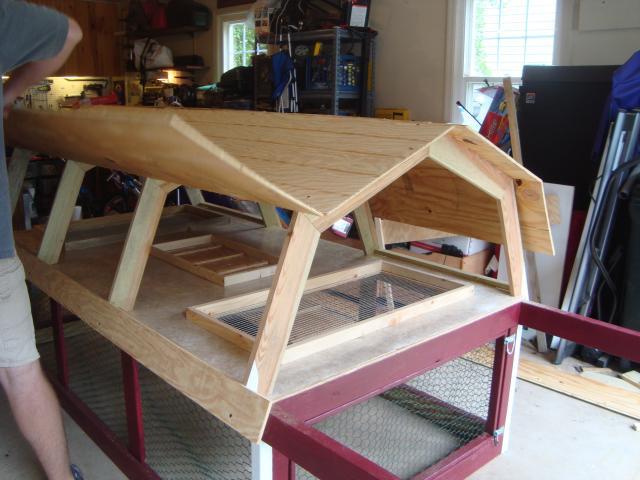
We went with a gambrel style roof for more 'head room'; here are the trusses in the background. There are a few great calculators online for figuring out the angles for custom gambrel roofs. The bottoms are notched to set on top of the coop flooring, with some overhang for ventilation up the sides of the coop.
The coop floor has frames around the pop door (center) and 2 poop screens; in the winter we have inserts to cover the screens up, but for the summer they provide extra ventilation. Hardware cloth is stapled into both openings, with the frames on top of it to keep the chickens from any sharp wire edges. At night there's a string that runs from one side of the pop door, up to a hook that it loops around on the front end of the coop, and back down to the other side of the pop door. That lets me use the string to pull the door shut once all the girls are upstairs. Then the pop door has 2 small locks to close it up at night and make sure no predators can pry it open If we were to do this again, I'd try to put the pop door off center-to make it easier to reach in and lock the pop door without having to duck my head into the coop.
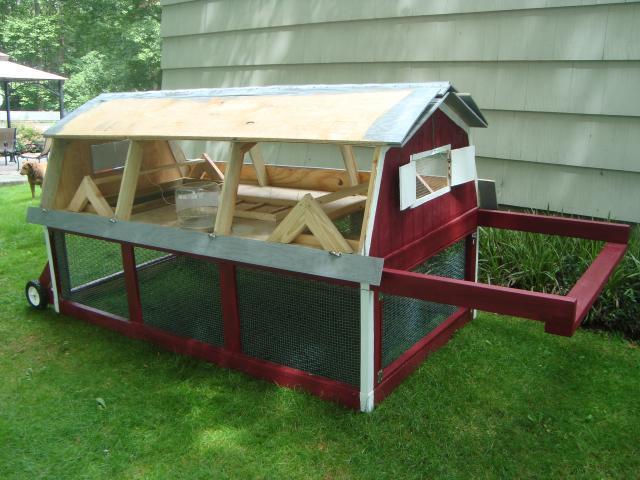
We covered the coop floor with linoleum; all edges are either under the trim around the holes, or held down by the roof truss edges. The pop door ramp is installed and hooks to the underside of the coop to get it out of the way when moving the coop. We had to put additional cleats across the ramp when we discovered our smallest chick (same age as the others but 1/3 of their size) couldn't navigate the longer spaces between cleats. Here the first part of the roof is on; it's offset from the center so that there's a ventilation ridge along the top. We used the lightest plywood we could find to try to keep the weight down. The range portion in this photo is covered with green chicken wire, but later I was able to convince hubby that hardware cloth is really what's needed for security. I just wish I'd convinced him of that BEFORE the coop was attached; crawling into the range to put in the hardware cloth was not fun!
The roof is nearly assembled. Both sides are hinged for full access to the interior with 3 long piano hinges on either side. Where the two roof pieces meet, at the piano ridge, one edge of the plywood is bevelled to prevent the two pieces from jamming each other up. A ridge vent will go across the top for ventilation without (hopefully) drafts.
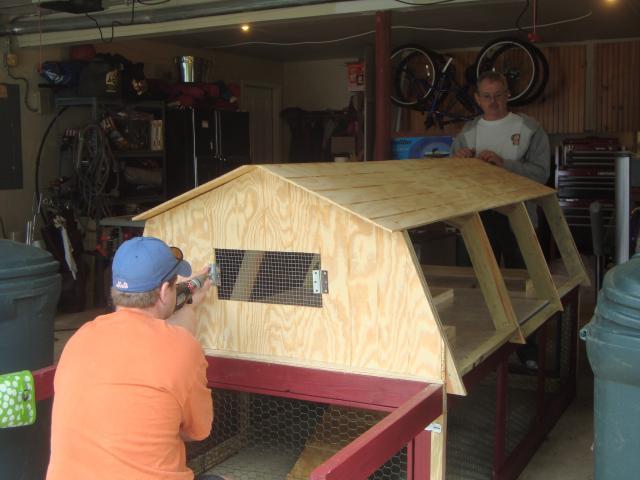
The ends of the coop were put on after the floor and roof were installed, and painted to mimic the look of an old fashioned barn.
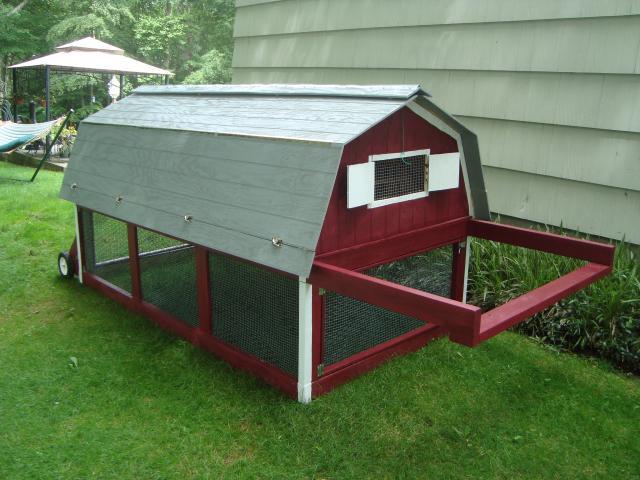
Almost done! The 'barn doors' are wooden shutters that cover the screened windows on either end of the coop; they'll be open for cross ventilation during the summer, and in the winter we can fasten plexiglass there to let the light in but not the drafts. The range has doors on the front and back for access. Coop access is via either side roof; I was afraid we'd have to cut one side into 3 small doors instead of one larger door to keep the chickens from hopping out when we're getting eggs, feeding them, etc. but so far they act as if the pop door is the only way to exit the coop.
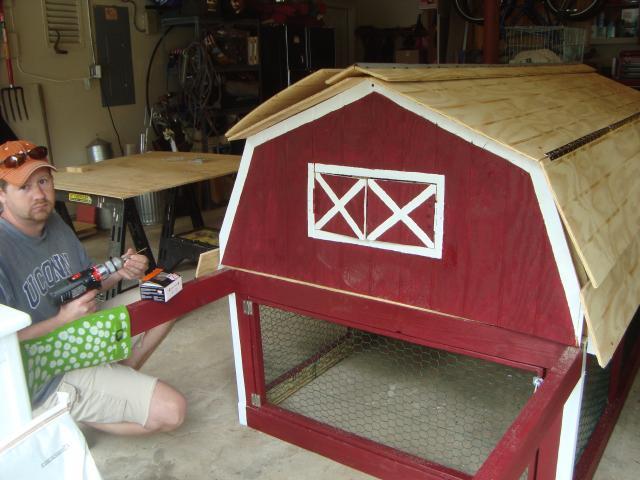
The kids were so happy that the chickies new home was almost ready! Here you can see the wheel assembly; by lifting up the coop with the front bars, the wheels come down on the ground enough to move the coop. The little yellow thing hanging from the 'window' is a thermometer, to check if the coop was warm enough at night for occupants.
We used window sash locks, 4 on each side, to secure the roof 'flaps'. Hopefully easy enough for us to open but hard enough for the raccoons NOT to open. The roof is painted grey for looks and to not absorb too much heat.
We used window sash locks, 4 on each side, to secure the roof 'flaps'. Hopefully easy enough for us to open but hard enough for the raccoons NOT to open. The roof is painted grey for looks and to not absorb too much heat.
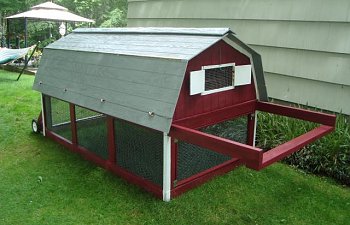
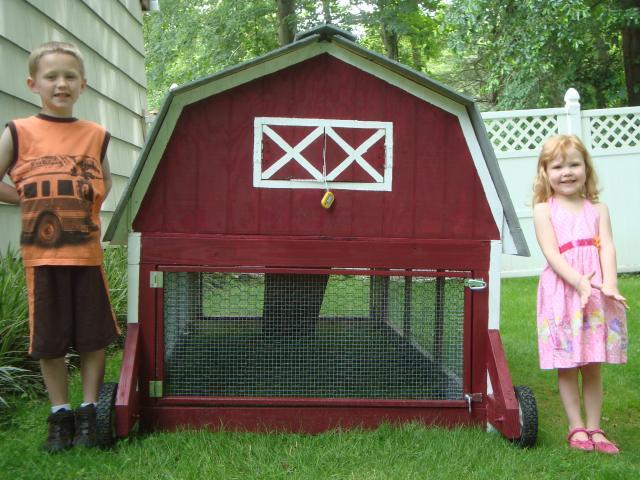
The finished product!
There are two removable roosts on either end of the coop; basically each roost is two triangles connected by a 1X2 for the actual perch. The perch is hopefully wide enough to encourage the girls to sit on their feet when it's cold outside and prevent losing toes to frostbite.
Right now they seem to prefer roosting at one end over the other-so the second roost is now down in the range where they'll sit during the day quite often.
So far it's easy to clean; the side is just the right height to pull the wheelbarrow over to and use a hoe to pull the dirty wood chips right into the wheelbarrow with minimal spillage. Poop doesn't stick too strongly to the linoleum, and if I need to hose it down I can leave both sides of the roof open afterwards to speed up the drying process.
Improvements if we do this again: put the pop door to one side to make it easier to lock at night; put access doors on the long sides of the range; and get more than just the 5 chicks I have right now!!
So, we needed a tractor for 5 hens (hopefully all 5 chicks make it to pullet-hood, and none decide to start 'cock-a-doodle-doo-ing!). While we won't be moving the coop a lot, I wanted the option of being able to move it around a bit during nice weather, and bring it close to the house during the winter. Having had to shovel paths through the several feet of snow we had on the ground at one time this past winter, I knew I didn't want to shovel paths all the way to the back of the yard if it's there when the snow is flying!!
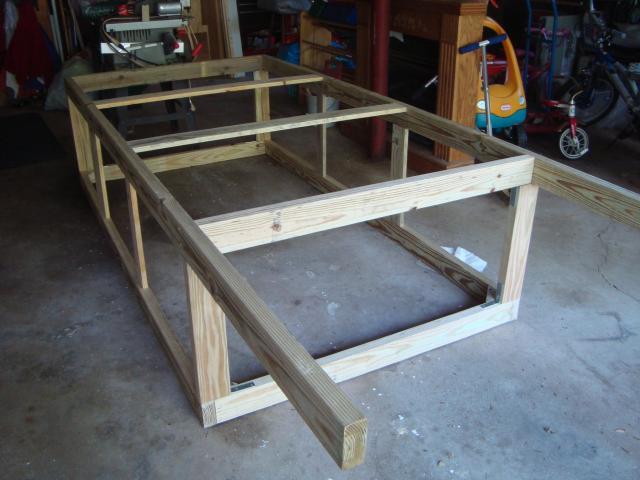
The frame for the 'range' portion of the tractor. It's 2' high, 4' wide, and 7' long; those seemed to be the best dimensions to take advantage of the sizes lumber is sold in. Making it 7' long means the plywood roofing will have sufficient overhang to provide some additional weather protection. The two handles on the front are 12' lumber and will be for my husband and I to lift and move the tractor once it's assembled and there are wheels on the back. Each of the ends is a door that opens up for access to the run. If we did it over, I think we'd do doors in the center of each long section instead-that would be easier when it's time to round the chickens up and get them upstairs for the night, and also would allow easier placement of the food/water where it's not underneath the poop screens on the ends.
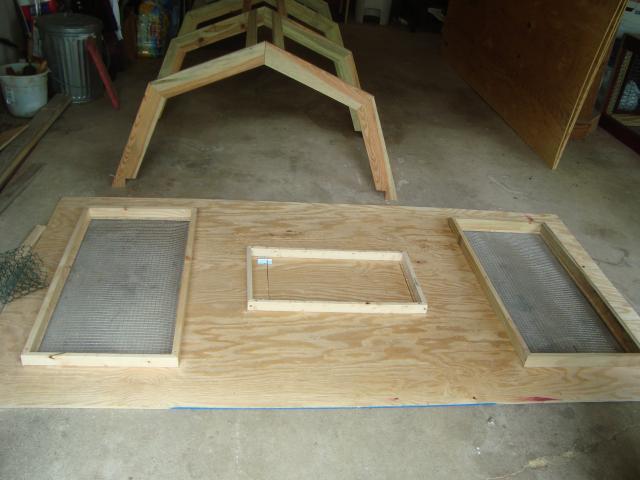
We went with a gambrel style roof for more 'head room'; here are the trusses in the background. There are a few great calculators online for figuring out the angles for custom gambrel roofs. The bottoms are notched to set on top of the coop flooring, with some overhang for ventilation up the sides of the coop.
The coop floor has frames around the pop door (center) and 2 poop screens; in the winter we have inserts to cover the screens up, but for the summer they provide extra ventilation. Hardware cloth is stapled into both openings, with the frames on top of it to keep the chickens from any sharp wire edges. At night there's a string that runs from one side of the pop door, up to a hook that it loops around on the front end of the coop, and back down to the other side of the pop door. That lets me use the string to pull the door shut once all the girls are upstairs. Then the pop door has 2 small locks to close it up at night and make sure no predators can pry it open If we were to do this again, I'd try to put the pop door off center-to make it easier to reach in and lock the pop door without having to duck my head into the coop.
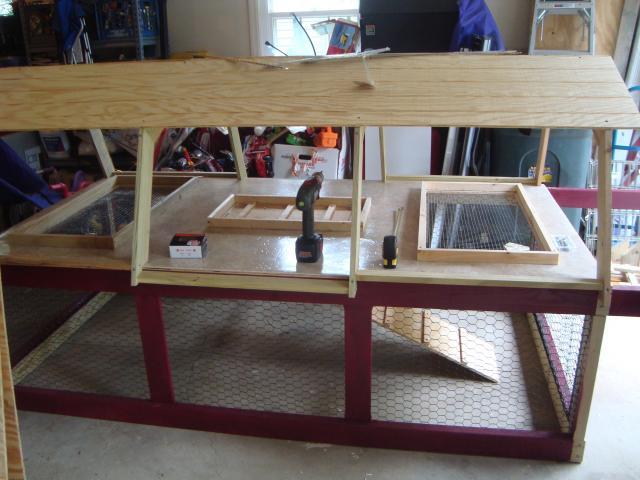
We covered the coop floor with linoleum; all edges are either under the trim around the holes, or held down by the roof truss edges. The pop door ramp is installed and hooks to the underside of the coop to get it out of the way when moving the coop. We had to put additional cleats across the ramp when we discovered our smallest chick (same age as the others but 1/3 of their size) couldn't navigate the longer spaces between cleats. Here the first part of the roof is on; it's offset from the center so that there's a ventilation ridge along the top. We used the lightest plywood we could find to try to keep the weight down. The range portion in this photo is covered with green chicken wire, but later I was able to convince hubby that hardware cloth is really what's needed for security. I just wish I'd convinced him of that BEFORE the coop was attached; crawling into the range to put in the hardware cloth was not fun!
The roof is nearly assembled. Both sides are hinged for full access to the interior with 3 long piano hinges on either side. Where the two roof pieces meet, at the piano ridge, one edge of the plywood is bevelled to prevent the two pieces from jamming each other up. A ridge vent will go across the top for ventilation without (hopefully) drafts.
The ends of the coop were put on after the floor and roof were installed, and painted to mimic the look of an old fashioned barn.
Almost done! The 'barn doors' are wooden shutters that cover the screened windows on either end of the coop; they'll be open for cross ventilation during the summer, and in the winter we can fasten plexiglass there to let the light in but not the drafts. The range has doors on the front and back for access. Coop access is via either side roof; I was afraid we'd have to cut one side into 3 small doors instead of one larger door to keep the chickens from hopping out when we're getting eggs, feeding them, etc. but so far they act as if the pop door is the only way to exit the coop.
The kids were so happy that the chickies new home was almost ready! Here you can see the wheel assembly; by lifting up the coop with the front bars, the wheels come down on the ground enough to move the coop. The little yellow thing hanging from the 'window' is a thermometer, to check if the coop was warm enough at night for occupants.
We used window sash locks, 4 on each side, to secure the roof 'flaps'. Hopefully easy enough for us to open but hard enough for the raccoons NOT to open. The roof is painted grey for looks and to not absorb too much heat.
We used window sash locks, 4 on each side, to secure the roof 'flaps'. Hopefully easy enough for us to open but hard enough for the raccoons NOT to open. The roof is painted grey for looks and to not absorb too much heat.
The finished product!
There are two removable roosts on either end of the coop; basically each roost is two triangles connected by a 1X2 for the actual perch. The perch is hopefully wide enough to encourage the girls to sit on their feet when it's cold outside and prevent losing toes to frostbite.
Right now they seem to prefer roosting at one end over the other-so the second roost is now down in the range where they'll sit during the day quite often.
So far it's easy to clean; the side is just the right height to pull the wheelbarrow over to and use a hoe to pull the dirty wood chips right into the wheelbarrow with minimal spillage. Poop doesn't stick too strongly to the linoleum, and if I need to hose it down I can leave both sides of the roof open afterwards to speed up the drying process.
Improvements if we do this again: put the pop door to one side to make it easier to lock at night; put access doors on the long sides of the range; and get more than just the 5 chicks I have right now!!