How to Make a Brooder on The Cheap


Brooder Setup
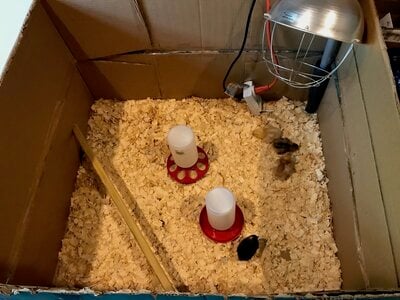
First need to find a plain cardboard box at least 2 feet high. You will also need chicken wire or hardware cloth for top over box to prevent flight risk. Just put some pine shavings large flake in about 1 inch deep. You can get from Tractor Supply Center (TSC) or Southern States as cheapest. Have a kitty litter scoop on hand cheap from Krogers or Dollar store to scoop manure with. Now you are ready to hook up heat lamp.
Thermoregulation
I bought an $8.00 heat lamp from TSC to which I clipped to a pole already from home and secured to corner of box at 18 inches of height which is recommended for safe brooder temperatures. Use a red bulb as safest heat source. This should be set up 24 hours in advance of your baby chicks arrival with heat lamp at 95 degrees F to allow your chicks to go right in and warm quickly on arrival as may be cold, tired, and hungry. I also placed a LUXPRO thermoregulator to my heat lamp with extension cord to outlet for temperature accuracy and less work for me.
Nutrition
Next provide a fountain waterer with marbles in tray to prevent accidental drownings as new baby chicks can be clumsy. For the first hour just provide water with Sav-a-Chick electrolytes/probiotics in it as they tend not to be great at eating first couple days till catch on. Remember the yolk they consume in the egg is their nutrition for first 48 hours till you provide it. Provide water the first hour, dip beak tip in water and sit in front. They will one by one all go there. This introduces the location of the food/water source so they can find it on their own. Remember you are now the momma and need to show by example so they can learn how to survive. After the first hour, you can introduce a good quality 18-20% Chick Starter or Starter/Grower Medicated Feed. I use a 20% protein as this provides optimal growth for average laying hen till 8 weeks then I drop to 18% Non-medicated Starter/Grower Feed.

Digestion
At 3 weeks you need to introduce Chick for grit for digestion till about 10-12 weeks then can switch to Poultry Grit. I did not use Grower grit as not easily found here and still did oK. Some will use Grower grit at 10-12 weeks till at laying stage about 16-18 weeks then will switch to Poultry Grit adult size.

Activity
After acclimated to food/water it is nice to add a perch to assist in good sleep hygiene and use of roosting bars early. I put a roosting bar on left side of coop away from food/heat at least 5 inches off ground, 1 inch wide, and 6-8 inches long for four baby chicks. They loved to all roost at different times and at the same time. Another fun item once this is accomplished is a chick swing to alleviate boredom, assist in balance, and once again roosting. Good use of early wing development going on and off items provide good exercise and methods to assist in natural development of life long skills for survival.

Treats
At 3-4 weeks of age, you can introduce treats now that they know how to eat and consume grit for digestion. Small strips of cabbage or dried mealworms are ideal and nutritious healthy snacks for the Peck N Play Ball. They will love it even when empty. Limit treats to not more than 10% of total daily diet. Fun exercise as well!
Now you have an excellent brooder on the cheap and good tools for next time! Good Luck on yours!
Links:
DIY Swing for the Brooder
https://www.backyardchickens.com/articles/diy-chicken-swing-for-the-brooder.74466/
Peck N Play Ball
https://www.backyardchickens.com/reviews/ware-chicken-peck-n-play-boredom-busting-ball.11882/
LUXPRO thermoregulator
https://www.backyardchickens.com/reviews/luxpro-thermoregulator-for-the-brooder.12007/