How to Make a Basic Cooler Incubator
Easy Instructions for Making you own High Quality Incubator
As of 2017, a cooler incubator will cost you around $50-$70 if you buy everything brand new. However, most people reduce this cost significantly by using things they already own or have gotten for free or reduced prices.
GATHER YOUR SUPPLIES AND TOOLS:
Supply List:GATHER YOUR SUPPLIES AND TOOLS:
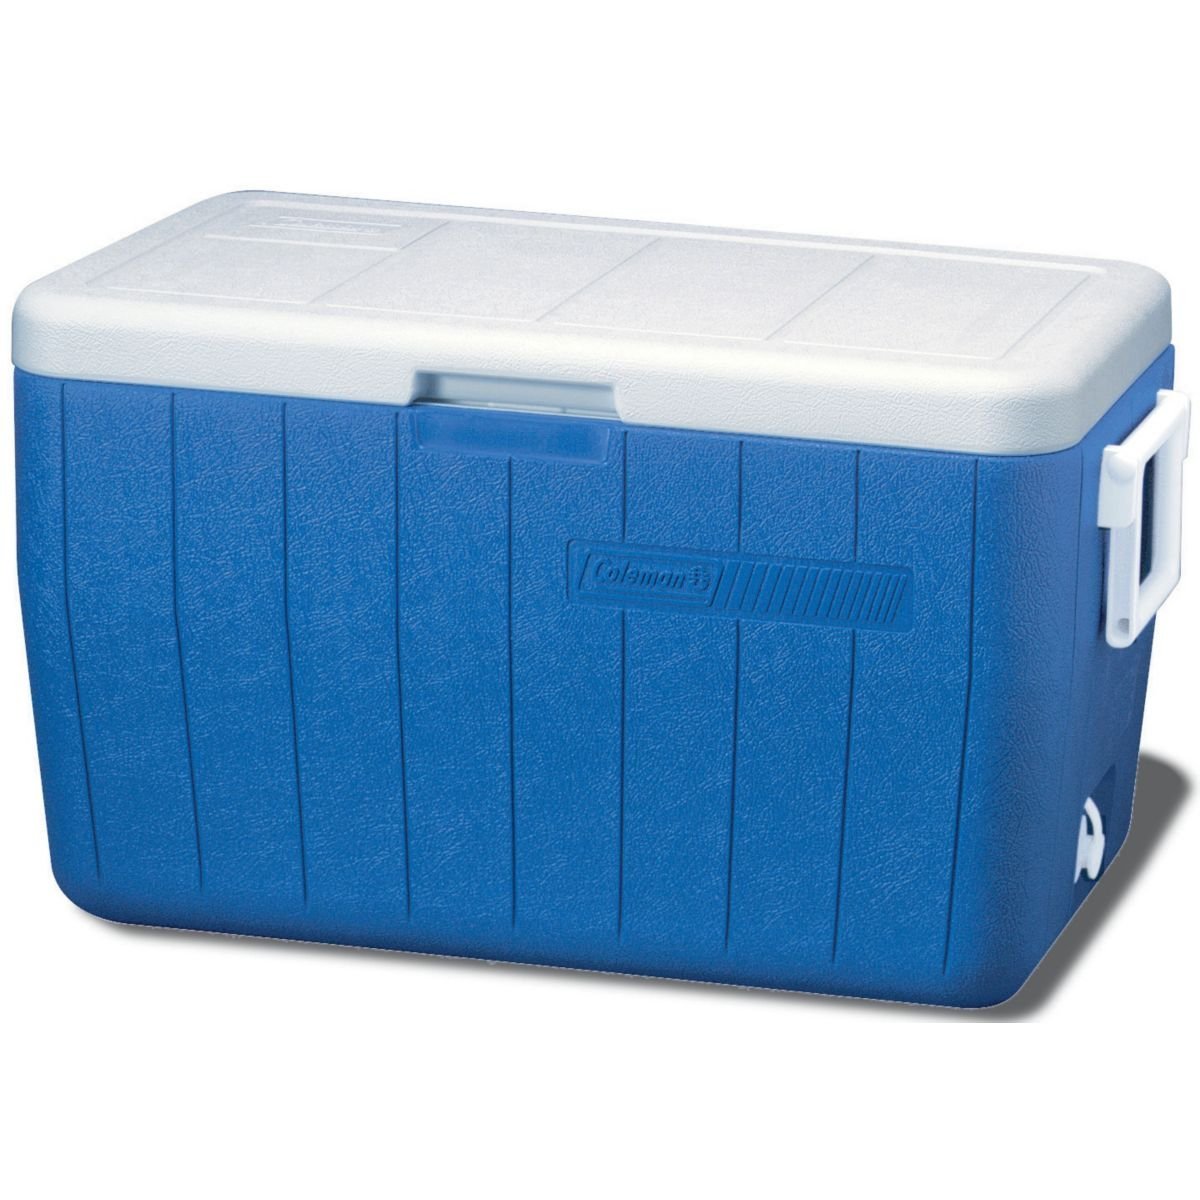
1. Cooler - These can be either plastic or styrofoam. Plastic incubators require more tools to cut and drill holes into, they are easier to clean, tend to hold up better, and are more expensive to buy new. Styrofoam coolers are easy to modify with household items, harder to clean, damage a little easier, and are cheaper to buy new and can often be found free.

2. Thermostat - The most common reliable thermostat used in coolerbators is the Wafer Thermostat Assembly for Hova-Bator Egg Incubators. When buying one make sure to get the Assembly, and not just the wafer replacement. You may use other thermostats, but remember having a good quality thermostat is one of the most important things in an incubator!

3. 2 Lightbulb Sockets - basic lightbulb sockets with the hot and ground wire coming off the back. Ceramic is best. You can get by with one, but two gives you a safe guard in case one of your lightbulbs goes out. For bigger coolers, regular sockets are fine. If you are using a smaller cooler I recommend candelabra size sockets. You can also use lamp kits.
4. 2 Low Wattage Incandescent Lightbulbs (25-40w) - these are your heat source. Low wattage helps so they are not going on and off constantly. We get ours at Dollar tree for $1

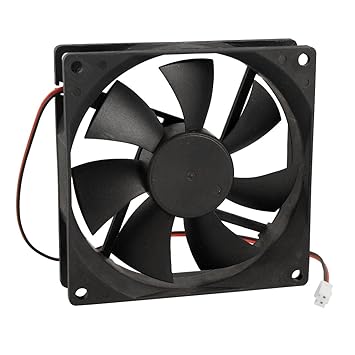
5. Computer Fan - Bigger coolers need bigger fans, make sure to get one appropriately sized (it's not an exact science just use your best judgment)
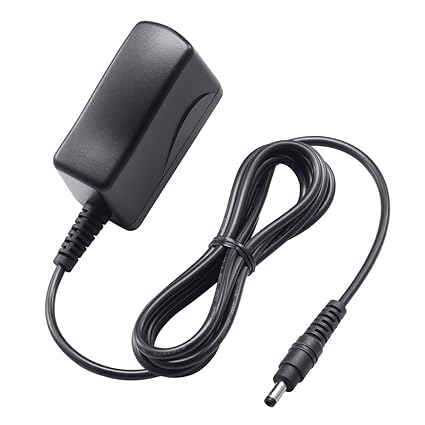
6. Phone Charger or other 120v Charger - This will be the power for your fan, you will be cutting the end off so any style is fine.
7. 4 Long Screws - These need to fit in the corner holes of your computer fan and be long enough to hold the fan at least 1 inch away from the cooler wall. Self tapping is best.
8. 2 Shorter Screws - these are for attaching the thermostat to the wall of the cooler. Self tapping is best.
9. Adhesive - I use silicone caulk, but other adhesives may also be used.
10. Household Extension Cord - This will be used to power your incubator and wire everything together. We get ours at Dollar Tree, for $1.
11. 3-6 Wire Nuts - to connect wires
12. Glass or Plexiglass (sized for viewing window) OPTIONAL - Picture frame glass is often used as an inexpensive option, though it is easier to break. Hardware stores such as Home Depot or Menards can often cut glass/plexiglass to size. Plexiglass is ideal for this, but is more cost prohibitive.
13. Electrical or Ducktape- tape is always useful!
Recommended Tools:
HOW TO BUILD YOUR INCUBATOR:
1. Mark on your cooler where you will need to make holes for your fan, light sockets, and thermostat. Use the items to get an idea of how much space they take up, and where to mark. Ideally you will want the light bulbs to be as high in the cooler as possible without the risk of melting your lid or sides. Styrofoam coolers melt easier! The fan should be positioned to blow on and slightly under the light bulbs. Technically the thermostat can be located anywhere in the cooler as long as it is not too close to the light bulbs. Between the light bulbs in line with the fan is thought to be ideal.

2. Cut or Drill out holes. Once you have marked where things need to go you need to cut, drill, or poke out your holes. Two sized holes for the light sockets, one small hole for the thermostat control piece, one hole for the thermostat wires, one hole for the fan wires and a couple of ventilation holes. You may also cut the window hole, if desired, at this time. Ventilation holes should be placed where they will not draft the eggs. Self tapping screws do not need pilot holes, and neither do styrofoam coolers. You can make holes in a styrofoam cooler with basic household items. Kitchen knives can be used to cut/scrape out light socket and window holes. Smaller diameter items such as pencils/markers can be pushed through to make wire and ventilation holes. (We happened to have an olive oil lid that was the perfect diameter to start the light socket holes on our styrofoam incubator. We pushed it into the side to cut a start circle, then dug it out with a butter knife! Worked fabulously!)

3. Attach light sockets, cords hanging out. Unless your light sockets fit very snug, you will want to glue them into the hole using your caulk/adhesive so they don't wiggle around. Simply coat the outside of the socket or inside of the hole with your adhesive and push the socket into the hole. Wipe off any excess adhesive that comes out. If desired you can also attach a reflective backing around the lightsocket, though it's not necessary.

4. Attach Computer fan using screws, making sure to keep it at least an inch away from the cooler wall so there will be proper airflow. Be very careful with styrofoam coolers as there is not a lot of mess up grace! (Should the screws be too loose, try coating them with your adhesive and holding them steady or propping up the fan till the adhesive sets). Thread the fan wires through your pre-drilled hole.

5. Attach Wafer Thermostat. Attach wafer assembly to the interior wall using screws, making sure to thread the wires through your pre-cut hole. If using styrofoam, coat the back of the assembly with adhesive before screwing it in, so that it does not become loose from regular use. Once the adhesive dries, thread the control piece through your pre-cut hole (from outside) and through the assembly hole. Then attach the wafer piece to it. Tighten the wingnut on the outer side untill it is snug.
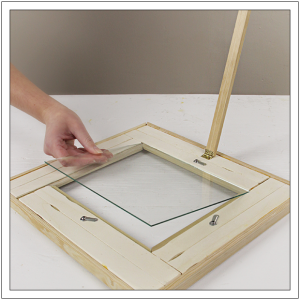
6. Attach your Viewing Window (Optional). Run a bead of caulk or your adhesive of choice around the edge of the window hole cut into the incubator. Press your glass firmly down on top of the adhesive, being careful not to press hard enough to break the glass. Run another bead of caulk/adhesive around the edge of the glass to firmly seal it and to cover any potentially sharp edges. Ducktape can also work here. Screws may be added to plexiglass on plastic coolers for added stability.

photo by missprissy
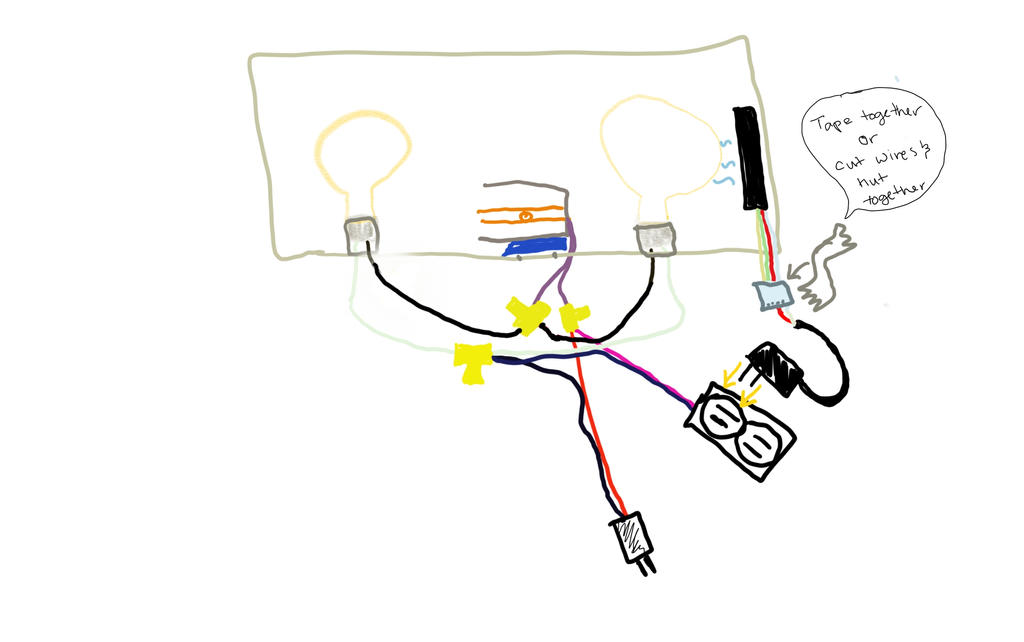
7.Wire your incubator:
- Cut your extension cord so that 2/3 of the cord length is connected to the plug side, and 1/3 is connected to the outlet side.
- Expose about an inch of the interior copper wire on each wire
- Split the wires down the middle and find the hot wire. The hot wire will be smooth, the neutral wire will have ridges down the side.
- Take the hot wire (smooth) from both cut ends of the extension cord, and one of the thermostat wires (it doesn't matter which one). Use an electrical nut and screw them together. (3 wires total)
- Take the second thermostat wire and the BLACK wires on the light sockets and nut them together. (3 wires total)
-Take the neutral wires (ribbed) from both cut ends of the extension cord and the WHITE wires on the light sockets and nut them together (4 wires total)
-Cut the small end off the phone charger, and peel back the outer casing revealing the interior black and red wires. Strip the ends off the black and red wires, about half an inch down, being careful not to cut the metal wire inside.
-Take your fan cord and either insert the wires into the hot and ground pin holes or cut and nut the wires (use small nuts!). Red is usually hot. Black is usually ground. If there is no black wire you will need to experiment to find which wire is ground. The fan will not work until you find the correct wire. Getting the charger wires into the pin holes and making a good connection can be a little tricky. Once you have them in the correct holes and have a good connection use electrical tape to keep them from pulling out. Still need more help? Try watching this video demonstration.
-Plug Extension cord into wall. Plug phone charger into extension cord. Your fan and lightbulbs should turn on! Here is what your finished wiring should look like. If at any time you find that a cord will not reach where it needs to go in order to nut it, you can always use a spare wire or cut the extension cord a bit shorter and use the excess cut piece to extend the short wire (nut together) so it reaches.
2. Thermostat - The most common reliable thermostat used in coolerbators is the Wafer Thermostat Assembly for Hova-Bator Egg Incubators. When buying one make sure to get the Assembly, and not just the wafer replacement. You may use other thermostats, but remember having a good quality thermostat is one of the most important things in an incubator!

3. 2 Lightbulb Sockets - basic lightbulb sockets with the hot and ground wire coming off the back. Ceramic is best. You can get by with one, but two gives you a safe guard in case one of your lightbulbs goes out. For bigger coolers, regular sockets are fine. If you are using a smaller cooler I recommend candelabra size sockets. You can also use lamp kits.

4. 2 Low Wattage Incandescent Lightbulbs (25-40w) - these are your heat source. Low wattage helps so they are not going on and off constantly. We get ours at Dollar tree for $1

5. Computer Fan - Bigger coolers need bigger fans, make sure to get one appropriately sized (it's not an exact science just use your best judgment)
6. Phone Charger or other 120v Charger - This will be the power for your fan, you will be cutting the end off so any style is fine.
7. 4 Long Screws - These need to fit in the corner holes of your computer fan and be long enough to hold the fan at least 1 inch away from the cooler wall. Self tapping is best.

8. 2 Shorter Screws - these are for attaching the thermostat to the wall of the cooler. Self tapping is best.
9. Adhesive - I use silicone caulk, but other adhesives may also be used.
10. Household Extension Cord - This will be used to power your incubator and wire everything together. We get ours at Dollar Tree, for $1.
11. 3-6 Wire Nuts - to connect wires
12. Glass or Plexiglass (sized for viewing window) OPTIONAL - Picture frame glass is often used as an inexpensive option, though it is easier to break. Hardware stores such as Home Depot or Menards can often cut glass/plexiglass to size. Plexiglass is ideal for this, but is more cost prohibitive.
13. Electrical or Ducktape- tape is always useful!
Recommended Tools:
- Pliers/Wire Cutters - for cutting wires
- Jigsaw (optional) - for cutting window
- Drill - this is important for plastic coolerbators
- 1.5 inch Hole saw (drill bit) - very useful especially if you want a clean look when installing light sockets! You will need a smaller size for candelabra sockets.
- Drill Bit - to make holes for wafer thermostat control piece and wires
- Screwdriver - make sure head matches your screw type
- Thermometer - make sure you can calibrate it!
HOW TO BUILD YOUR INCUBATOR:
1. Mark on your cooler where you will need to make holes for your fan, light sockets, and thermostat. Use the items to get an idea of how much space they take up, and where to mark. Ideally you will want the light bulbs to be as high in the cooler as possible without the risk of melting your lid or sides. Styrofoam coolers melt easier! The fan should be positioned to blow on and slightly under the light bulbs. Technically the thermostat can be located anywhere in the cooler as long as it is not too close to the light bulbs. Between the light bulbs in line with the fan is thought to be ideal.
2. Cut or Drill out holes. Once you have marked where things need to go you need to cut, drill, or poke out your holes. Two sized holes for the light sockets, one small hole for the thermostat control piece, one hole for the thermostat wires, one hole for the fan wires and a couple of ventilation holes. You may also cut the window hole, if desired, at this time. Ventilation holes should be placed where they will not draft the eggs. Self tapping screws do not need pilot holes, and neither do styrofoam coolers. You can make holes in a styrofoam cooler with basic household items. Kitchen knives can be used to cut/scrape out light socket and window holes. Smaller diameter items such as pencils/markers can be pushed through to make wire and ventilation holes. (We happened to have an olive oil lid that was the perfect diameter to start the light socket holes on our styrofoam incubator. We pushed it into the side to cut a start circle, then dug it out with a butter knife! Worked fabulously!)
3. Attach light sockets, cords hanging out. Unless your light sockets fit very snug, you will want to glue them into the hole using your caulk/adhesive so they don't wiggle around. Simply coat the outside of the socket or inside of the hole with your adhesive and push the socket into the hole. Wipe off any excess adhesive that comes out. If desired you can also attach a reflective backing around the lightsocket, though it's not necessary.
4. Attach Computer fan using screws, making sure to keep it at least an inch away from the cooler wall so there will be proper airflow. Be very careful with styrofoam coolers as there is not a lot of mess up grace! (Should the screws be too loose, try coating them with your adhesive and holding them steady or propping up the fan till the adhesive sets). Thread the fan wires through your pre-drilled hole.
5. Attach Wafer Thermostat. Attach wafer assembly to the interior wall using screws, making sure to thread the wires through your pre-cut hole. If using styrofoam, coat the back of the assembly with adhesive before screwing it in, so that it does not become loose from regular use. Once the adhesive dries, thread the control piece through your pre-cut hole (from outside) and through the assembly hole. Then attach the wafer piece to it. Tighten the wingnut on the outer side untill it is snug.
6. Attach your Viewing Window (Optional). Run a bead of caulk or your adhesive of choice around the edge of the window hole cut into the incubator. Press your glass firmly down on top of the adhesive, being careful not to press hard enough to break the glass. Run another bead of caulk/adhesive around the edge of the glass to firmly seal it and to cover any potentially sharp edges. Ducktape can also work here. Screws may be added to plexiglass on plastic coolers for added stability.
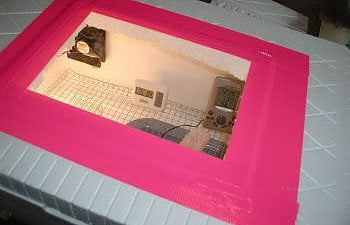
photo by missprissy
7.Wire your incubator:
- Cut your extension cord so that 2/3 of the cord length is connected to the plug side, and 1/3 is connected to the outlet side.
- Expose about an inch of the interior copper wire on each wire
- Split the wires down the middle and find the hot wire. The hot wire will be smooth, the neutral wire will have ridges down the side.
- Take the hot wire (smooth) from both cut ends of the extension cord, and one of the thermostat wires (it doesn't matter which one). Use an electrical nut and screw them together. (3 wires total)
- Take the second thermostat wire and the BLACK wires on the light sockets and nut them together. (3 wires total)
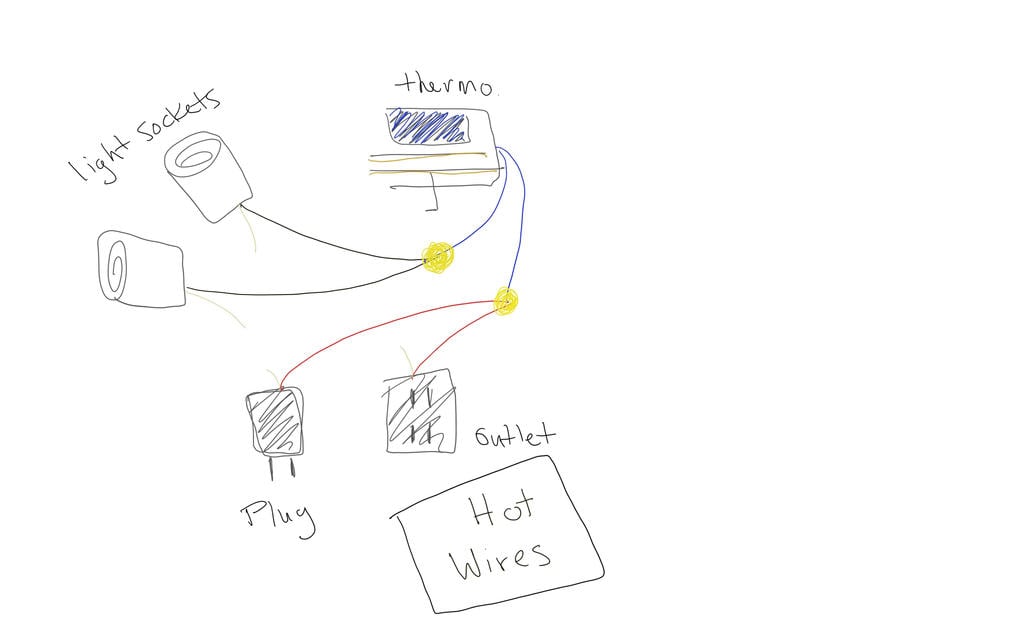
-Take the neutral wires (ribbed) from both cut ends of the extension cord and the WHITE wires on the light sockets and nut them together (4 wires total)

-Cut the small end off the phone charger, and peel back the outer casing revealing the interior black and red wires. Strip the ends off the black and red wires, about half an inch down, being careful not to cut the metal wire inside.

-Take your fan cord and either insert the wires into the hot and ground pin holes or cut and nut the wires (use small nuts!). Red is usually hot. Black is usually ground. If there is no black wire you will need to experiment to find which wire is ground. The fan will not work until you find the correct wire. Getting the charger wires into the pin holes and making a good connection can be a little tricky. Once you have them in the correct holes and have a good connection use electrical tape to keep them from pulling out. Still need more help? Try watching this video demonstration.
-Plug Extension cord into wall. Plug phone charger into extension cord. Your fan and lightbulbs should turn on! Here is what your finished wiring should look like. If at any time you find that a cord will not reach where it needs to go in order to nut it, you can always use a spare wire or cut the extension cord a bit shorter and use the excess cut piece to extend the short wire (nut together) so it reaches.
And now you are finished with the basic incubator! All that's left to do is calibrate your thermometer and play with your thermostat until your incubator is sitting steady at 99.5 degrees Fahrenheit or 38 degrees Celsius for at least 4 hours. Good luck and good hatching! For more information on how to hatch using your new incubator visit the Hatching Articles Page here on BYC!
For a slightly more challenging build, bottom trays and automatic egg turners can also be added to these coolerbators, though they will work perfectly fine without them.
For a slightly more challenging build, bottom trays and automatic egg turners can also be added to these coolerbators, though they will work perfectly fine without them.