or: How I learned to stop worrying and love brooding outdoors!
Contents:
Please note that authors don't get notifications on articles. If you have comments or questions, feel free to leave them on my 2024 brooding and integration thread: https://www.backyardchickens.com/th...egrate-along-from-feed-store-to-coop.1617102/
= = = = = = = = = = = = = = = = = = = =
BUILDING THE BROODER
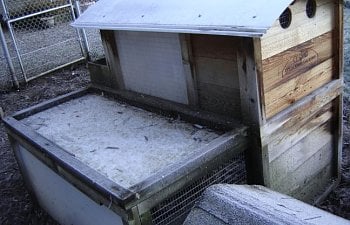
Like many first time chicken owners, I started my foray into chickens with a prefab coop. After two years passed we decided to expand the flock, so our hens moved to new, larger digs, and the prefab? Well, it went from this:

To this:

As seen above, this is the top section of our old prefab coop minus the ledge in front. It measures 29" x 44.5" x 23" tall (8.96 sq ft) so good for 3 or 4 chicks through integration. The large side access door hinges at the bottom so it can't accidentally close on a chick. The door also has small cutouts on either side at the top so I can run a power cord without pinching it.
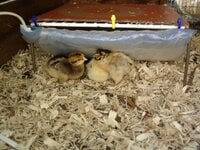
We're using a Mama Heating Pad (directions below) and contrary to the conventional set up with chicks under a 250 watt red heating lamp 24 hours a day, we have 2 to 3-day-old chicks actively running around in 60-70 F daytime with nap breaks under the heating pad. It gets down to about 45-50 F at night so they tuck themselves in before dusk.

The brooder placement takes into account prevailing wind directions, but still allows some light and air flow to get through. Even with ventilation on all four sides of the brooder, I’m able to place the heating pad in a spot between three solid wall panels on one end to provide a warm spot with adequate draft protection.
In my first iteration of this brooder, I had no good way to deal with rain and would move the brooder into the garage for protection. It wasn’t that rain blew into the brooder (as I’d taken wind direction into account) but rather that rainwater would seep up from the ground and get the litter wet. I’ve since made the following change, building up the deep litter a few inches directly underneath the brooder, elevating the floor enough to keep it fairly dry on the surface (the bricks around the base are to prevent the hens from digging out the built up litter). I tested it through a couple of rainstorms and discovered it works surprisingly well.

With the brooder directly at ground level, my hens can get used to the presence of the chicks and vice versa, for a faster, smoother integration.

Cleaning is also a breeze, in large part because the brooder has no built in floor, so it takes advantage of the deep litter already in place in the run. For a quick refresh of the bedding, stirring up the shavings (for extra cushion for chicks) and litter a bit helps extend the usability of it. When the bedding is too dirty for my liking, I simply drag the brooder to a new patch of the run, and let the hens come and kick around the soiled bedding that was left behind. Easy and effective!
As an extra bonus this unit also serves as a broody breaker, an isolation unit for sick birds/birds in need of a private meal, and even a rain shelter.
Looking for a brooder like this one? Some rabbit hutches have similar layout and design and can be altered to serve this task. Or if you’d like to try your hand at building, scrap wood and wire can be cobbled together for a similar build.
= = = = = = = = = = = = = = = = = = = =
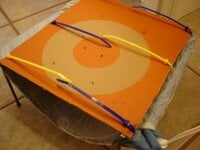
MAKING A MAMA HEATING PAD
Here’s what you need:
- a heating pad without auto shut off
- a frame for “mama” (I used a wire plate rack with a scrap of welded wire)
- Glad Press N Seal
- optional: cardboard and zip ties are only necessary if using a frame with open wire on top

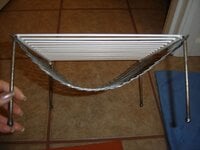
Most MHPs are built either flat or in an upside down U. I bend a U shape from the welded wire to mimic the round belly of a hen, providing high and low spots underneath for heat for younger chicks (when the chicks get older, they can climb into the upper part of the U to nap instead, for continued warmth that isn’t quite as toasty).


Then take the heating pad and using the Press N Seal, wrap the heating pad onto the bottom of the welded wire. I wrap between 3-4 times, pressing firmly to seal it as tightly as possible so chicks don’t get stuck in any gaps.

If using a wire topped frame like mine, take some cardboard and zip tie it to the top for a safe platform that’s also easy to clean (simply cut off zip ties and toss cardboard).

Voila! Chicks enjoying the warmth from "mama."

= = = = = = = = = = = = = = = = = = = =
EARLY INTEGRATION PROCESS
Early integration requires a bit of preplanning, but if done correctly, it's an easy way to add new chicks to an existing flock. It takes advantage of the fact that young chicks are small enough to fit into spaces adults can't, which allows you to provide them safe cover that only they can use.
I've split this section into 2018 and 2020, as 2018 was my first go at this, and I'd hoped to improve and speed up the process for 2020.
 2018
2018 
Week 1: Chicks stayed in the brooder.
Week 2: Chicks started getting restless so I let them out of the brooder for short periods of time. At first they just sat on the door. Didn't take long for them to start venturing forth, though they stayed close. Of my 3 hens, one ignored them, one more or less accepted them, and one pecked and chased them around. So the chicks only came out when I was around to supervise.
Week 2.5: I decided to start working more on integration and tried raising the brooder on bricks so that the chicks could run in and hide if they were being harassed by adults. While the chicks got the hang of it quickly, the plan backfired as the adults wanted to get into the brooder to get the food and water (so basically they just stuck their heads under the gap). So I went with Plan B.
Week 3 (Plan B!): I took some chicken wire* and made a 16 sq ft mini run around the brooder, so the chicks had outdoor space that effectively doubled the safe space they had access to. The chicken wire could be elevated using the brooder door and some bricks, allowing the chicks to venture into the larger run if they preferred, while still having a safe haven.
Additionally there's 5 other structures inside the run, plus the run is split into two halves, so the chicks have a lot of options if they need to get out of line of sight from a harassing hen - see diagram below for layout. To prevent chicks from being cornered, all obstacles against a wall have extra openings cut out to give chicks an extra escape route.
* Use chicken wire with caution - chicks can get their heads stuck in the openings. Also note that even little chicks can easily hop/fly out of an enclosure like this, so cover it with something (a lightweight netting works), if you do not want them leaving the enclosure.

Week 4: MHP went away and got replaced by a practice roost, made from the original roost bar for this prefab screwed into some scrap wood for the sides. The chicken wire went away too. I replaced it with a wire closet shelf that's placed across the brooder entrance, but at a slight angle so there's a chick sized gap on either side. The wire shelf is kept in place with bricks and also hooked on the lip of the metal roof, with one end pushed into the chain link fencing to further steady it. I gave it a good push and pull each time I set it up to make sure it would not fall or be knocked aside.

Week 4.5: Brooder is officially closed and chicks now spend their nights in the coop, inside a portable dog pen as they're not interested in roosting overnight yet. Chicks are now willing to eat fermented feed as well. To minimize the hens pestering them while they eat and drink, I've placed food and water on top of a chicken jungle gym that the hens aren't using, but the chicks like to play on. There's 2 other feeding stations as well, so they have options if the hens do hop up.

Week 5.5: The portable pen is gone and chicks are learning to roost. For their safety, the pop door is currently programmed to open earlier than usual, in case they need to put some distance between themselves and the adults first thing in the morning.
After just two days, the chicks have not only figured out how to roost, but are up on the top roost with the hens!

Obviously the two sub flocks still have a ways to go before they're on equal footing, but roosting was the last major hurdle in integration, so I'm very happy to have it resolved before week 6.
 2020
2020 
~2 days to ~1 week old: Chicks stayed in the brooder and adjusted to their new environment, while cranky hens adjusted to the presence of peeping newcomers.
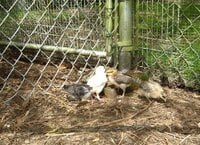
10 days old: Had a warm day (high of 69 F) so I enclosed the hens in half the run, opened the brooder, and then supervised chicks for an hour. Chicks came out with a little urging and enjoyed their first dust bath and even went under the split run fence to the side where the hens were. A couple of the hens approached to investigate, and chicks responded appropriately by darting under the fence (as seen in first photo below) when one hen pecked at them. I went ahead and set up the chicken wire mini run around the brooder. I plan to leave the brooder open from this point on as long as weather is good.


15 days old: Moved the brooder to the second/final location. I once again used the chicken wire mini run, but only long enough to safely teach the chicks how to use the wire closet shelf "panic openings" as seen in Week 4 from 2018. Once the chicks were reliably using the openings, I removed the chicken wire mini run entirely. The chicks and hens are now able to fully interact outside the brooder.


22 days old: Chicks and hens are interacting fairly well for the most part, able to share space and even food.


27 days old: Brooder is now closed. Mama Heating Pad has been removed and disassembled. Chicks will now have to rely solely on clutter to hide from hens if needed, and to provide shelter from rain. Nighttime lows are around 48 F, which should be no problem for them at this point.
To transition into the coop, the chicks will be placed in a small cage to protect them from any hen aggression in the early morning before the pop door opens. Cage will be removed once they show inclination to roost. I'm happy to report that only 24 hours after being introduced to the coop for the very first time, they have already learned to enter and exit the coop via pop door, eat at the flock's feeder inside the coop, and to return to the coop at dusk.

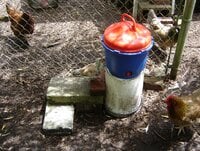
29 days old: Success! Chicks demonstrated today that they understand how to use the horizontal nipple waterer. Because the waterer is set so high above their heads, I used concrete blocks to build steps to it.
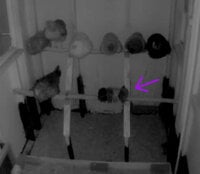
Even better, without any prompting from us or pre-training on a mini roost, the chicks put themselves on the roost at dusk this evening. Transition cage has been removed. Pop door again will be programmed to let them out early for a quick escape, if needed.


Thrilled to have shaved off over a week in getting the chicks to this stage, compared to 2018's more cautious chick integration.
 2024
2024 
Changing things up a little... covering 2024 in a brood along / integrate along thread, so folks can follow along as things happen: https://www.backyardchickens.com/th...egrate-along-from-feed-store-to-coop.1617102/
= = = = = = = = = = = = = = = = = = = =
OTHER EARLY INTEGRATION ARTICLES
Contents:
- Building the Brooder
- Making a Mama Heating Pad
- Early Integration Process
- Other Early Integration Articles
Please note that authors don't get notifications on articles. If you have comments or questions, feel free to leave them on my 2024 brooding and integration thread: https://www.backyardchickens.com/th...egrate-along-from-feed-store-to-coop.1617102/
= = = = = = = = = =
BUILDING THE BROODER
Like many first time chicken owners, I started my foray into chickens with a prefab coop. After two years passed we decided to expand the flock, so our hens moved to new, larger digs, and the prefab? Well, it went from this:
To this:
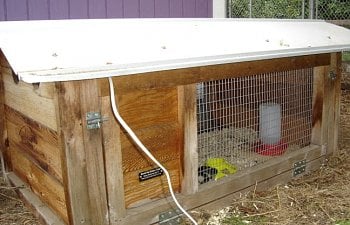
As seen above, this is the top section of our old prefab coop minus the ledge in front. It measures 29" x 44.5" x 23" tall (8.96 sq ft) so good for 3 or 4 chicks through integration. The large side access door hinges at the bottom so it can't accidentally close on a chick. The door also has small cutouts on either side at the top so I can run a power cord without pinching it.
We're using a Mama Heating Pad (directions below) and contrary to the conventional set up with chicks under a 250 watt red heating lamp 24 hours a day, we have 2 to 3-day-old chicks actively running around in 60-70 F daytime with nap breaks under the heating pad. It gets down to about 45-50 F at night so they tuck themselves in before dusk.
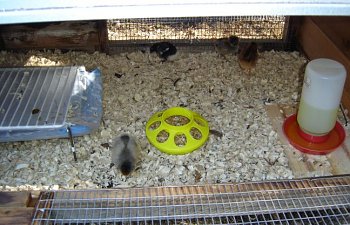
The brooder placement takes into account prevailing wind directions, but still allows some light and air flow to get through. Even with ventilation on all four sides of the brooder, I’m able to place the heating pad in a spot between three solid wall panels on one end to provide a warm spot with adequate draft protection.
In my first iteration of this brooder, I had no good way to deal with rain and would move the brooder into the garage for protection. It wasn’t that rain blew into the brooder (as I’d taken wind direction into account) but rather that rainwater would seep up from the ground and get the litter wet. I’ve since made the following change, building up the deep litter a few inches directly underneath the brooder, elevating the floor enough to keep it fairly dry on the surface (the bricks around the base are to prevent the hens from digging out the built up litter). I tested it through a couple of rainstorms and discovered it works surprisingly well.
With the brooder directly at ground level, my hens can get used to the presence of the chicks and vice versa, for a faster, smoother integration.
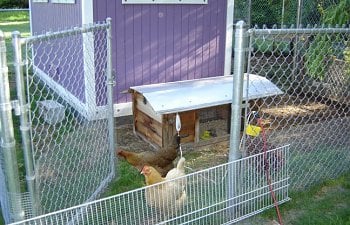
Cleaning is also a breeze, in large part because the brooder has no built in floor, so it takes advantage of the deep litter already in place in the run. For a quick refresh of the bedding, stirring up the shavings (for extra cushion for chicks) and litter a bit helps extend the usability of it. When the bedding is too dirty for my liking, I simply drag the brooder to a new patch of the run, and let the hens come and kick around the soiled bedding that was left behind. Easy and effective!
As an extra bonus this unit also serves as a broody breaker, an isolation unit for sick birds/birds in need of a private meal, and even a rain shelter.
Looking for a brooder like this one? Some rabbit hutches have similar layout and design and can be altered to serve this task. Or if you’d like to try your hand at building, scrap wood and wire can be cobbled together for a similar build.
= = = = = = = = = =
MAKING A MAMA HEATING PAD
Here’s what you need:
- a heating pad without auto shut off
- a frame for “mama” (I used a wire plate rack with a scrap of welded wire)
- Glad Press N Seal
- optional: cardboard and zip ties are only necessary if using a frame with open wire on top
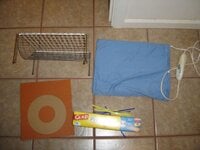
Most MHPs are built either flat or in an upside down U. I bend a U shape from the welded wire to mimic the round belly of a hen, providing high and low spots underneath for heat for younger chicks (when the chicks get older, they can climb into the upper part of the U to nap instead, for continued warmth that isn’t quite as toasty).
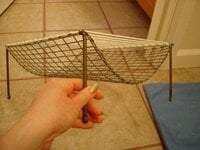
Then take the heating pad and using the Press N Seal, wrap the heating pad onto the bottom of the welded wire. I wrap between 3-4 times, pressing firmly to seal it as tightly as possible so chicks don’t get stuck in any gaps.
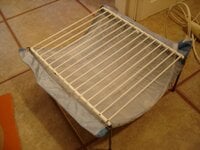
If using a wire topped frame like mine, take some cardboard and zip tie it to the top for a safe platform that’s also easy to clean (simply cut off zip ties and toss cardboard).
Voila! Chicks enjoying the warmth from "mama."
= = = = = = = = = =
EARLY INTEGRATION PROCESS
Early integration requires a bit of preplanning, but if done correctly, it's an easy way to add new chicks to an existing flock. It takes advantage of the fact that young chicks are small enough to fit into spaces adults can't, which allows you to provide them safe cover that only they can use.
I've split this section into 2018 and 2020, as 2018 was my first go at this, and I'd hoped to improve and speed up the process for 2020.
Week 1: Chicks stayed in the brooder.
Week 2: Chicks started getting restless so I let them out of the brooder for short periods of time. At first they just sat on the door. Didn't take long for them to start venturing forth, though they stayed close. Of my 3 hens, one ignored them, one more or less accepted them, and one pecked and chased them around. So the chicks only came out when I was around to supervise.
Week 2.5: I decided to start working more on integration and tried raising the brooder on bricks so that the chicks could run in and hide if they were being harassed by adults. While the chicks got the hang of it quickly, the plan backfired as the adults wanted to get into the brooder to get the food and water (so basically they just stuck their heads under the gap). So I went with Plan B.
Week 3 (Plan B!): I took some chicken wire* and made a 16 sq ft mini run around the brooder, so the chicks had outdoor space that effectively doubled the safe space they had access to. The chicken wire could be elevated using the brooder door and some bricks, allowing the chicks to venture into the larger run if they preferred, while still having a safe haven.
Additionally there's 5 other structures inside the run, plus the run is split into two halves, so the chicks have a lot of options if they need to get out of line of sight from a harassing hen - see diagram below for layout. To prevent chicks from being cornered, all obstacles against a wall have extra openings cut out to give chicks an extra escape route.
* Use chicken wire with caution - chicks can get their heads stuck in the openings. Also note that even little chicks can easily hop/fly out of an enclosure like this, so cover it with something (a lightweight netting works), if you do not want them leaving the enclosure.
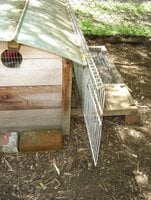
Week 4: MHP went away and got replaced by a practice roost, made from the original roost bar for this prefab screwed into some scrap wood for the sides. The chicken wire went away too. I replaced it with a wire closet shelf that's placed across the brooder entrance, but at a slight angle so there's a chick sized gap on either side. The wire shelf is kept in place with bricks and also hooked on the lip of the metal roof, with one end pushed into the chain link fencing to further steady it. I gave it a good push and pull each time I set it up to make sure it would not fall or be knocked aside.
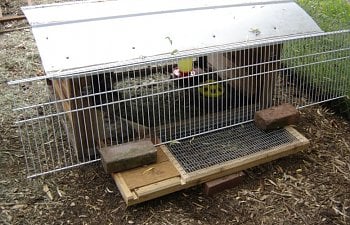
Week 4.5: Brooder is officially closed and chicks now spend their nights in the coop, inside a portable dog pen as they're not interested in roosting overnight yet. Chicks are now willing to eat fermented feed as well. To minimize the hens pestering them while they eat and drink, I've placed food and water on top of a chicken jungle gym that the hens aren't using, but the chicks like to play on. There's 2 other feeding stations as well, so they have options if the hens do hop up.
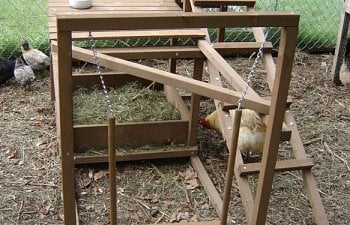
Week 5.5: The portable pen is gone and chicks are learning to roost. For their safety, the pop door is currently programmed to open earlier than usual, in case they need to put some distance between themselves and the adults first thing in the morning.
After just two days, the chicks have not only figured out how to roost, but are up on the top roost with the hens!
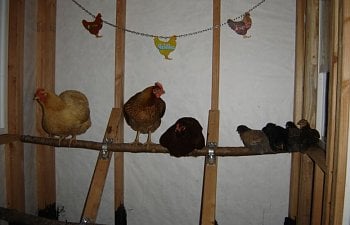
Obviously the two sub flocks still have a ways to go before they're on equal footing, but roosting was the last major hurdle in integration, so I'm very happy to have it resolved before week 6.
~2 days to ~1 week old: Chicks stayed in the brooder and adjusted to their new environment, while cranky hens adjusted to the presence of peeping newcomers.
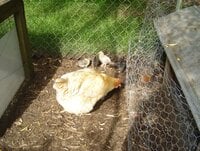
10 days old: Had a warm day (high of 69 F) so I enclosed the hens in half the run, opened the brooder, and then supervised chicks for an hour. Chicks came out with a little urging and enjoyed their first dust bath and even went under the split run fence to the side where the hens were. A couple of the hens approached to investigate, and chicks responded appropriately by darting under the fence (as seen in first photo below) when one hen pecked at them. I went ahead and set up the chicken wire mini run around the brooder. I plan to leave the brooder open from this point on as long as weather is good.
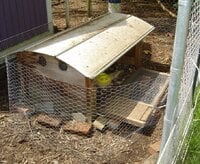
15 days old: Moved the brooder to the second/final location. I once again used the chicken wire mini run, but only long enough to safely teach the chicks how to use the wire closet shelf "panic openings" as seen in Week 4 from 2018. Once the chicks were reliably using the openings, I removed the chicken wire mini run entirely. The chicks and hens are now able to fully interact outside the brooder.
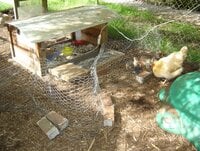
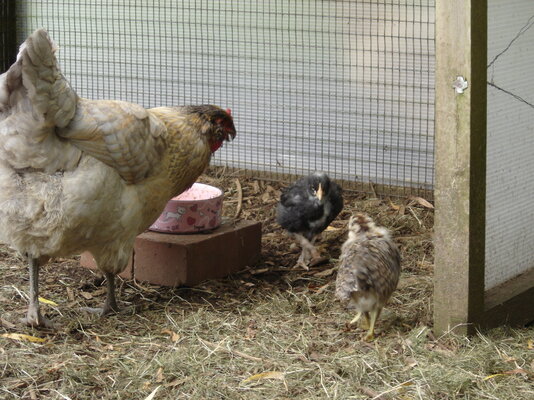
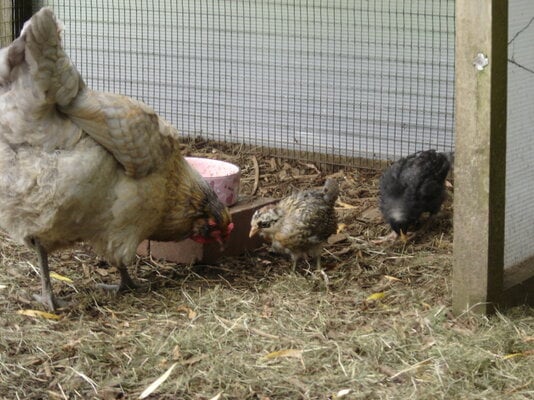
22 days old: Chicks and hens are interacting fairly well for the most part, able to share space and even food.
27 days old: Brooder is now closed. Mama Heating Pad has been removed and disassembled. Chicks will now have to rely solely on clutter to hide from hens if needed, and to provide shelter from rain. Nighttime lows are around 48 F, which should be no problem for them at this point.
To transition into the coop, the chicks will be placed in a small cage to protect them from any hen aggression in the early morning before the pop door opens. Cage will be removed once they show inclination to roost. I'm happy to report that only 24 hours after being introduced to the coop for the very first time, they have already learned to enter and exit the coop via pop door, eat at the flock's feeder inside the coop, and to return to the coop at dusk.
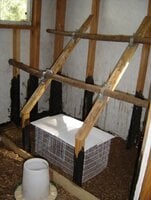
29 days old: Success! Chicks demonstrated today that they understand how to use the horizontal nipple waterer. Because the waterer is set so high above their heads, I used concrete blocks to build steps to it.
Even better, without any prompting from us or pre-training on a mini roost, the chicks put themselves on the roost at dusk this evening. Transition cage has been removed. Pop door again will be programmed to let them out early for a quick escape, if needed.
Thrilled to have shaved off over a week in getting the chicks to this stage, compared to 2018's more cautious chick integration.
Changing things up a little... covering 2024 in a brood along / integrate along thread, so folks can follow along as things happen: https://www.backyardchickens.com/th...egrate-along-from-feed-store-to-coop.1617102/
= = = = = = = = = =
OTHER EARLY INTEGRATION ARTICLES
- https://www.backyardchickens.com/articles/integrating-new-birds-at-4-weeks-old.72603/
- https://www.backyardchickens.com/ar...and-start-raising-your-chicks-outdoors.71995/
- https://www.backyardchickens.com/articles/my-coop-brooder-and-integration.74591/
- https://www.backyardchickens.com/articles/yes-you-certainly-can-brood-chicks-outdoors.68067/
