I just completed a new waterer for my 14 hens. I had some goals in mind. First, I wanted a waterer that only needed to be filled every month or so. Secondly, I wanted it to be minimum maintenance. Thirdly, it had to be visually appealing. I know obsessive, but even my hen house is automated with lights, an auto door opener, it is built to resemble a miniature red barn.
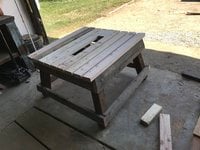
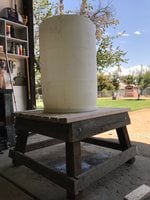
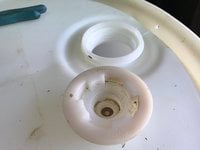
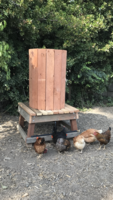
I will describe it briefly as it is pretty simple once you start building it. I used a 55 gallon food grade drum, a 30 gallon drum would work just as well. You want a drum with the caps that have a 1/2" pipe threads in the center. You knock the center out and plumb your piping into this port. Build a platform to your desired height as this will be a gravity fed system. Mine is elevated 18". The platform should be about 8" wider than the diameter of you barrel. This platform must be constructed to hold 400 to 500 pounds. I used 4X4 legs and 2X4's for all cross members and decking. You want to leave the center 2X4 out to allow for piping from barrel. using a hole saw drill a 1 1/4 hole in the bottom of the barrel, which for our application will become the top of our water. From one of the caps, punch out the center and thread a 1/2" short pipe nipple in to cap, then thread a 1/2" PVC union onto the nipple. Then screw an adapter into the union to go to glued fittings. I wont describe the plumbing for the nipples or bowls as this will be based on your preference. Cut to radiuses of thick plywood 2 inches in diameter larger than the diameter of you drum, which was about 25" for mine. You will ne to cut a circle out of one for the plumbing you just installed on the cap. Make sure you align the plywood radius so it is roughly center with the drum when marking this hole, also this hole should be cut significantly oversized to ease assembly (it won't be seen after assembly anyway). Now cut a hole in the other radius that aligns roughly with the hole you drilled in the opposite end of the barrel, which ultimate be the top of your waterer. Placed the radius you cut for the cap and the plumbing on the deck of your platform aligning the hole with the gap left in the platform decking, insure the radius is centered on the deck on all sides and screw down. Now place your drum on the platform with the cap plumbing protruding through the hole in the radius you just installed. Place the second radius on top of the drum aligning the hole in the plywood with the hole you drilled in the drum. Using cheap 6' by 6" wooden fence slats cut to 4" longer than you barrel is tall wrap the barrel with these wooden slats. The slats can be screwed into the plywood radiuses at the top and the bottom. Screw a PVC fitting into the hole in the top with a short nipple and cap for filling your water. drill small hole around the perimeter of the cap to allow for needed venting for the gravity system to work. Now plumb your watering nipples or bowls in per your own design. The water will sty tepid in the barrel, but any piping exposed to direct sun can cause hot water so keep exposed piping to a minimum and shades as much as possible. Your finished product should resemble a miniature wooden water tower. By adding a 32 ounce bottle of organic apple cider vinegar to the drum when filling it will prevent algae growth and is beneficial to my hens. This system should supply water to my hens for well over a month. Combined with my tredle high capacity feeder, I have minimum chores. I apologize for the length of this thread. This sounds complicated but really only took 1 day to build. Once you star it comes together pretty quickly.
Here are a few pics during construction, as requested. I will be adding a conical shaped metal roof to the tower and 2 black metal straps around the wood barrel soon. These items will on be for esthetics only. Note do not paint the PVC black as I did initially, it heats the water up excessively. I have since changed this. Hope this helps.
Attachments
Last edited:
