Advice/help requested - 8x8 shed to coop conversion

Pics

chickachickayea

Songster
Mar 25, 2016
422
179
166
LV, PA
I decided to bite the bullet and got my hands on an 8x8 shed to be converted into a coop. I will need all the help I can get, as I am not a builder (with the exception of canvas stretchers!) and am a total visual learner, so seeing other members builds/tutorials have been helpful!

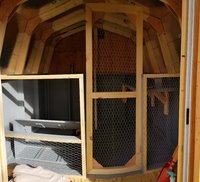
Here's the shed-coop:
20170629_130019-1.jpg


I have loosely mapped out the inside setup (this is not to scale :oops:). And of course have a long list of things I want to do, thanks to this awesome forum!

Sidenote: I live in Northeast PA and currently have 5 chickens.
Coop.jpg

- separate storage/"walk-in" area (studs+poultry wire+man door)
- 3 nest boxes that are accessible via "walk-in" area (although my hens have 3 now and only use 1, I like options lol)
- roost w/ pdz poop board/tray (set higher than nest boxes)
- pop door (auto is ideal, but $$. N-side is only available spot)
- predator proof with hardware cloth

20170725_165911.jpg

I have painted the "chicken area" inside with deck paint, along with the walls (not pictured).

I plan to make a DIY feeder as per instructions I've found on here & keep the main food/H20 directly outside under a sheltered area, as I've read it'll help reduce mess/spillage inside. Although what do I know, this will be my 2nd winter with chickens!

Planning on using solar power because I have no idea how we'd run electric to it. Last winter I used a long exterior extension cord from our garage to the coop for the water heater, but I'd prefer not to do that again if possible.

20170906_110543.jpg

I just got 2 of these to install (with YouTube help ) for more ventilation since the current gable vents are standard and insufficient, I'd like to replace those as well.

I think that is all for the inside... If any of you wonderful folks have any suggestions I am open to them! Any advice, help or "I wish I would've done this..." stories are all greatly appreciated! :)
 
It's cool you got a nice big shed. You could check out the coop pages to get some ideas. Ventilation and some windows, which I see you have for sunlight are always good to have.

I look forward to seeing how it turns out. I like to go in all those sheds at the Home Depot and try to imagine them as chicken sheds.
 
That's a good layout....you're going to love the space.

Biggest problem with prefab sheds is ventilation and lack of roof overhangs to protect installed windows and vents. Top hinged windows opening outward work well, but may be hard to access. Saw someone here rebuild same gambrel style roof with over hangs off both roof planes for double eave vents, was pretty slick but major construction. Wish I had saved a link to the thread as I can't find it now. Your 5 birds in that large space will reduce your ventilation needs, so that's a good thing.

Not sure solar will heat a waterer, might have to go with extension cord.
I've used one for 4 years. The separation wall will make if safer too as the birds have way less access to the wiring. A heated nipple waterer will make keeping water in coop a much better proposition, a little drippage rather than any major spills and no evaporation issues. Feed and water in coop will be better for birds and keeper, especially during nasty winter weather.

Where did you put the new windows?

ETA:Thought this might help:
Here's my theory on the 'stack up' aspect to coop design:

Bottom of pop door is best about 8" above floor so bedding doesn't get dragged out of coop.

Nice to have bottom of nests about 18" above bedding to allow use of that floor space under them(doesn't count if your nests are mounted on outside of coop).

Roosts are best about 12" higher than nests so birds won't roost(sleep) in nests and poop in them, if you use poop boards under roosts it will also 'stretch' your floor space.

Upper venting works best as high as possible above roosts so no strong drafts hit roosts in winter...and hot/moist air and ammonia can rise and exit coop.

Ah! @aart ! I feel like I'm having a celebrity moment! Thank you for commenting and the points made above! :bow

I've been wanting to go bigger because currently I have to crouch into the run, and the coop I have now is one I bought at Tractor Supply (back when I was so uninformed...). My chickens are definitely more like pets, and I wanted a bigger and better space for them, so I'm trying to start over and do it right :) And of course, there's the potential for chicken math!

I was aware of the shed's mediocre ventilation when we went to look at it, and so had already planned to add ventilation somehow. I did get those small 2 hinged windows to install (have not done it yet - also need to google how to install window into shed lol) I'm thinking on the N & S facing sides to create a cross-breeze, as we are set on top of a hill and get a good amount of wind daily. But with that I worry slightly about cold temps, so I've not entirely made up my mind on placement yet... But I definitely would like to replace/expand the current gable vents that are on the shed to aid with ventilation up high. I was looking into possibly buying actual vents from Lowe's/HD or cutting the hole wider and securing with hardware cloth (I have 1/2" & smaller) and a frame.

I bought the heated water bowl out of complete desperation in winter last year. I'm going to make a DIY bucket nipple waterer using horizontal nipples, so I may be using your tutorial for the heated part! I'm just really unsure of how to get electric out there, unless we hire someone to do it, or use an extension cord again...

You're right, I'll be better off keeping the food/water inside. That way it stays dry and unfrozen and they have easy access to it, and it's also closed off to whatever may lurk in the night.

I did NOT even think about how high to have the coop door off the floor! I thought about having wood or feed bags to block off the bedding from the storage area, but wow... That's why I posted! ;)

I did think about the heights of the boxes & roosts... However I do have 1 Silkie along with 4 LF (my GLW can jump/fly to 4'!), so I worry about her being able to hop up, especially since she's been sleeping in her nest box since she was a chick (I know, they're not supposed to do that... :oops:) So I figured I will have to make ramps for the boxes & roosts.

Ah thank you so much again! I definitely appreciate it! I may need your expert advice when it comes to attaching the run! :lol:
 
Okay here's my progress so far...

20170910_171812.jpg

IMG_20170910_174851.jpg

20170910_172617-1.jpg

20170910_172551-1.jpg


Might not look like much, but whew! I do feel accomplished. Still have quite a bit to go yet.

Walls are just uprighted for photos and visualization purposes. I may add brace/support bars to them. The nest box still needs finished, that's tomorrow's goal. It fits pretty snugly in the left side partition wall (seen in 2nd pic). Vertical studs will be added when I get to the door.

I underestimate how quickly I can work and how much I can get done in one day :lol: This is my first time building anything substantial like this, so I'm trying to take my time to avoid mistakes! But I am honestly pretty pleased with what I have so far :yesss:
 
Only 1 progress pic because that door and poop board were giving me a bit of a hard time! Measure twice, cut once. ...multiple times. :lol: :he

IMG_20170916_092006.jpg


Still trying to figure out the nest box door. I really don't want a top hinge mount so it's easier to clean and saves space, so I need to figure out my dremel tool for routing a sliding-style door.

Also I measured the space for the new run and it's about 14'x20' :O

I'm hoping I can make more progress and share photos this weekend!
 
Oookay thanks to work, life and chicken ordeals, here I am 1 month later, finally really getting things together! :bun While I wish we had fall weather, I'm somewhat glad to have been given extended summer-like weather so I can get this finished before it's too cold!

20171018_122538.jpg

Poop board, check! (Pictured with my lovely new toy, my impact driver :love)

20171020_155816.jpg

1 chicken ladder to poop board, check! I will have to make 1 or 2 more for my little Silkie.

20171021_152708.jpg

Roosting bar fixed on poop board, check!

20171021_151353.jpg

Walls in place (not yet screwed in) but here's where I run into a sliiight problem... the door is about 1/8" too wide for the space between the walls. :he *deep sigh* SO I'm trying to figure out the easiest solution... I'm limited on the tools that I have, and definitely don't have any wood working tools such as a planer... Any ideas? :confused:

I caulked most of the pieces and used deck paint on everything to help a bit with durability and for cleaning purposes - except for the side of the walls facing the camera because I stapled the wire on before I decided to paint... oops! :lau
 

Attachments

  • 20171021_151353.jpg
    20171021_151353.jpg
    617.1 KB · Views: 5
WooHoo move in day!!


BTDT...not the cockbird, but other birds, until they figure out were the mesh is...
.... it is kinda hard to see. They'll figure it out.

It almost never ends.

You know that mesh on the run roof is not going to withstand much if any snow load, got any upgrade plans??

You might need some higher fronts on the nests.

What do you have for ventilation?

I need to add the window :oops: I'm seriously planning on doing that tomorrow! I cut the door out so my fear of cutting holes into the shed side is over! :lol: My fiancée was very skeptical about that, until he saw it all put together and the doors closed he said "Wow it is really dark in there." See I know what I'm talking about sometimes! :p I also saw some DIYs where you cut horizontal "strips" and add HC over, and can add the board with hinges back over top to close if needed. So that could be another possibility...

We will watch and see what happens with the mesh... We left some slack for snow load, and have a 10' pole to put in the center when needed. We didn't have any trouble last year with our blizzard, and from having the pheasants a few years back, boy do we know how bad it can get sometimes... I also have extra netting in case we run into any hole troubles. I originally wanted an actual roof, but it just wasn't in the budget. So we're playing it by ear.

The nest box was pretty much my arch nemesis this entire time :he:lol: The back isn't flush, so flakes will very likely be falling out, so I may fix it up at some point.
 
That's a good layout....you're going to love the space.

Biggest problem with prefab sheds is ventilation and lack of roof overhangs to protect installed windows and vents. Top hinged windows opening outward work well, but may be hard to access. Saw someone here rebuild same gambrel style roof with over hangs off both roof planes for double eave vents, was pretty slick but major construction. Wish I had saved a link to the thread as I can't find it now. Your 5 birds in that large space will reduce your ventilation needs, so that's a good thing.

Not sure solar will heat a waterer, might have to go with extension cord.
I've used one for 4 years. The separation wall will make if safer too as the birds have way less access to the wiring. A heated nipple waterer will make keeping water in coop a much better proposition, a little drippage rather than any major spills and no evaporation issues. Feed and water in coop will be better for birds and keeper, especially during nasty winter weather.

Where did you put the new windows?

ETA:Thought this might help:
Here's my theory on the 'stack up' aspect to coop design:

Bottom of pop door is best about 8" above floor so bedding doesn't get dragged out of coop.

Nice to have bottom of nests about 18" above bedding to allow use of that floor space under them(doesn't count if your nests are mounted on outside of coop).

Roosts are best about 12" higher than nests so birds won't roost(sleep) in nests and poop in them, if you use poop boards under roosts it will also 'stretch' your floor space.

Upper venting works best as high as possible above roosts so no strong drafts hit roosts in winter...and hot/moist air and ammonia can rise and exit coop.
 
We are on the same page ;)

Top hinged windows are best opened to the outside, to deter with rain infiltration, especially where there are no roof overhangs, and to not add interior obstructions or landing/perching places. But that window is so small and your coop is roomy it might not matter and it will be easier to install with window opening to the inside.

Poop board/roost will need to be attached to stud, but size does not have to match studs. I built simple support attached to studs. Poop board bottom is luan and is lined with heavy duty vinyl held down with corner trim. Poop board itself is just tacked thru back edge into stud in 2 places.
full

full


I built my roosts to be removable but found I didn't need to remove them to clean.
Can reach under the 8" clearance with hoe and sifter basket.
http://www.backyardchickens.com/t/6...raphic-gross-poop-pictures/1100#post_13179595

The never ending debate about what size to use for roosts goes on and on,
my advice is use what you want. My birds roost on the 3.5" of a 2x4, and on the 2x2 edge of poop board, and on the poop board itself. Never had toes freeze or damaged tendons or broken keel bones.

They probably will try to land on those ledges....good thinking.
Chicken wire would be better...or, oh!, even maybe just a couple strands of wire at 3-4 and 6-8" above the ledge would deter their landing there and would not collect debris.

Oooh yes I looked through your coop build before while creating my wishlist! That picture is helpful! Is the vinyl just flooring vinyl like what you used on the coop floor? Also I've gotten used to squeezing the upper half of my 5'4" frame into their tiny TSC coop for cleanout, I think I'll be able to easily handle a hip high poop board! :lol:

The wire strands is a great idea - kind of like what you do to deter birds from flying into pens or unwanted areas. I saw this done at a hotel pool once, they used to have a terrible seagull problem (I had one swoop down and snatch a chip from my hand!) but the strands deter them, with the exception of sneaky little sparrows... Anyway! Good idea. I'll have to try and see what happens!

Okay I edited my original drawing, I think I understood your window placement suggestion correctly? Let me know otherwise!

Coop (1).jpg


I also tried to make things slightly more accurate scale-wise... :oops:
 
You haven't really mentioned it yet, but how are you planning on seating the shed? On a concrete pad, blocks, etc? Ground contact will shorten the life of the shed. We have horrendous termite issues here in Southern Missouri, so wood on the ground is virtually guaranteed to have termite damage within a year.
Shed looks good though, the wife wants one of the pink ones from the shed place here in town... will have to keep her from seeing your finished product.

Ah! The shed is set up on a 9'x9' pad of 3 tons of tamped 2B modified stone approx. 4" deep. :thumbsup

You know what they say... Happy wife... ;)
 

New posts New threads Active threads

Back
Top Bottom