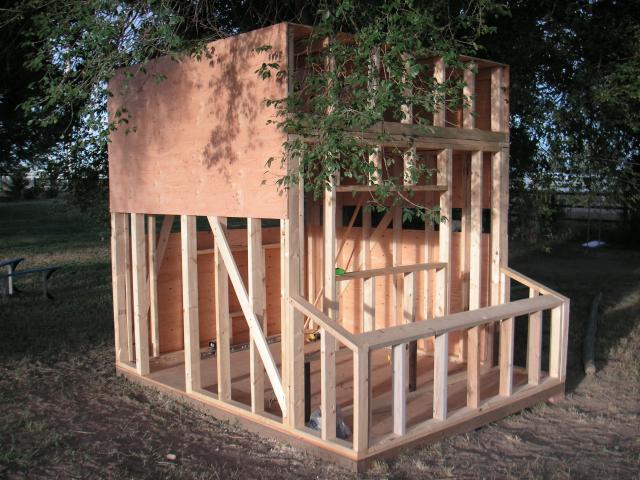
Chicken Coop stability issues

Quote:
I rest my case!

tongue.png
yes, though neither of those items are supposed to be direct exposure applications. Below is a link to publications from the Building and Construction Technology Department of The University of Mass, Amhearst. I think it gives a fair summation of the properties of OSB.

http://bct.eco.umass.edu/publications/by-title/choosing-between-oriented-strandboard-and-plywood/

For those who do not wish to delve that deep, here is an excerpt of the above paper which mimics my personal experiences:

"Performance is similar in many ways, but there are differences in the service provided by osb and plywood. All wood products expand when they get wet. When osb is exposed to wet conditions, it expands faster around the perimeter of the panel than it does in the middle. Swollen edges of osb panels can telegraph through thin coverings like asphalt roof shingles.

The term ghost lines or roof ridging was coined to describe the effect of osb edge swelling under thin roof shingles. The Structural Board Association (SBA), a trade association that represents osb manufacturers in North America, has issued a technical bulletin outlining a plan to prevent this phenomenon. SBA correctly indicates that dry storage, proper installation, adequate roof ventilation and application of a warm-side vapor barrier will help prevent roof ridging.

Irreversible edge swelling has been the biggest knock on osb. Manufacturers have done a good job of addressing this issue at the manufacturing facility and during transportation by coating panel edges. But the reality is that builders don’t limit osb use to full-sized sheets. The edges of cut sheets are seldom if ever treated in the field. Houses under construction get rained on. And if you use osb in an area of very high humidity, like over an improperly vented attic or over a poorly constructed crawlspace, you are asking for trouble.

Osb responds more slowly to changes in relative humidity and exposure to liquid water. It takes longer for water to soak osb and conversely, once water gets into osb it is very slow to leave. The longer that water remains within osb the more likely it is to rot. Wood species has a significant impact. If osb is made from aspen or poplar, it gets a big fat zero with regard to natural decay resistance. Many of the western woods used to manufacture plywood at least have moderate decay resistance.

In the past we’ve heard that walls in many Southeastern homes covered with the Exterior Finish and Insulation System (EIFS) were rotting. Rigid foam insulation was applied over osb and coated with a stucco-like covering. When the exterior foam boards were removed, wet, rotted, crumbling osb was exposed. Osb was slammed in the press. The problem really isn’t osb’s fault. All cases I’m familiar with were caused by improper installation of flashing or protective coverings."

and so,....
cool.png
 
Hi All - thought I'd post my progress to date and how it affected the stability issues which started this thread. I ended up putting in wind braces on three sides of the coop. That made a big difference on those sides and made the coop much more rigid. After some of the plywood siding was installed, the coop became even more sturdy. The only issue remaining is the non-reinforced side - where the nesting boxes will be. That side still has a lot of give - just as the other sided did before the bracing and siding. Because of the design, there isn't much room for a wind brace so I'm hoping the siding will be enough.

Thanks again for everyone's input and help on this thread.

103219_pict0688.jpg


103219_pict0689.jpg
 
A small 45 degree piece between the corner stud and the next one over will help alot. It can be 12-18 inches long as long as it is nailed to top and side piece (it makes a triangle) in the corner.
 
Just put up the siding it will firm up. My coup was wobbly just like yours and once I put on my siding it was very solid. I used fiber board siding and not CDX so yours with 3 sides of metal wind brace and cdx plywood for siding is going to be ready for tornado season! Also if you plan to finish the inside that too will provide a lot of support.
 
Quote:
=================
Hi
You need more horizontal bracing between the uprights. Cut some 2x4 braces to fit firmly & horizontally between the uprights. Space them at different
heights about 1/2 way down between the 1st pair of veritcal studs; then , then 5/8 way down
the next pair of vertical studs; then 1/2 way up the next pair of vertical studs; , then 5/8 way
down between the next pait of vertical studs studs. if you do it this way, you won't have to
screw them in at an angle to avoid the next brace.
Best Regards,
Karen Tewart
 
Thanks for the advice - wish I'd have known that before I installed diagonal wind braces. But i'm learning a lot on this forum.

Now I have one last problem. This picture is of the nest box side of the coop.

103219_pict0711.jpg


The top lid flips upward to rest against the wall and provide access to the nest boxes(blue arrows). Unfortunately, the depth is a little bit more than I can reach bending over the rail. I cut the vertical wall in half and added hinges to allow the doors to open like french doors (red arrows).

The problem is, this was a departure from the original design and the french doors are heavy enough that they pull on the side supports in a direction shown by the green arrows. This makes the opening and closing of the doors very difficult.

Does anyone have a recommendation on how to fix this? If those side supports didn't move inwards, the doors would actually open and close fairly smoothly.
 
Did you use diagonal boards to support your vertical boards? How far apart did you space your vertical boards? You can add smaller horizontal boards between your vertical boards to add stability. You should do this under your floor also so that you floor won't sag. Good luck!!!
 
what does the inside of the nesting boxes look like? If possible i would suggest putting a board in the area as a sort of raised floor, that way you don't have to use the french doors.
 
you are really moving right along on it! Love it! It is looking great! Some times I really have to sit and think about some of the problems I run into. I'm sure it's all going to work out for you, sounds like everyone has great ideas.
 

New posts New threads Active threads

Back
Top Bottom