Would it be better to place the light bulb heat source on the bottom of the incubator or the top? And what would be the best place to connect my humidity pump to my incubator?
Would it be better to place the light bulb heat source on the bottom of the incubator or the top? And what would be the best place to connect my humidity pump to my incubator?
I plan to do 8 trays. Each tray will hold 30 eggs. I estimate each tray loaded with eggs will weigh around 5 lbs each. So 5lbs * 8 = 40lbs. I will be working of my racking system once I have the motor I finally decide to go with and the wood. I'm debating on either of these two turners:
Both cost the same price:
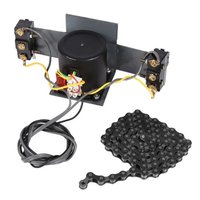
First one is a turner with a chain. I have no clue how to use it or wire it up. It ships from China and will take 1 month just to get here. It's ebay ad's name is
"220V Egg Turning Motor System Industrial Automatic Incubator With 100cm Chain ES"
No clue how strong it is, but I see it used in a lot of videos.
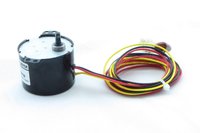
Second Turner.
High Torque (60lbs/in) (So it can work perfectly for my setup.)
Cabinet Egg Turner Motor 1 RPM
Hole in Shaft for easy Turner Shaft Linkage
Works with IncuStat Advanced & IncuKit XL Advanced
Incubator Warehouse 1 Year Hassle Free Guarantee
Can get to me in 1 week.
But I also don't know how to use it either.
Just some notes and comments.
My failed attempt that you may find usefull.
Either way, IMO your selections is a bad set up.
The 220 v, chain,switchs and motor you show..... will not work in the US as China uses 220 v on one line (think about a US 110v 2 prong lamp cord), The US 220v (3 wires "think cook stove cord") and uses two lines L1 and L2 (plus a neutral) to get 220 v. In the US, each line (L1 & L2) carry 110 v (110v * 2=220v) and the 3rd "US" wire is neutral creates the flow of return electricity.
It will run, but since it is only possible to hook it up to 110v (US) it will not have the same torque power as its only getting half the require voltage. Basically your trying to fit a sqaure in and round hole with that motor.
The second motor (another fail).....is a 110v forward- reverse/ left right- CW/CCW motor and you can use it but its not adiquate and you will have problems with it at every turn. To save yourself some time and weeks of effort only to be disapponted when you incubate, go to the Grainger link below and order you a new (the right) motor, and scrap the idea of the motor you show.. or use it for some light duty hobby purpose as it is a strong motor for its size. Just not designed for what you need! Then start reading my recomendations below.
I cheaped out and bought one myself and ended up having to motify for the right motor. For 40 lbs of eggs. Mine would never lift more than 25lbs before it started clutching, slipping and reversing as its a matter of weight distribution and leverage.
Plus you are not considering the weight of the wood frame or friction at the swivle and pivots as well. Also to mention wood swelling as its retaining moisture thus making it more heavy and not to forget murpheys law.
Thus the reason I went all Aluminium angle and flat stock.
My Recomendation......You should really (buy American ) step up the motor and Torque to at least 100lb/in and I would recomend Grainger (Shaded POLE) as they have one that is being discontinued (but in stock) and on sale as of (6-9-2018) for about $40. It will last years not months like the one you show!
I bought 3, a 1-200 and 2-100 (lb/in) just as backups so I will be dead before I use them all.
If you can afford it I would beef it up to the 200lb/in motor ($120) and you know it will do the job ((((and you will have some swing arm lenght to play with as well)))! The link below list all I have mentioned and more so check out the shaded pole motors. Oh yeah.... Grainger will ship to your house in about 3 days, not 30 to 50 days later (like china post) and there is No doubt they will work in the US ON 110v. lol
As for the turning arm/swing arm for the grainger (dayton) motor:
I brazed one up in a matter of minutes using some 3/4" inch steel flat bar (thickness 1/8") x 3" to 4" long. For the shaft to flat bar connection I used a long 3/8" hex-nut "connector/coupling nut" (used to join all thread) and brazed it to the flat bar as to attach it to the motors D-shaft.
Before brazing, I drilled out the threads of the Hex nut (prior) to a hole size of 0.375 (if I remember correctly) as to match the motors D-shaft diameter. Then I drilled two holes (cross fire) through the hex nut for a set screw (tapped it) and spring pin. Then I aligned the spring pin hole on the moters D-shaft and drilled through the shaft as to give it extra strength in case the set screw backed out, slips or stripped and it gives it all the holding strenght it will ever need. Its best to thread/tap the set screw first and tightent it down on the shaft before you drill the shafts spring pin hole (1/8 hole) so it wont move around.
Or you could just by some cheap made swing arm from GQF for the sportsman 1500. But it looks like it will not last long and considering you might need a longer or shorter custom length arm....well its your call. http://www.gqfmfg.com/cabinet-model-parts/3028-swing-arm-w/cam/ http://www.gqfmfg.com/cabinet-model-parts/3028-swing-arm-w/cam/ Either way you will need a 3rd arm (a pivot arm point) between the swing arm and the turning racks vertical connection bracket as it will change positions (left to right as it moves up and down), but I will leave you to rig that up and figure the linkage length. Just think about an old steam engine trains wheel and how it drives as the wheel rotates and you will see what I am attempting to explain.
Just remember to get the lift and 45 degrees angle on each end of the turning rack, the swing arm is half the length to center to get the total lift and back down. As the motor turns the swing arm to 6:00 and 12:00 oclock. (making it half the lenght).. it doubles the total length and lift. Example (4 inces at 6:00 (turn +) 4 inches at 12:00 = 8inches lift.


")

 ) step up the motor and Torque to at least 100lb/in and I would recomend Grainger (Shaded POLE) as they have one that is being discontinued (but in stock) and on sale as of (6-9-2018) for about $40. It will last years not months like the one you show!

 Picture Of The Week (POW) Information & Submissions


 BYC's 52-week Photography Challenge. Week 5: (Feb 2 - Feb 8, 2026) Theme: Nature
 Question of the Day - Friday, February 13th, 2026