Since I have a chronic disorder of incubating WAAAAYYYY too many chickens and needing more space than what I have, I was not too shocked when I realized on Monday that my little chicks were getting too big for their current brooder. What, oh what could I do as a lonely housewife, chicken lady and horse farmer? Husband was far away, my favorite power tools had been left at the family cottage an hour away and I was desperate. So I put on my favorite A-Team Soundtrack, chewed on a pepperoni stick as if it were a cigar, and started to think
and before I knew it, 2 days later, the project was completed! For all you lonely housewifes wanting to build something while hubby is gone, here is my plan:
You will need:
About 8 2x4x8, maybe an extra one in case you cut wrong
A roll of Hardware cloth
Chicken wire staples
A good hammer
A halfway decent drill
Bolts or square head screws with coordinating drill bits
A skill saw
Some long (2.5in I think) nails
Some plywood for the bottom
So I started out deciding how big it was going to get. I decided for 4ft on the long side and 2ft on the short side (give or take the width of the 2x4 that it was going to be connected to since the 2ft sections were on the inside). I cut 2 pieces of 2x4 to 4ft length and the leftovers I cut into 2 pieces at 2ft each. I laid those onto their short sides (to create a nice barrier for chicks that love to throw sawdust all over kingdom come) and I used the long nails to temporarily hold everything in place. It helps if you have a big brick behind the boards you are nailing into to keep them from sliding while you are hammering. It also helps if you weigh them down with your own weigh or push them against a firm wall. So before I knew it, I had my bottom part done (without the bottom board). Now I had to figure out how I was going to build the top. I decided to keep the brooder as airy as possible so in order to have good airflow, I wanted to have as much hardware cloth around it as possible. To do that I built another 4ftx2ft section, did the same steps as above and that would be my top part. To connect those 2 pieces I had to think of some support beams so I cut myself 4 43in (dont ask me why I chose 43in but it did come in handy) long pieces of 2x4 which I bolted into each corner of my bottom section. For those of you that use old bathtubs for watering thoughts, it is the same principle as the frame to hold the tub in place. Once I had all supports firmly bolted in, I put some bolts into each corner section to connect the 2x4s that I had originally connected with long nails. I like to have extra support whenever I can. So next I turned my construction around so that it would sit on the 4 43in long support beams that I had just installed. I placed it right over the top part and made sure that everything would line up. Once everything was in place I bolted the support beams into the corners of the top 4ft by 2ft frame. Once done my chick brooder started to look like a cube

Now all I had to do was to grab some hardware cloth and start attaching it around the cube, since my door was going to be on the top. This way the chicks would have airflow from each direction. I soon realized that doing the 43in length was a blessing because the hardware cloth was double as wide, hence I would be able to use it again on another brooder if needed. I always hate wasting materials and this way nothing got wasted. Once I had the hardware cloth firmly secured around the cube I started to work on the top. Again, I wanted to make it as airy as possible. I did the same principle again as with the top and bottom parts, except that I used the flat side of the 2x4s. 2 pieces of 4ft 2x4 and 2 pieces of I believe 20in of 2x4. You will have to measure how long it has to be. Connected them with the long nails (I chose not to use bolts for the top) and placed hardware cloth over it. I nailed some leftover scraps of 2x4 in the corners for extra support. Now all that was left to do was to cut some plywood for the bottom and I was in business. I originally thought about putting hinges on the opening door on top but since it is so heavy I decided against it for now. If you do want to add it, that would be easy to do.
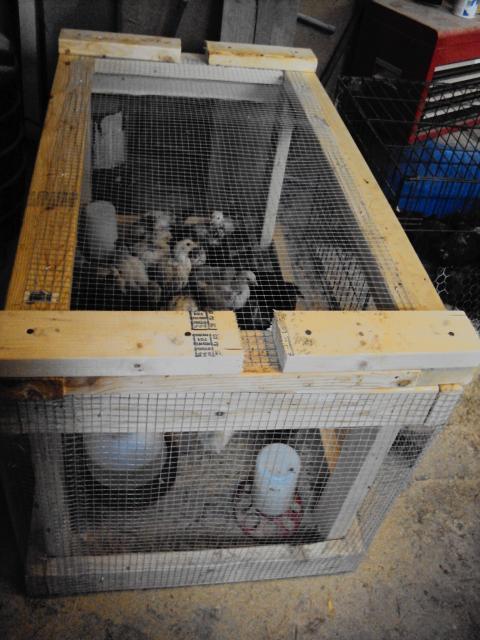
And here are my pictures. I will be sure to take step by step pictures next time. Between those two days it only took me about 4hrs to put it together. Since I did not have my good tools on me it may take me much less time next time. Just be sure to pre-drill the 2x4s before bolting them otherwise it will strip the wood. I hope you enjoyed my idea of a quick fix chick brooder. I will think about adding a nice little roost for it tonight.

You will need:
About 8 2x4x8, maybe an extra one in case you cut wrong
A roll of Hardware cloth
Chicken wire staples
A good hammer
A halfway decent drill
Bolts or square head screws with coordinating drill bits
A skill saw
Some long (2.5in I think) nails
Some plywood for the bottom
So I started out deciding how big it was going to get. I decided for 4ft on the long side and 2ft on the short side (give or take the width of the 2x4 that it was going to be connected to since the 2ft sections were on the inside). I cut 2 pieces of 2x4 to 4ft length and the leftovers I cut into 2 pieces at 2ft each. I laid those onto their short sides (to create a nice barrier for chicks that love to throw sawdust all over kingdom come) and I used the long nails to temporarily hold everything in place. It helps if you have a big brick behind the boards you are nailing into to keep them from sliding while you are hammering. It also helps if you weigh them down with your own weigh or push them against a firm wall. So before I knew it, I had my bottom part done (without the bottom board). Now I had to figure out how I was going to build the top. I decided to keep the brooder as airy as possible so in order to have good airflow, I wanted to have as much hardware cloth around it as possible. To do that I built another 4ftx2ft section, did the same steps as above and that would be my top part. To connect those 2 pieces I had to think of some support beams so I cut myself 4 43in (dont ask me why I chose 43in but it did come in handy) long pieces of 2x4 which I bolted into each corner of my bottom section. For those of you that use old bathtubs for watering thoughts, it is the same principle as the frame to hold the tub in place. Once I had all supports firmly bolted in, I put some bolts into each corner section to connect the 2x4s that I had originally connected with long nails. I like to have extra support whenever I can. So next I turned my construction around so that it would sit on the 4 43in long support beams that I had just installed. I placed it right over the top part and made sure that everything would line up. Once everything was in place I bolted the support beams into the corners of the top 4ft by 2ft frame. Once done my chick brooder started to look like a cube
Now all I had to do was to grab some hardware cloth and start attaching it around the cube, since my door was going to be on the top. This way the chicks would have airflow from each direction. I soon realized that doing the 43in length was a blessing because the hardware cloth was double as wide, hence I would be able to use it again on another brooder if needed. I always hate wasting materials and this way nothing got wasted. Once I had the hardware cloth firmly secured around the cube I started to work on the top. Again, I wanted to make it as airy as possible. I did the same principle again as with the top and bottom parts, except that I used the flat side of the 2x4s. 2 pieces of 4ft 2x4 and 2 pieces of I believe 20in of 2x4. You will have to measure how long it has to be. Connected them with the long nails (I chose not to use bolts for the top) and placed hardware cloth over it. I nailed some leftover scraps of 2x4 in the corners for extra support. Now all that was left to do was to cut some plywood for the bottom and I was in business. I originally thought about putting hinges on the opening door on top but since it is so heavy I decided against it for now. If you do want to add it, that would be easy to do.
And here are my pictures. I will be sure to take step by step pictures next time. Between those two days it only took me about 4hrs to put it together. Since I did not have my good tools on me it may take me much less time next time. Just be sure to pre-drill the 2x4s before bolting them otherwise it will strip the wood. I hope you enjoyed my idea of a quick fix chick brooder. I will think about adding a nice little roost for it tonight.


