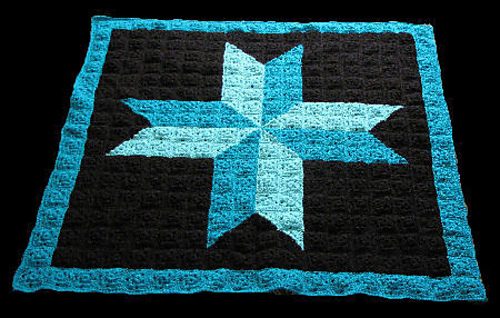
AMISH STAR CROCHET LAPGHAN
Approximate finished size 46 " x 46 "
ABBREVIATIONS
beg - beginning
ch - chain
sp - space
sl st - slip stitch
sc - single crochet
dc - double crochet
BLO - Back Loop Only
RSC - Reverse Single Crochet
Here's the directions for the squares
SOLID COLOR GRANNY
Finished square measures approximately 2 1/2”
With size G hook, ch 4, join with a sl st to first chain to form a ring
RND 1: Ch 3, 2 dc in ring, ch 1, (3 dc in ring, ch 1) three times, join with sl st to top of
beg ch 3.
RND 2: Ch 3, turn, 2 dc in first ch 1 sp, ch 1, 3 dc in same ch 1 sp, ch 1 (3 dc, ch 1, 3 dc,
ch 1) in remaining 3 ch 1 sps, join with sl st to top of beg ch 3, finish off, weave in loose
ends
BI-COLOR GRANNY
Finished square measures approximately 2 1/2”
With size G hook, Ch 4, with main color, join with a sl st to first chain to form a ring
RND 1: Ch 3, 2 dc in ring, ch 1, 3 dc in ring, drop main color but DO NOT cut,
pickup second color, YO draw through loop on hook, 3 dc in ring, ch 1, 3 dc in ring,
ch 1 , join with sl st to top of beg ch 3
RND 2: Turn, sl st in first ch 1 sp, ch 3, 2 dc in same ch 1 sp, ch 1, (3 dc, ch 1, 3 dc) in
next ch 1 sp, ch 1, 3 dc in next ch 1 sp, drop second color, pick up main color again,
YO draw through loop on hook, 3 dc in same ch 1 sp, ch 1, (3 dc, ch 1, 3 dc) in next ch
1 sp, ch 1, 3 dc in last ch 1 sp, ch 1, join with sl st to top of beg ch 3, finish off, weave in
loose ends
Materials NeededModel was stitched using "I Love This Yarn" available at all Hobby
Lobby stores)
18 oz Peacock worsted weight yarn
7 oz Light Turquoise worsted weight yarn
27 oz Black worsted weight yarn
Size "G" crochet hook
Tapestry needle
Assembly
Using Tapestry needle and appropriate color yarn and whip stitching through Back Loops
Only, assemble the squares using the diagram below as a reference.
BORDER
Rnd 1: With Peacock join with a sl st to any stitch along edge. Ch 1, hdc in same st as
join. Hdc evenly along all four edges of quilt, working (hdc, ch 1, hdc) in the corners.
Ch 1, turn.
Rnd 2: Rsc in each hdc around all four edges, working (rsc, ch 1, rsc) in the corners.
Finish off. Weave in loose ends.
Every effort has been made to ensure the accuracy of these instructions. We cannot be
responsible for human error, differences in individual stitching techniques or
typographical errors.
Copyright 2008 C.L. Halvorson
299 TREES....thats alot! What kind are you getting? I can remember when we planted quite a few, can't remember the exact amount but all we did was, take a shovel, poke it in the ground and then slide the tree inside the slit. Worked quite well. Have fun.
299 TREES....thats alot! What kind are you getting? I can remember when we planted quite a few, can't remember the exact amount but all we did was, take a shovel, poke it in the ground and then slide the tree inside the slit. Worked quite well. Have fun.
250 are mixed trees, pines, and other native trees to this area, they were donated to me by the NM Forestry seedling sale. The other 49 are Pinon Pines, I didn't need that many but that is how they are sold.
250 are mixed trees, pines, and other native trees to this area, they were donated to me by the NM Forestry seedling sale. The other 49 are Pinon Pines, I didn't need that many but that is how they are sold.
Good for you. The people who owned the lot nextdoor, which we now own, cut all the trees years ago and just left the cuttings and a mess. Why I have no idea. None are Pines but what a waste. I'd like to replant some of it but can't afford it.
I have another neighbor who has cleared his land and mows it all summer. He doesn't use it for anything just cleared it and left it.
 Model was stitched using "I Love This Yarn" available at all Hobby

 299 TREES....thats alot! What kind are you getting? I can remember when we planted quite a few, can't remember the exact amount but all we did was, take a shovel, poke it in the ground and then slide the tree inside the slit. Worked quite well. Have fun.

")
