Originally, I wanted to build my own brooder for out in the barn so that I wouldn't have to borrow a neighbor’s anymore. Three cats & three dogs at home - and me at work all day made the idea of brooding in the house a no-go. Last year I borrowed one that was essentially a big, long box on legs. Easy-peasy ….. I thought.
Gonna need:
- Crate (with legs and door added)
- A way to hang a lamp
- Room for feed & water
I salvaged a big shipping crate from work thinking that I could simply add legs and be good to go. But then, just before I was going to start on it, another friend offered me two Jersey Giant mix hens. Well, WHO could refuse something like that? But… where to keep them for the recommended quarantine time? That was where things started to get a little out of hand.
Now Gonna need:
- Crate (with legs and door added)
- A way to hang a lamp
- Room for MUCH more feed & water
- Roost
- Nest box
- Run of some sort
So here’s how it went.
I took the old crate that was going to be a low, square brooder with lots of floor space and turned it on its side – because the hens wouldn’t even be able to stand in it otherwise. I don’t know what was shipped in it, but there is a bunch of blocking and bracing attached to what was the bottom and I couldn't get them off. Figured they wouldn't hurt anything so I left them there.
After zero planning and just a little bit of work, it had legs which gave it clearance of 24” underneath.
All I did was take some left over 2x4's and cut them to 36". Then, while the crate was laying on it's back, attached them so all the legs were 24". Standing it up was the hardest part.
I took the old lid and cut a strip off so that there would be something across the bottom to keep the bedding (and any little chickies) from falling out. Then I cut 1/3 off of the remaining piece to become a wall. Once I had another piece of 2x4 nailed across the opening, I could attach this smaller piece to be the wall where the roost/nest box would be. The last piece became the door. I even got all super-dooper and added a wire ‘vent’.
I didn’t realize it at the time, but almost everything I had done other than hang the door was going to be a problem.
I shoved a wheelbarrow under it and managed to move it (HEAVY!) into the barn to dry out from the weeks of rain it had been soaking up.
.. you might be able to tell here that the legs on the left are attached to the sides of the crate, and the legs on the right are attached to the ‘pallet’ that used to be the bottom of the crate and that is smaller than the crate itself. Problem #1 - one set of legs is about 6” wider than the other. LOL
A couple of weekends later, it was still raining so I painted the inside which brightened things up a good bit. The next day it stopped raining so I moved it back outside and started to frame up a run …. again, with almost zero planning……
All I did was to nail 12' 2x4's to the top and bottom of the legs - sort of a connect the dots. Then I added short pieces between the legs and to make a square at the ends of the long sides. The sloped part was really tricky and although it finally worked out, the angles are pretty ugly.
Well, as it turned out, adding those legs at 2 different widths means that the far end of the run doesn’t have a snowball’s chance of coming out square… not that it would matter since, as far as I can tell, there isn’t another single square angle anywhere else on the thing. Also, it started to rain again and guess what? That super-dooper vent means that the inside is FLOODED.

Time to add the wheels! .... um...... ?????
I finally begged a neighbor to come over and see what he could do. I wanted the wheels to sit on the ground without lifting the floor frame off the ground. When the small end of the run was lifted, it should tip up on the wheels like a wheel barrow. It took him about 2 hrs to laugh at my completely crooked contraption, design the wheel braces, remove the old wheels from an old double-wheel wheelbarrow and attach them to the tractor. Basically he built 2 triangles out of 2x6 and put the axle between them.
In that same amount of time… I cut a (crooked) hole for the pop door….
The next couple of weekends were BUSY with all the details to finish up. I covered the run in fencing (2"x3" openings) and then covered the lower portion with hardware cloth to keep any little heads from poking out or any little paws from reaching in. I installed an old doggie door to use as a pop door. Some plastic roofing panels protect the top and give a little bit of an overhang above the pop door. I framed up a gate for access to the run and tested out the mobility by shoving it around the driveway.
1 day till the hens arrive - and .... IT'S DONE!!!!!!!
Both doors actually work (I was a little shocked)
I didn't get a picture of it, but to cover that window/vent in the coop door I ended up taking a small piece of roofing panel and stapling it to the bottom edge of the window. Then attaching a short chain to the end of it and a cup hook above the window. When the weather is bad I can curl the plastic panel up to keep the rain out without sacrificing air flow. When the weather is nice, I just let it hang down the front.
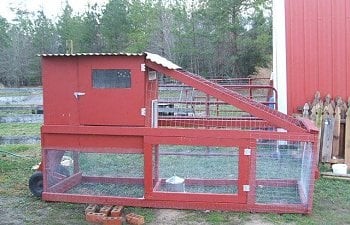
Since it works like a wheelbarrow, this is the 'handle' end. That board across the end is what lifts if up on it's wheels. Heavy, but do-able.
Also not pictured is the ladder. I took an old box fan and cut the front panel into 4 6" wide strips. Then I screwed these to a 2x4 and hung it from 2 cup hooks at the bottom of the pop door. LOTS of traction, lightweight and easily removable.
Inside: The roost, poop shelf, and nest box. The 'nest box' is just a 4x4 that keeps the hay nicely piled up. I still need to paint that roost and poop shelf.......
The other side is the pop door, which is an old doggie door. I'll have to open and close it each day, but when this is a brooder - I can just leave it locked until they are big enough to have some outdoor time. The white pipe is the chick feeder - the hens will have a larger version. When it's a brooder, I'll have one of the little chick waterers in there. For the hens, the water is outside under the coop.
OH - also a vent tip. I used little plastic vents that are supposed to go up under the soffit of a roof. They have slanted 'blades' to keep the rain out and a screen behind that would help with bugs/snakes. I was trying to figure out how to measure and cut the hole for the vent to cover (and worrying that it wouldn't be very predator proof) when my friend (the wheel guy) said to just trace it and then drill a bunch of 1" holes inside the lines and slap the vent over to cover. Easy, looks fine and works great.
Since it's mobile, I can move it over next to the big coop when it's time to add whoever the current resident is to the flock. That way they can spend a few days seeing each other before actually having contact.
Well, there it is. I hope that this might help inspire someone else to turn some old bits & pieces into something useful.