Forty years ago, when I took care of an African Grey parrot for a year, I fell in love with birds. So chickens! Why not chickens! I'm only one generation away from the farm. With chickens eggs would be nice, but it was the idea of chicken company and chicken antics that really drew me. Here's my process of creating a coop and run in a city backyard.
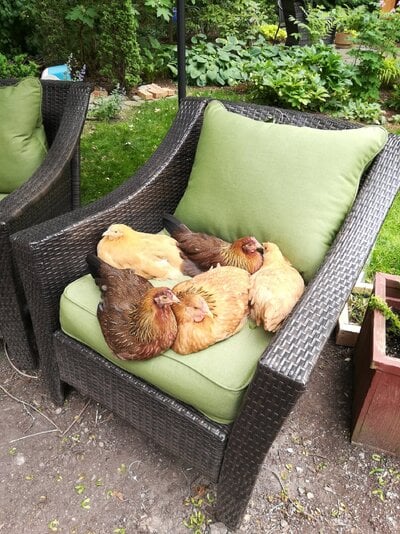
In January 2023, filled with spring fever, I bought a very expensive dollhouse coop from MyPetChicken. Whoops. It's now out of sight behind behind some evergreens awaiting use as chicken jail/hospital/brooder. I think @3KillerBs said this - don't buy a chicken coop that's measured in inches. This is what the pullets think of their playhouse.


I realized I had to get educated. I bought some books, stayed up late a couple of nights reading around this site and others, and watched dozens of YouTube videos. My go-tos here were @Chuckie chicken 's rubbermaid shed conversion, Repecka on ventilation, @3KillerBs on deep litter method, and @Ridgerunner on how much space chickens need. I also ordered six female chicks from a local hatchery to arrive on March 17.
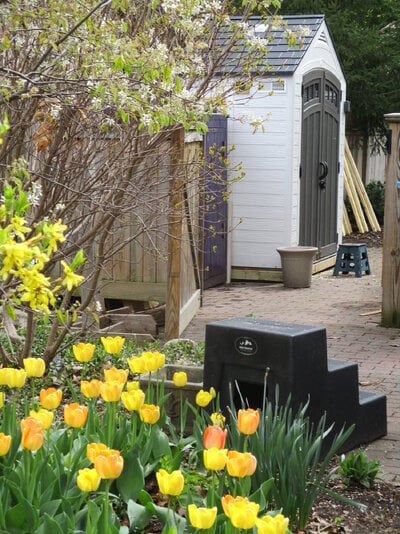
Here were the assets and liabilities: My husband and I live in the snowy winter/hot summer city of Rochester, NY, with a half-acre fully fenced lot filled with trees and garden. The coop needed to be where it could easily be reached in the winter; be sheltered from prevailing winds and sun; be close to the house and have a separate smaller shed for storing supplies. We're next to a big park and thus have a zoo full of predators (raccoons, opossums, hawks, foxes, owls, rats). We decided to put the 4 x 7' coop and 4 x 6 x 16' run in our partly paved side yard next to the woodpile and extending into the garden along a 6' fence. A 4' deep coop left us a path big enough to get a wheelbarrow through. We can't run electric line under our brick patio, so everything for the chickens needed to be solar/battery powered.
I bought a 4 x 7 Suncast resin shed from my local Ace Hardware and they delivered it for free! I also got a chicken-run plan from Etsy that could be adapted for 4 x 16 ft run.
I'd recommend the shed but not the run plans, which have lousy instructions and an unnecessarily heavy roof structure.


Getting Ready
Before I set up the shed, when it was still snowing outside, I added some ventilation to the not-yet-assembled shed walls. I made openings for two $48 working double-hung shed windows for cross-ventilation. I also installed some closable heat registers scrounged from our local Habitat ReStore, hole-punched high circular vents, and secured everything, including the front and back windows, with hardware cloth.
One freezing winter day I got ambitious, and thinking about @Chuckie chicken's monitor roof, I bought a cupola, but later discovered it wouldn't fit between the existing vent and skylight. I should have measured. Duh.
Shed to Coop
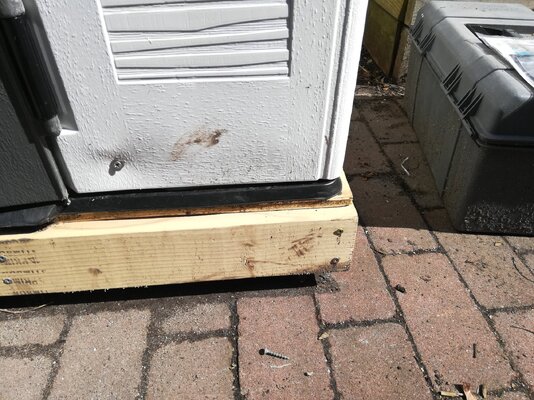
I framed a base for the shed (pressure-treated 2 x 6s topped with plywood) and after a lot of head-scratching got it leveled with some heavy-duty workbench-leveling feet I learned about on YouTube.
Shout out to the guy in the Home Depot parking who saw a 63-year old struggling to get two half-sheets of plywood into her Outback and drove the load to my house in the back of his pickup.
Above the base, which added 6" in height, are the brass spring-loaded fasteners I added to deter predators. There are two more of these fasteners at the top. These allow you to open one of the two doors at a time, or both of them. There are two adult-size doors designed to be closed by the flimsy stable-door slider that came with the shed.
The double-walled resin shed itself can be assembled by one (persistent) person. But the way it snaps together mostly without hardware isn't exactly reassuring, so I framed the inside of the shed with 2x4s. I think this is probably overbuilding, but whatever.
Before I got started on the run, I spent some time figuring out the inside of the coop, which is tall but narrow and has human-sized double doors. I bought a poop board/roost from a friend who was upgrading and painted the tray with gloss paint.
I picked up some Walmart storage containers to serve as dual-purpose nesting boxes/hopping stairs up to the roost. (A couple of our hens are heavy breeds and 4' deep shed doesn't have a lot of landing space.) I added a commercial nest box in case we get a tall hen! Update 11/23: they love the Walmart boxes, but not the commercial nest box.
I drilled small holes in the resin floor of the shed for drainage. For deep litter control, I created a removable 8" threshold for the bottom of the doorway and filled the floor with about 8" of dry maple leaves from last fall.
Above are the Walmart nesting boxes, the threshold plank, and the poop board, which is about 3' off the ground and level with the openable parts of the double-hung shed windows.
The resin shed went together pretty easily and was sturdier than I'd imagined. The fact that that the resin has two layers is kind of nice. It has some insulating power and keeps the place fairly cool and hot days and warm enough in the nights.
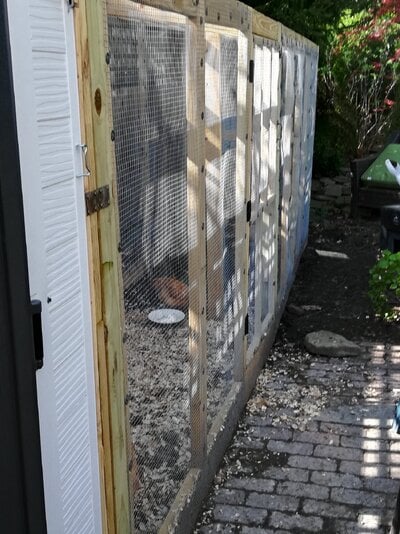
The Run
The run was a multi-day adventure in improvising. Pressure-treated and ground-contact lumber for the 4 x 16 run was about $300 and 350 lbs. My truck-owning friend John helped me pick out, load, and unload the lumber. Over the several days the run took to build, I modified the plans in a bunch of ways to suit the site and our needs. We doubled the length of the run to 16 feet. I blew off the plan and made an extra-wide door in the middle of the run and rejiggered the roof design, which was needlessly heavy. I made the bottom sides of the run 6" tall (instead of 2") to keep litter from spilling out the door. It took me a long time, but eventually I figured out how to connect the coop to the run; how to run predator aprons under a shared wood fence with a cyclone fence behind it; and how to add purlins to the roof framework.
Lots of great words in building - purlins, birds-nest notches, mullions, muntins, fascia. . .
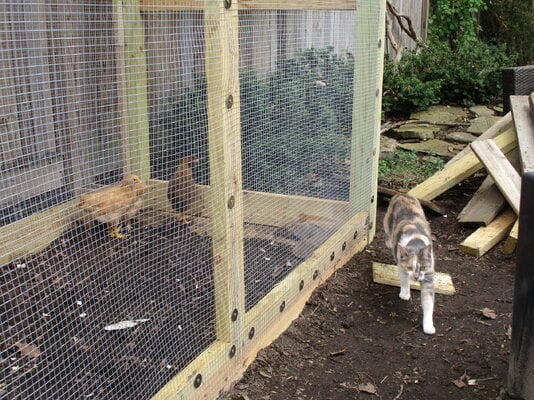
To secure the walls of the run, I went through a couple of 50' 4-ft rolls of half-inch hardware cloth and 200 each 1" screws and and 1.25" fender washers. Note the cat supervision. I cut these in the garage workshop and assembled them onto the frame - I don't have enough strength (or enough friends) to frame a wall, cloth it, and attach it to the rest of the frame.
Hardware cloth is one of the nastiest materials I've ever worked with. Despite my heavy gloves I kept getting poked and punctured and holes began to appear in my clothes. I decided to use a small angle grinder to cut pieces to size and also to trim off rough edges. The angle grinder cuts hardware cloth like butter but it is a dangerous tool and has to be used with full facial protection and heavy gloves.
The run-to-yard door is extra-wide and has two secure slide latches plus a couple of rare-earth-magnet cabinet closures to use while going in and out.
I used Kreg pocket-hole screws to join most of the wood pieces. Buy the accompanying jig. These are easy to master and make much stronger joints than regular screws. A couple of good-sized metal angle braces also helped at the major 90-degree joints.
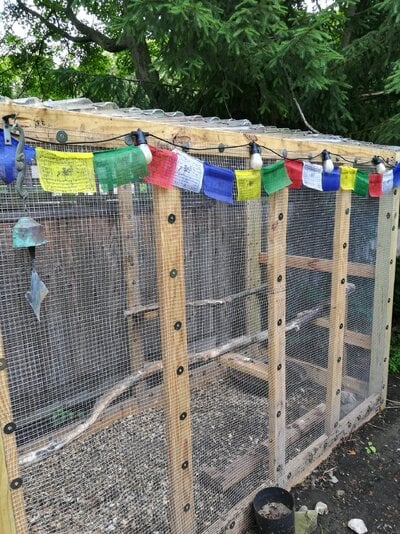
The "rust"colored Suntuf roof panels I'd ordered were hideous orange so I swapped them out for clear ones. The run is in a sheltered and shady area and letting the light in seems like a good idea. I reinforced the rafters with extra purlins made from offcuts because we sometimes get ice and wet, heavy snow here. The panels overlap, can be cut easily and are secured by roofing nails and silicone sealant between panels. I also flipped the design so that the tall part of the lean-to is at the back, and allowed a 6" overhang on the front.
I got four extra clear 8' panels to attach horizontally to the run walls in the winter when there's blowing snow. Update 11/23: these are working out great.
After sitting around and watching the the pullets enjoy their new palace, I added a couple of extras. There are solar lights that turn on at night; solar cameras for both the run and the coop; colorful prayer flags; and a couple of thick limb perches in the coop for the girls. They also have an enormous dusting bowl made from a shallow wide planter from Home Depot, a mirror, and an automatic door that lets them out at about 9 and closes at sunset. (I like the Omlet door because the controls can be placed at eye level outside the coop/run.) I also added a wireless temperature/hygrometer gauge so I can check how hot or cold it is in the coop without having to leave the house. Also, a motion-activated larger solar lamp over the coop door. It's dark out there at night.
Some tools, supplies, and hardware I used in this project
chop saw/miter saw (for lumber)
jigsaw with a clean-wood blade (for cutting holes in the resin shed walls)
Kreg pocket-hole jig and 1-1/2" Kreg screws
3" metal face clamps
2.5-inch torx-head screws
200 1-inch torx-head screws and around 200 1.125" fender washers for securing the HWC
a hole saw (to cut ventilation holes high up in the shed)
A small angle grinder with several metal cutting blades
A lightweight battery-powered stapler to tack the HWC into place before you secure it with washers/screws
Heavy gloves, safety glasses and a face shield for protecting yourself from flying metal, polycarbonate, and wood shards
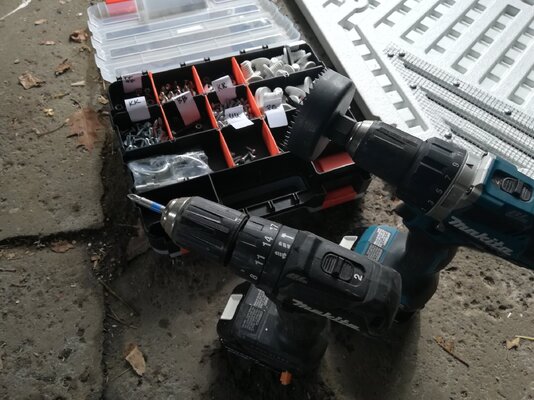
Makita 18-volt battery drill(s) - one with a hammer function is useful for the pocket holes; a couple of drills always makes things easier
3 measuring tapes, because you will temporarily lose all of them
A speed square/carpenter's square
long and short spirit levels
8 8' x 26" panels (or more) of clear corrugated roofing; roofing nails and a cartridge of Gorilla waterproof silicone sealer and gun
A truck or a friend with a truck for transporting lumber. (You can have Home Depot deliver, but can't trust that they'll bring you straight cuts of wood.). You can also rent a van or a truck at HD for not much money (less then $50 for a couple of hours.)
Salonpas pain-killing pads for my aching back.
Total cost: I don't want to think about it.
Fun learning experience and satisfaction: yes.
Patience, enthusiasm, and generosity of DH, John, and the kind man in the Home Depot parking lot: invaluable.
The six girls are Andie and Jennie, the Buff Sussexes; Ruth Bader Ginsbird and Bucket, the brown Leghorns; and Henrietta and Lizzie, the Buff Orpingtons.
In January 2023, filled with spring fever, I bought a very expensive dollhouse coop from MyPetChicken. Whoops. It's now out of sight behind behind some evergreens awaiting use as chicken jail/hospital/brooder. I think @3KillerBs said this - don't buy a chicken coop that's measured in inches. This is what the pullets think of their playhouse.
I realized I had to get educated. I bought some books, stayed up late a couple of nights reading around this site and others, and watched dozens of YouTube videos. My go-tos here were @Chuckie chicken 's rubbermaid shed conversion, Repecka on ventilation, @3KillerBs on deep litter method, and @Ridgerunner on how much space chickens need. I also ordered six female chicks from a local hatchery to arrive on March 17.
Here were the assets and liabilities: My husband and I live in the snowy winter/hot summer city of Rochester, NY, with a half-acre fully fenced lot filled with trees and garden. The coop needed to be where it could easily be reached in the winter; be sheltered from prevailing winds and sun; be close to the house and have a separate smaller shed for storing supplies. We're next to a big park and thus have a zoo full of predators (raccoons, opossums, hawks, foxes, owls, rats). We decided to put the 4 x 7' coop and 4 x 6 x 16' run in our partly paved side yard next to the woodpile and extending into the garden along a 6' fence. A 4' deep coop left us a path big enough to get a wheelbarrow through. We can't run electric line under our brick patio, so everything for the chickens needed to be solar/battery powered.
I bought a 4 x 7 Suncast resin shed from my local Ace Hardware and they delivered it for free! I also got a chicken-run plan from Etsy that could be adapted for 4 x 16 ft run.
I'd recommend the shed but not the run plans, which have lousy instructions and an unnecessarily heavy roof structure.
Getting Ready
Before I set up the shed, when it was still snowing outside, I added some ventilation to the not-yet-assembled shed walls. I made openings for two $48 working double-hung shed windows for cross-ventilation. I also installed some closable heat registers scrounged from our local Habitat ReStore, hole-punched high circular vents, and secured everything, including the front and back windows, with hardware cloth.
One freezing winter day I got ambitious, and thinking about @Chuckie chicken's monitor roof, I bought a cupola, but later discovered it wouldn't fit between the existing vent and skylight. I should have measured. Duh.
Shed to Coop
I framed a base for the shed (pressure-treated 2 x 6s topped with plywood) and after a lot of head-scratching got it leveled with some heavy-duty workbench-leveling feet I learned about on YouTube.
Shout out to the guy in the Home Depot parking who saw a 63-year old struggling to get two half-sheets of plywood into her Outback and drove the load to my house in the back of his pickup.
Above the base, which added 6" in height, are the brass spring-loaded fasteners I added to deter predators. There are two more of these fasteners at the top. These allow you to open one of the two doors at a time, or both of them. There are two adult-size doors designed to be closed by the flimsy stable-door slider that came with the shed.
The double-walled resin shed itself can be assembled by one (persistent) person. But the way it snaps together mostly without hardware isn't exactly reassuring, so I framed the inside of the shed with 2x4s. I think this is probably overbuilding, but whatever.
Before I got started on the run, I spent some time figuring out the inside of the coop, which is tall but narrow and has human-sized double doors. I bought a poop board/roost from a friend who was upgrading and painted the tray with gloss paint.
I picked up some Walmart storage containers to serve as dual-purpose nesting boxes/hopping stairs up to the roost. (A couple of our hens are heavy breeds and 4' deep shed doesn't have a lot of landing space.) I added a commercial nest box in case we get a tall hen! Update 11/23: they love the Walmart boxes, but not the commercial nest box.
I drilled small holes in the resin floor of the shed for drainage. For deep litter control, I created a removable 8" threshold for the bottom of the doorway and filled the floor with about 8" of dry maple leaves from last fall.
Above are the Walmart nesting boxes, the threshold plank, and the poop board, which is about 3' off the ground and level with the openable parts of the double-hung shed windows.
The resin shed went together pretty easily and was sturdier than I'd imagined. The fact that that the resin has two layers is kind of nice. It has some insulating power and keeps the place fairly cool and hot days and warm enough in the nights.
The Run
The run was a multi-day adventure in improvising. Pressure-treated and ground-contact lumber for the 4 x 16 run was about $300 and 350 lbs. My truck-owning friend John helped me pick out, load, and unload the lumber. Over the several days the run took to build, I modified the plans in a bunch of ways to suit the site and our needs. We doubled the length of the run to 16 feet. I blew off the plan and made an extra-wide door in the middle of the run and rejiggered the roof design, which was needlessly heavy. I made the bottom sides of the run 6" tall (instead of 2") to keep litter from spilling out the door. It took me a long time, but eventually I figured out how to connect the coop to the run; how to run predator aprons under a shared wood fence with a cyclone fence behind it; and how to add purlins to the roof framework.
Lots of great words in building - purlins, birds-nest notches, mullions, muntins, fascia. . .
To secure the walls of the run, I went through a couple of 50' 4-ft rolls of half-inch hardware cloth and 200 each 1" screws and and 1.25" fender washers. Note the cat supervision. I cut these in the garage workshop and assembled them onto the frame - I don't have enough strength (or enough friends) to frame a wall, cloth it, and attach it to the rest of the frame.
Hardware cloth is one of the nastiest materials I've ever worked with. Despite my heavy gloves I kept getting poked and punctured and holes began to appear in my clothes. I decided to use a small angle grinder to cut pieces to size and also to trim off rough edges. The angle grinder cuts hardware cloth like butter but it is a dangerous tool and has to be used with full facial protection and heavy gloves.
The run-to-yard door is extra-wide and has two secure slide latches plus a couple of rare-earth-magnet cabinet closures to use while going in and out.
The "rust"colored Suntuf roof panels I'd ordered were hideous orange so I swapped them out for clear ones. The run is in a sheltered and shady area and letting the light in seems like a good idea. I reinforced the rafters with extra purlins made from offcuts because we sometimes get ice and wet, heavy snow here. The panels overlap, can be cut easily and are secured by roofing nails and silicone sealant between panels. I also flipped the design so that the tall part of the lean-to is at the back, and allowed a 6" overhang on the front.
I got four extra clear 8' panels to attach horizontally to the run walls in the winter when there's blowing snow. Update 11/23: these are working out great.
After sitting around and watching the the pullets enjoy their new palace, I added a couple of extras. There are solar lights that turn on at night; solar cameras for both the run and the coop; colorful prayer flags; and a couple of thick limb perches in the coop for the girls. They also have an enormous dusting bowl made from a shallow wide planter from Home Depot, a mirror, and an automatic door that lets them out at about 9 and closes at sunset. (I like the Omlet door because the controls can be placed at eye level outside the coop/run.) I also added a wireless temperature/hygrometer gauge so I can check how hot or cold it is in the coop without having to leave the house. Also, a motion-activated larger solar lamp over the coop door. It's dark out there at night.
Some tools, supplies, and hardware I used in this project
chop saw/miter saw (for lumber)
jigsaw with a clean-wood blade (for cutting holes in the resin shed walls)
Kreg pocket-hole jig and 1-1/2" Kreg screws
3" metal face clamps
2.5-inch torx-head screws
200 1-inch torx-head screws and around 200 1.125" fender washers for securing the HWC
a hole saw (to cut ventilation holes high up in the shed)
A small angle grinder with several metal cutting blades
A lightweight battery-powered stapler to tack the HWC into place before you secure it with washers/screws
Heavy gloves, safety glasses and a face shield for protecting yourself from flying metal, polycarbonate, and wood shards
Makita 18-volt battery drill(s) - one with a hammer function is useful for the pocket holes; a couple of drills always makes things easier
3 measuring tapes, because you will temporarily lose all of them
A speed square/carpenter's square
long and short spirit levels
8 8' x 26" panels (or more) of clear corrugated roofing; roofing nails and a cartridge of Gorilla waterproof silicone sealer and gun
A truck or a friend with a truck for transporting lumber. (You can have Home Depot deliver, but can't trust that they'll bring you straight cuts of wood.). You can also rent a van or a truck at HD for not much money (less then $50 for a couple of hours.)
Salonpas pain-killing pads for my aching back.
Total cost: I don't want to think about it.
Fun learning experience and satisfaction: yes.
Patience, enthusiasm, and generosity of DH, John, and the kind man in the Home Depot parking lot: invaluable.
The six girls are Andie and Jennie, the Buff Sussexes; Ruth Bader Ginsbird and Bucket, the brown Leghorns; and Henrietta and Lizzie, the Buff Orpingtons.


For their waterer I plan to use a birdbath de-icer and will have to improvise an extension cord from the garage.
Lisa