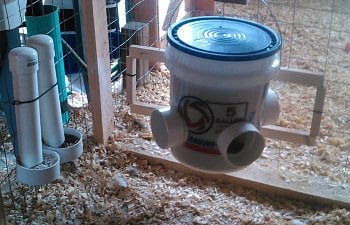
I have made a few different Feeders from PVC. Thanks to ideas from BYC and the internet this is by far the best I have used. Keeps food in bucket and not on the floor, keeps food clean, holds a nice amount of feed, very easy to take apart to clean as needed. It checks all the boxes for me so this is what I am using. The one shown is made of 4 feeding stations using 4" fittings. You can make with any size fittings really.
I have noticed that the one I made with 3" PVC fittings is used primarily by the hens.
The one shown here is made of 4" SDR fittings and used by both Hens and Roosters. The reason I point this out is because some may want to provide a different feed for hens and roosters.
Also if you use 4" PVC fittings and not the 4" SDR sharp 90° as shown you not be able to get 4 feeding stations in. You can however get 4 feeding stations in using 3" PVC if that's all you need.
So here is a list of the parts needed:
Total cost if purchased new $18-$20
1- 5 Gallon Bucket w/ Lid (I like clear ones to see inside)
4- 4" SDR Sharp 90° Elbows
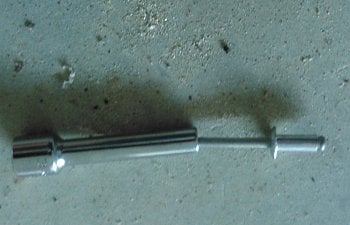
4- 3/16"dia X 1/2" Pop Rivets
Tools needed:
Drill
4 1/8" or 4 1/4" O.D Hole saw
3/16" Drill Bit
Sand Paper
Saw to cut elbows as shown
Utility knife
Here we go:

Locate center of 4 1/8"or 4 1/4" hole to be drilled by placing fitting flat on the bottom of the inside of bucket and slide to the edge and transfer center of elbow. In order to get 4 feeding stations in you will need to have all 4 holes located directly across from one another. When drilling your holes do not push down hard on the drill as this will flatten out the bucket and end result will be an oblong hole. Slow and steady, if you see bucket flattening your pushing to hard.
Note: if using exact parts listed and pictured I can tell you that on the exterior side of the bucket your hole center will be located 4 3/8"- 4 1/2" up from the bottom.


Note: different colors are to show each different tab location for each elbow.

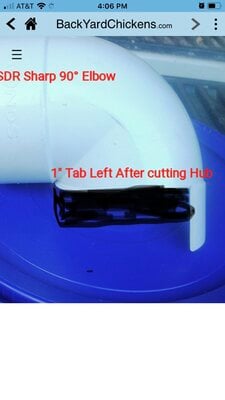
Cut off the HUB (flared part) on your elbows leaving a 1" tab as shown above. Move the tab location on each elbow, notice photo above with different colors for different locations. If the tabs are all left at the furthest point (green area) on all the elbows you will create a void in the center of your bucket that the birds will not be able to get at. This may lead to stale/moldy food in that spot.


Drill a hole according to the size rivet you are using. For this I used a 3/16" drill bit, locate as shown above. Drill hole right at the tapered edge as shown. If not drilled close to tapered edge your elbow will move in and out alittle.


Sand all cut edges on elbows and bucket so no sharp edges are left.
Start assembly sliding elbows in as shown, you will likely need to rotate the elbows as your pushing them into the bucket. Lock elbow in place by pushing rivet into hole. Rivet does not need to be pushed all the way in, once head of rivet is inside elbow as shown that is far enough. I used a socket to slide over rivet to push rivet into place.


Fill with feed and let the chooks enjoy.
If you ever need to clean inside of bucket simply pull out Rivets and everything comes apart for easy cleaning.
Bucket in place:


This is the one made with 3" PVC elbows and is used only by the hens. To small of a hole for my roosters I guess as I have never seen them use it.


UPDATE: 10/10/2020
I would leave more of the elbow as shown in the black shaded area. I think this will help even more with keeping feed in.
I have noticed that the one I made with 3" PVC fittings is used primarily by the hens.
The one shown here is made of 4" SDR fittings and used by both Hens and Roosters. The reason I point this out is because some may want to provide a different feed for hens and roosters.
Also if you use 4" PVC fittings and not the 4" SDR sharp 90° as shown you not be able to get 4 feeding stations in. You can however get 4 feeding stations in using 3" PVC if that's all you need.
So here is a list of the parts needed:
Total cost if purchased new $18-$20
1- 5 Gallon Bucket w/ Lid (I like clear ones to see inside)
4- 4" SDR Sharp 90° Elbows
4- 3/16"dia X 1/2" Pop Rivets
Tools needed:
Drill
4 1/8" or 4 1/4" O.D Hole saw
3/16" Drill Bit
Sand Paper
Saw to cut elbows as shown
Utility knife
Here we go:
Locate center of 4 1/8"or 4 1/4" hole to be drilled by placing fitting flat on the bottom of the inside of bucket and slide to the edge and transfer center of elbow. In order to get 4 feeding stations in you will need to have all 4 holes located directly across from one another. When drilling your holes do not push down hard on the drill as this will flatten out the bucket and end result will be an oblong hole. Slow and steady, if you see bucket flattening your pushing to hard.
Note: if using exact parts listed and pictured I can tell you that on the exterior side of the bucket your hole center will be located 4 3/8"- 4 1/2" up from the bottom.
Note: different colors are to show each different tab location for each elbow.
Cut off the HUB (flared part) on your elbows leaving a 1" tab as shown above. Move the tab location on each elbow, notice photo above with different colors for different locations. If the tabs are all left at the furthest point (green area) on all the elbows you will create a void in the center of your bucket that the birds will not be able to get at. This may lead to stale/moldy food in that spot.
Drill a hole according to the size rivet you are using. For this I used a 3/16" drill bit, locate as shown above. Drill hole right at the tapered edge as shown. If not drilled close to tapered edge your elbow will move in and out alittle.

Sand all cut edges on elbows and bucket so no sharp edges are left.
Start assembly sliding elbows in as shown, you will likely need to rotate the elbows as your pushing them into the bucket. Lock elbow in place by pushing rivet into hole. Rivet does not need to be pushed all the way in, once head of rivet is inside elbow as shown that is far enough. I used a socket to slide over rivet to push rivet into place.
Fill with feed and let the chooks enjoy.
If you ever need to clean inside of bucket simply pull out Rivets and everything comes apart for easy cleaning.
Bucket in place:

This is the one made with 3" PVC elbows and is used only by the hens. To small of a hole for my roosters I guess as I have never seen them use it.
UPDATE: 10/10/2020
I would leave more of the elbow as shown in the black shaded area. I think this will help even more with keeping feed in.

