Lind's Incubator -After looking at all of the great home made incubators on BYC and paying extra charges for small quantities of chicks. I decided I was going to get started and build my own incubator so that I can purchase hatching eggs and hatch my own babies..
2/15/2009 - I made two additional adjustments. First, I remounted the fan so it was blowing on an angle out over the light to circulate air better. I have three thermostats and the farthest corner is 99 - 100 degrees and the closest to the heat source is 99 - 101. Second, (thanks to idea from gopherboy) I put two tall jars of water in the bator to help stabilize the temps when it is opened. Working great. The orange thing behind the water heater thermostat is a Nerf Dart. I wanted something to keep it out away from the wall and the Nerf Dart was laying on the floor in the basement.

I actually also built a hatcher so that I can keep things moving and built a candler to help identify the progress of each egg. See the linds-hatcher and linds-candler
1/26/2008 - Test Hatch complete. We ended up with One Chick. I went out of town on the 1/17, there were a couple of issues that caused complications for my son (bator watcher). First, the 2 bantam eggs got rolling around and got up against the cage around the light bulb, I think they got too hot. Second, when the humidity was raised, the duct tape that was holding the inside piece of plexiglas came loose and fell off sometime during the day and fell down on top of the eggs and heat source, again, getting them too hot.
This was a great test hatch and the following corrective measures were taken. First, when using to Hatch, I put up a piece of hardware cloth that prevents rolling eggs or chicks from getting to close to the heat source. Second, use gorilla glue to attach the plexiglas to the inside of the bator and then use duct tape as a security.
1/15/2008 - Candling results as of Day #18 As of now, no more turning and the Humidity is UP.
2 Bantam Egg - Definate movement inside the eggs.
4 Brown Eggs - 2 Definate movement, 1 definately something there, but may have quite, 1 Removed - Not Fertile
1/9/2008 - Candling results as of Day #13
2 Bantam Egg - Can see the baby moving around
4 Brown Eggs - 3 of 4 definately developing. The 4th no veins, yolk moving around
- Candling results as of Day #101/6/2008
2 Bantam Egg - Can see the baby moving around
3 White Eggs - REMOVED - Checked - Not Fertilized
4 Brown Eggs - All 4 have veins. Darker shell, harder to see babies.
- Candling results as of Day #71/3/2008
2 Bantam Egg - Definate veins.
3 White Eggs - No development - Had questioned if these were fertile.
4 Brown Eggs - 2 appeared to have veins. Other 2 could not tell, dark shells.
12/28/2008 - Test hatch begins. If they are fertilized and make it to hatch, they should hatch 1/17/2009.
2 Bantam Egg, Hen is Silkie or Cochin and the Roo is Silkie or Cochin.
3 White Eggs - Hen is Brown or White Leghorn and the Roo is White Leghorn.
4 Brown Eggs - Hen is Producion Red, SexLink or Jersey Giant and the Roo is White Leghorn.
12/27/2008 - I built an incubator. I must thank MissPrissy and SpeckledHen. It was their threads, which were so great that encouraged me to fall into the trap. There is no stopping me now. I am going to be a hatching fool.
MissPrissy - https://www.backyardchickens.com/forum/viewtopic.php?id=8510
SpeckledHen - https://www.backyardchickens.com/forum/viewtopic.php?id=43984
It did not take that much time to assemble once I had the parts. The wiring, which I was most concerned about was not hard at all. Again, great instructions. The hardest part in my mind was bending that hardware cloth which is sharp and frustrating.
I have been shopping for parts and pieces for the last couple of months.
Thermos Cooler - $2 at Yard sale.
PC Fan - Free from Friend
Fan Adaptor - Free from Friend
Hardware Cloth - Already Had
Pie Pan for Bottom Water - $1 from Yard sale.
NightLight - Only thing I salvaged from one of those DOME Incubators (Never Hatched)
Hygrometer / Thermometer - Already Had
Light Ficture (Bottle Type) - $6.98 Home Depot
Hot Water Heater Thermostat - $8.57 at Home Depot
Plexiglass (1 on Ouside, 1 Inside) - $3.00 Ace Hardware
Still to purchase
Water Wiggler - Still searching for one.....
Corks
Total Cost as of now - $21.55
This was an old Thermos Cooler that I purchased at a YardSale. It was a little dirty, but with some bleach it turned out great. I cut out the top and used duct tape to tape a piece of plexiglass on the inside and outside of the lid. I drilled holes in the end to run the wires for the night light, light ficture and PC fan.
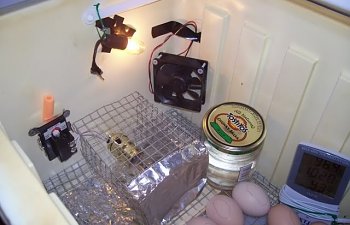
The one thing that I did change was add a piece of foil to the end of the light cage to deflect heat from the eggs just outside the cage. I also added a piece of foil under the light to deflect the heat up.
The light ficture is used as a heat source. A cage of hardware cloth is around it to keep something from getting burned. The night light is used so that when the heat source is off, we can still see the eggs and thermostats. The PC fan is used to circulate the heat around in the cooler. The Hot Water heater thermostat is used to control the temperature. The pie plate in the bottom is used to hold water to increase humidity when required.
2/15/2009 - I made two additional adjustments. First, I remounted the fan so it was blowing on an angle out over the light to circulate air better. I have three thermostats and the farthest corner is 99 - 100 degrees and the closest to the heat source is 99 - 101. Second, (thanks to idea from gopherboy) I put two tall jars of water in the bator to help stabilize the temps when it is opened. Working great. The orange thing behind the water heater thermostat is a Nerf Dart. I wanted something to keep it out away from the wall and the Nerf Dart was laying on the floor in the basement.

I actually also built a hatcher so that I can keep things moving and built a candler to help identify the progress of each egg. See the linds-hatcher and linds-candler
1/26/2008 - Test Hatch complete. We ended up with One Chick. I went out of town on the 1/17, there were a couple of issues that caused complications for my son (bator watcher). First, the 2 bantam eggs got rolling around and got up against the cage around the light bulb, I think they got too hot. Second, when the humidity was raised, the duct tape that was holding the inside piece of plexiglas came loose and fell off sometime during the day and fell down on top of the eggs and heat source, again, getting them too hot.
This was a great test hatch and the following corrective measures were taken. First, when using to Hatch, I put up a piece of hardware cloth that prevents rolling eggs or chicks from getting to close to the heat source. Second, use gorilla glue to attach the plexiglas to the inside of the bator and then use duct tape as a security.
1/15/2008 - Candling results as of Day #18 As of now, no more turning and the Humidity is UP.
2 Bantam Egg - Definate movement inside the eggs.
4 Brown Eggs - 2 Definate movement, 1 definately something there, but may have quite, 1 Removed - Not Fertile
1/9/2008 - Candling results as of Day #13
2 Bantam Egg - Can see the baby moving around
4 Brown Eggs - 3 of 4 definately developing. The 4th no veins, yolk moving around
- Candling results as of Day #101/6/2008
2 Bantam Egg - Can see the baby moving around
3 White Eggs - REMOVED - Checked - Not Fertilized
4 Brown Eggs - All 4 have veins. Darker shell, harder to see babies.
- Candling results as of Day #71/3/2008
2 Bantam Egg - Definate veins.
3 White Eggs - No development - Had questioned if these were fertile.
4 Brown Eggs - 2 appeared to have veins. Other 2 could not tell, dark shells.
12/28/2008 - Test hatch begins. If they are fertilized and make it to hatch, they should hatch 1/17/2009.
2 Bantam Egg, Hen is Silkie or Cochin and the Roo is Silkie or Cochin.
3 White Eggs - Hen is Brown or White Leghorn and the Roo is White Leghorn.
4 Brown Eggs - Hen is Producion Red, SexLink or Jersey Giant and the Roo is White Leghorn.

12/27/2008 - I built an incubator. I must thank MissPrissy and SpeckledHen. It was their threads, which were so great that encouraged me to fall into the trap. There is no stopping me now. I am going to be a hatching fool.
MissPrissy - https://www.backyardchickens.com/forum/viewtopic.php?id=8510
SpeckledHen - https://www.backyardchickens.com/forum/viewtopic.php?id=43984
It did not take that much time to assemble once I had the parts. The wiring, which I was most concerned about was not hard at all. Again, great instructions. The hardest part in my mind was bending that hardware cloth which is sharp and frustrating.
I have been shopping for parts and pieces for the last couple of months.
Thermos Cooler - $2 at Yard sale.
PC Fan - Free from Friend
Fan Adaptor - Free from Friend
Hardware Cloth - Already Had
Pie Pan for Bottom Water - $1 from Yard sale.
NightLight - Only thing I salvaged from one of those DOME Incubators (Never Hatched)
Hygrometer / Thermometer - Already Had
Light Ficture (Bottle Type) - $6.98 Home Depot
Hot Water Heater Thermostat - $8.57 at Home Depot
Plexiglass (1 on Ouside, 1 Inside) - $3.00 Ace Hardware
Still to purchase
Water Wiggler - Still searching for one.....
Corks
Total Cost as of now - $21.55
This was an old Thermos Cooler that I purchased at a YardSale. It was a little dirty, but with some bleach it turned out great. I cut out the top and used duct tape to tape a piece of plexiglass on the inside and outside of the lid. I drilled holes in the end to run the wires for the night light, light ficture and PC fan.
The one thing that I did change was add a piece of foil to the end of the light cage to deflect heat from the eggs just outside the cage. I also added a piece of foil under the light to deflect the heat up.

The light ficture is used as a heat source. A cage of hardware cloth is around it to keep something from getting burned. The night light is used so that when the heat source is off, we can still see the eggs and thermostats. The PC fan is used to circulate the heat around in the cooler. The Hot Water heater thermostat is used to control the temperature. The pie plate in the bottom is used to hold water to increase humidity when required.