Squeeing_Onion

Chirping
Jun 17, 2023
44
58
64
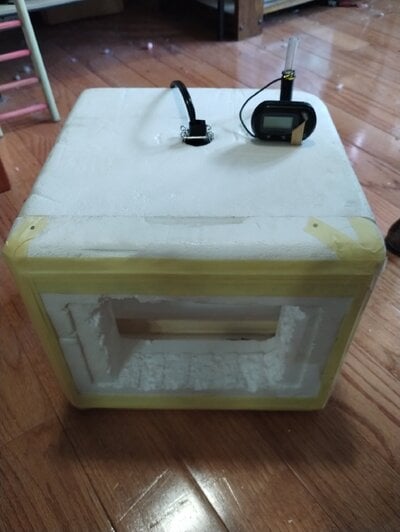
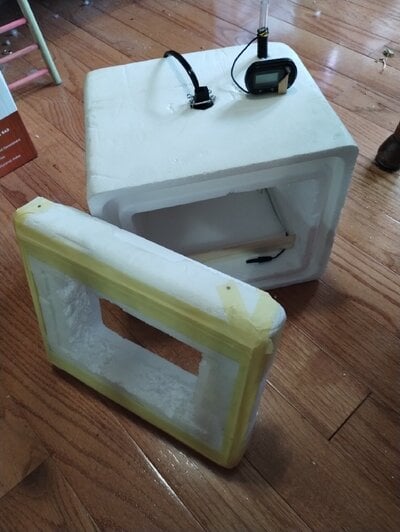
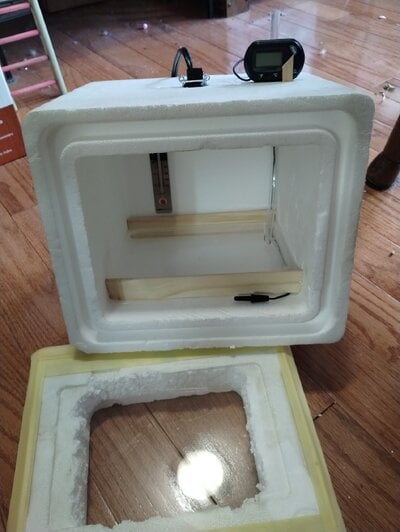
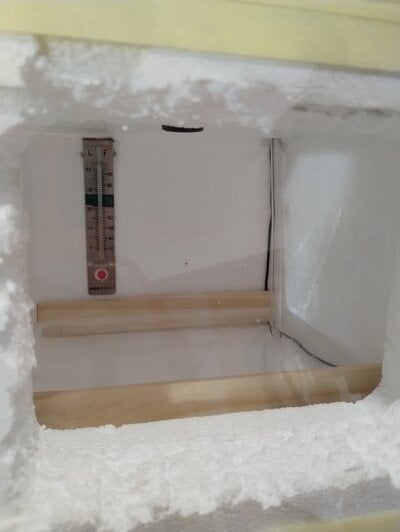
This is a very small incubator i intend to use for quail eggs.

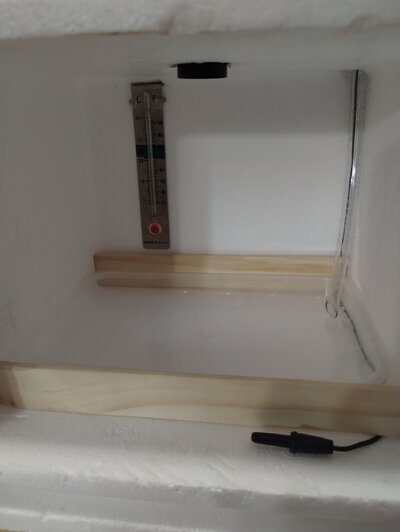
It has two thermometers for redundancy insurance in case one goes goofy, one glass and one digital (needs batteries but it works!).

The bottom has a plastic tray for holding water. A hose extends down into the tray so water can be added without opening the incubator. I don't have the cork yet, but i will be capping the exposed end above the ceiling with a cork.

Above the shallow water basin will be a small tray of hardware cloth that will neatly rest upon the wooden frame, over the water. The chicks will not be able to access the water.

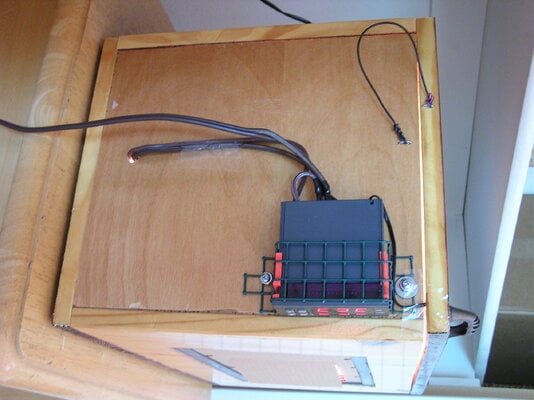
The light socket is for a salt lamp so it has a dimmer switch to help me adjust temperature once i put a light bulb in.

The next step is ventilation -- I'm wary of installing a fan because even though i have plenty i could salvage from old computers, I've never wired one to a switch before.

-Could i get away without a fan and just have screened vents i can open and adjust? Would it be better for the quail chicks if there was a fan for air circulation?

-Can i put paper towel over the hardware cloth so the chicks hatch onto a softer surface instead of right into metal, or would it get too humid? Do you have other suggestions for holding the eggs?

The inside of the incubator is roughly 8" x 8" x 7"
 

Attachments

  • IMG_20230621_191100839.jpg
    IMG_20230621_191100839.jpg
    259.2 KB · Views: 196
  • IMG_20230621_191112834.jpg
    IMG_20230621_191112834.jpg
    356.3 KB · Views: 13
  • IMG_20230621_191131521.jpg
    IMG_20230621_191131521.jpg
    325 KB · Views: 12
  • IMG_20230621_191140867.jpg
    IMG_20230621_191140867.jpg
    159.9 KB · Views: 13
  • IMG_20230621_191209963.jpg
    IMG_20230621_191209963.jpg
    164.8 KB · Views: 11
If you don't use a fan, then it's a still air incubator. The important part is maintaining the correct temperature since the heat won't be moving much. Having your temperature gauge at egg level is very important. You can over heat the eggs if your gauges are not at that level. Also you need some air holes, just 2 holes, 1 on the lower side wall, 1 on the other side wall. Hole size should be 1/4" to 1/2".

Use a kitchen drawer liner. There cheap to buy and resistant to moisture and there breathable.
 
Since you didn't mention what type of bulbs your using, make sure to use aluminum foil around the bulb that is near the Styrofoam wall. You don't want the foam box to burn or melt.
I've seen people put foil around the bulb itself -- do you mean to put it over the actual foam like a skirt? Heat is definitely a concern for me. I will be test running it before i ever put live eggs inside.

I haven't actually decided what bulb to use, but it will probably end up being a simple tiny lamp bulb. I figured i might have to try a few different ones to find which heats the space the best. It's small, so not much to heat... But it's small, so easy to overheat.

Can you plug a lightbulb socket into a thermostat like the ones i use for my reptile and seedling heating mats? Then I'd have the two separate thermometers to put in different spots to see the range of temp distribution, and one that sits in the center and will automatically shut the bulb off if it gets too hot, and turn it back on again as needed. I'm not sure if that's necessary or overkill with the fan I'll be installing.

The back thermometer sits at the level the eggs will be one the rest is installed, the digital probe I'll set in the center of the eggs.

I did order a fan! It should be here Monday. I really didn't like the idea of no air movement. I'm waiting to poke the vent holes until I've decided where to install the fan. I'm thinking the back or the top.
 
This is pretty small. You are going to want to pay close attention to the temp with a light bulb. Start testing different bulbs now because it is very likely this little area heats up fast so make sure your are able to turn the light on an off fast.
 
This is pretty small. You are going to want to pay close attention to the temp with a light bulb. Start testing different bulbs now because it is very likely this little area heats up fast so make sure your are able to turn the light on an off fast.
It has a dimmer switch wired to the socket, so i should be able to help 'set' the temperature by dimming the bulb, and the fan turned on.

I'll hopefully get bulbs this week tho start testing it; I'm in no rush to put eggs in it (even though i aaaabsolutely have the burning impulse, im so excited to see baby chicks!), And I'm thinking i may even wait until spring so i can see how my coop design holds up to our winter.

I really want to avoid the panic of "guys heeelp my eggs are coming and I'm not ready with x y z."

Do you think i should look at getting a larger foam box, before even bothering to see if i can get this one stabilized?

I'm only looking to incubate a small batch of about twelve eggs.
 
I made a styrofoam incubator and hatcher. See the pics here. https://www.backyardchickens.com/threads/my-diy-incubator-and-hatcher.1449865/

I do recommend a fan. You can just wire your computer fan to a plug without a switch. I use an Inkbird thermostatic switch to control the light bulbs. I also add a couple of these thermometers at egg level to make sure the temps match.
Tysm!

I ordered a fan that has a speed adjustment switch. It should be here tomorrow!
 
Here's some pictures of my diy incubator I made from a wall shelf and put together 3 years ago. Total cost was about $20. Some of the materials I had that came from things around the house. I never had any issues with it breaking and it's easy to repair or replace parts for. Did about 15 hatches so far and light bulb I used is a 40 watt appliance bulb with a PC fan mounted above it.
P1010045.JPG
P1010054.JPG
P6230014.JPG
P1010055.JPG
P1010049.JPG
 

Attachments

  • P1010053.JPG
    P1010053.JPG
    522.6 KB · Views: 10

New posts New threads Active threads

Back
Top Bottom