Well since the 1st hatch of silkies hit 3 weeks old and the 2nd unhatched hit 3 days in a incubator. We found the time to get started on what will be one of the hardest projects I have every tried to build.
I don't know when the idea came about, but we started researching pictures and designs 2-3 months ago on what will be our Dr. Seuss/ rustic silkie coop. I love the bright colors but not on the outside of the coop. It needs to fit in with the other structures around the property to some degree. Of course this is a work in project that can and will change from day to day. The plans are in my head at this point. The only thing I drew on paper was what was completed today. So from this point forward there will be no level, square or plum bob used in this build. (That really is the hardest point for me). I will be using a ruler from time to time to measure what we need to fit the gap we created. I am excited to get back to building I always have fun. We are also on a tight budget on this build . We are looking to buy flooring support, floor, shingles and roof plywood. Then cut all the rest on the mill. Also we will use some left over wood we have from other projects.
Today we set out to get the floor built so we can start cutting the 2x material we need for framing the walls.
So with no delay the pictures
1st the floor framing. Leveled with rocks and dirt filled inside so no holes to get under the coop. Well at least not the chickens. We will add the Hardwire to the run side later.........................................................

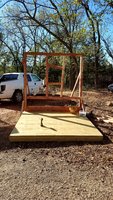
The plywood floor. The floor and 2x6 are ground contact treated. and before any comments come Yes, rest assured the floor will be painted..........................

Well we wanted to paint the floor today but it was way too windy and lots of leaves falling that we did not want in wet paint . We will wait on that till there is a roof and walls. Then no leaves or chicken feet will get in the wet paint. We decides to prep the run and let the hens start composting it until the runs complete.
1st load of wood chips.........................................................................

And then another load of wood chips....................................................

The hens loved it. They were inspecting everything we did today and gave us a big thumbs up.
Also please let us know if something looks wrong, out of place, or just a easier way. We are always open to suggestion that is how we learn.
Scott
I don't know when the idea came about, but we started researching pictures and designs 2-3 months ago on what will be our Dr. Seuss/ rustic silkie coop. I love the bright colors but not on the outside of the coop. It needs to fit in with the other structures around the property to some degree. Of course this is a work in project that can and will change from day to day. The plans are in my head at this point. The only thing I drew on paper was what was completed today. So from this point forward there will be no level, square or plum bob used in this build. (That really is the hardest point for me). I will be using a ruler from time to time to measure what we need to fit the gap we created. I am excited to get back to building I always have fun. We are also on a tight budget on this build . We are looking to buy flooring support, floor, shingles and roof plywood. Then cut all the rest on the mill. Also we will use some left over wood we have from other projects.
Today we set out to get the floor built so we can start cutting the 2x material we need for framing the walls.
So with no delay the pictures
1st the floor framing. Leveled with rocks and dirt filled inside so no holes to get under the coop. Well at least not the chickens. We will add the Hardwire to the run side later.........................................................
The plywood floor. The floor and 2x6 are ground contact treated. and before any comments come Yes, rest assured the floor will be painted..........................
Well we wanted to paint the floor today but it was way too windy and lots of leaves falling that we did not want in wet paint . We will wait on that till there is a roof and walls. Then no leaves or chicken feet will get in the wet paint. We decides to prep the run and let the hens start composting it until the runs complete.
1st load of wood chips.........................................................................
And then another load of wood chips....................................................
The hens loved it. They were inspecting everything we did today and gave us a big thumbs up.
Also please let us know if something looks wrong, out of place, or just a easier way. We are always open to suggestion that is how we learn.
Scott
Last edited: